In a previous blog post, I showed you how to build and deploy an AWS Lambda function with Go and Pulumi. In this blog post, I will go one step further and show you how to build and deploy a complete back end for an HTTP API on AWS with Go and Pulumi.
Overview 
Overview of the application I present in this article:

The client is an Ionic/Angular single-page web application. However, this could be a client written in any framework and does not have to be a web application. For example, it could be a mobile app, a command-line tool, or a desktop application.
The client sends HTTP requests to the Amazon API Gateway, which converts them to events that trigger an AWS Lambda. The Lambda retrieves and stores data in Amazon DynamoDB and writes log statements to Amazon CloudWatch.
Client 
The client is a regular Angular/Ionic application. You can find the complete source code of the application here: https://github.com/ralscha/blog2022/tree/master/awsbackend/client
I will not go further into the implementation details of the client application. For this tutorial, I focus on the HTTP requests the application sends to the back end.
GET /todos 
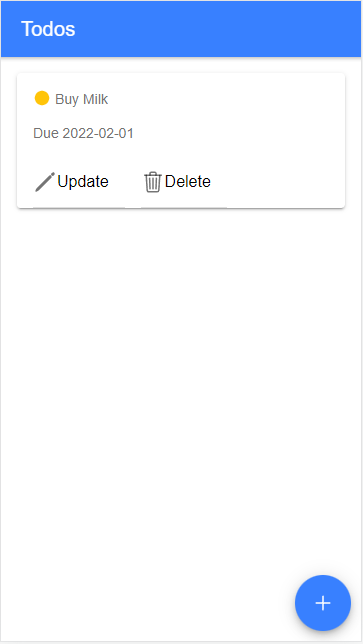
Fetches all stored todo entries.
Response Body:
[{
  "id": "e38e37c5-0056-45db-a5cb-9e50ff99ab9c",
  "dueDate": "2022-01-27",
  "description": "Buy Milk",
  "priority": "normal"
}]
POST /todos 
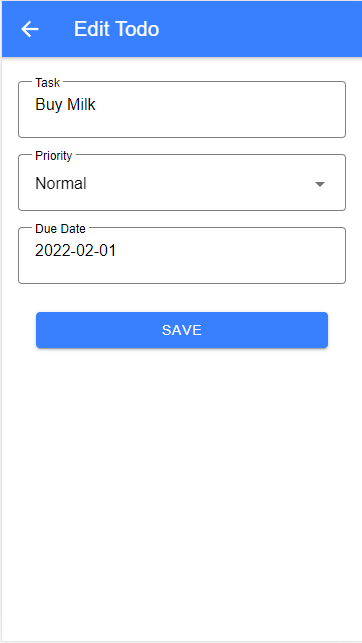
Inserts or updates a todo entry.
Request Body:
{
  "id": "e38e37c5-0056-45db-a5cb-9e50ff99ab9c",
  "description": "Buy Milk",
  "priority": "normal",
  "dueDate": "2022-01-27"
}
Response: 204
DELETE /todos/{id} 
Deletes a todo entry.
For example:
https://....amazonaws.com/v1/todos/e38e37c5-0056-45db-a5cb-9e50ff99ab9c
No Request Body
Response: 204
The primary key is a universally unique identifier v4 (UUID) generated on the client with the uuid library.
The POST request inserts new entries and updates existing ones. There is no difference in the implementation on the back end for these two operations.
Amazon API Gateway 
The back end code runs as an AWS Lambda. However, a JavaScript application can't directly send HTTP requests to an AWS Lambda because these functions do not run all the time. Instead, they are dormant until an event arrives. Here is where the Amazon API Gateway comes into play. The API Gateway is an HTTP proxy server that handles incoming requests and forwards them to other services, like AWS Lambda.
Amazon API Gateway is a fully managed service that makes it easy to create HTTP, REST, and WebSocket APIs. I implemented the three HTTP endpoints as an HTTP API for this tutorial.
Like many AWS serverless offerings, the API Gateway charges you based on usage (number of requests). https://aws.amazon.com/api-gateway/pricing/
It is possible to configure everything in the API Gateway with an OpenAPI specification. If you have such a specification, I recommend doing it this way. Check out the Pulumi documentation for more information.
The following configuration shows you how to configure the API Gateway without an OpenAPI specification.
First, we need to set up the API. Pulumi creates the API with the logical name todo and the protocol type HTTP.
API Gateway also supports APIs with the protocol WEBSOCKET.
func createApi(ctx *pulumi.Context, lmbda *lambda.Function) (*apigatewayv2.Api, error) {
  api, err := apigatewayv2.NewApi(ctx, "todo", &apigatewayv2.ApiArgs{
    ProtocolType: pulumi.String("HTTP"),
    CorsConfiguration: apigatewayv2.ApiCorsConfigurationArgs{
      AllowCredentials: pulumi.Bool(false),
      AllowMethods:     pulumi.StringArray{pulumi.String("GET"), pulumi.String("POST"), pulumi.String("DELETE")},
      AllowOrigins:     pulumi.StringArray{pulumi.String("*")},
      AllowHeaders:     pulumi.StringArray{pulumi.String("content-type")},
      MaxAge:           pulumi.Int(7200),
    },
  })
  if err != nil {
    return nil, err
  }
The other necessary configuration is CORS. I will not deploy my client application, and so it runs on http://localhost:8100. The API Gateway will not allow requests from a browser that runs on a different domain than the exposed API Gateway URL. Therefore, a CORS configuration is required to allow the requests from the client to go through.
The configuration allows the three HTTP methods GET, POST, and DELETE and opens the API to everyone with AllowOrigins: *.
Also, it allows the request header content-type because the client sends JSON requests with the header
Content-Type: application/json.
Next, we need to configure the integration. This configuration tells the API Gateway what the target of incoming requests is. You can configure as many integration objects as you need. This example forwards all requests to one Lambda, but it is also possible to forward each route to a different Lambda or a different service.
  integration, err := apigatewayv2.NewIntegration(ctx, "todo", &apigatewayv2.IntegrationArgs{
    ApiId:                api.ID(),
    IntegrationType:      pulumi.String("AWS_PROXY"),
    IntegrationUri:       lmbda.Arn,
    IntegrationMethod:    pulumi.String("POST"),
    PayloadFormatVersion: pulumi.String("2.0"),
    TimeoutMilliseconds:  pulumi.Int(3000),
  })

  if err != nil {
    return nil, err
  }
To link the Lambda to the integration, pass the ARN (Amazon Resource Name): IntegrationUri: lmbda.Arn
The Lambda will be configured in the next section.
Now follows the configuration of the three routes. The above integration configuration is linked to each of
the routes with the Target option.
  target := integration.ID().ToStringOutput().ApplyT(func(integrationId string) string {
    return "integrations/" + integrationId
  }).(pulumi.StringOutput)

  _, err = apigatewayv2.NewRoute(ctx, "todos-get", &apigatewayv2.RouteArgs{
    ApiId:    api.ID(),
    RouteKey: pulumi.String("GET /todos"),
    Target:   target,
  })
  if err != nil {
    return nil, err
  }

  _, err = apigatewayv2.NewRoute(ctx, "todos-post", &apigatewayv2.RouteArgs{
    ApiId:    api.ID(),
    RouteKey: pulumi.String("POST /todos"),
    Target:   target,
  })
  if err != nil {
    return nil, err
  }

  _, err = apigatewayv2.NewRoute(ctx, "todos-delete", &apigatewayv2.RouteArgs{
    ApiId:    api.ID(),
    RouteKey: pulumi.String("DELETE /todos/{id}"),
    Target:   target,
  })
  if err != nil {
    return nil, err
  }
The RouteKey has to be set to a valid HTTP method and resource path. In the DELETE endpoint, you see how to configure path variables ({id}). The name of the path variable is arbitrary. The API Gateway extracts path variables and sends them in the event object to the Lambda.
The last configuration concerns the deployment of the API. Only a deployed API is callable by clients.
We create a stage and set the auto-deployment flag to true. A stage is a logical reference to a lifecycle state (for example, dev, prod, beta, v2). Here I called the stage v1. The name of the stage becomes a part of the URL (i.e., https://bmirak7ioa.execute-api.us-east-1.amazonaws.com/v1). When setting the auto-deployment flag to true, AWS automatically deploys the API whenever something changes.
  stage, err := apigatewayv2.NewStage(ctx, "todo-v1-stage", &apigatewayv2.StageArgs{
    ApiId:       api.ID(),
    AutoDeploy:  pulumi.Bool(true),
    Description: pulumi.String("Todo API V1 Stage"),
    Name:        pulumi.String("v1"),
    DefaultRouteSettings: &apigatewayv2.StageDefaultRouteSettingsArgs{
      ThrottlingBurstLimit: pulumi.Int(10),       // maximum number of concurrent requests
      ThrottlingRateLimit:  pulumi.Float64(50.0), // max requests per seconds
    },
  })
In the stage configuration, you also find the throttling configuration. Here I set the burst limit to 10 (maximum number of concurrent requests) and the rate limit to 50 (max requests per second). In the developer guide, you can find a detailed description of how throttling works in API Gateway.
This section gave you a broad overview of the API Gateway. For more in-depth information, check out the API Gateway developer guide.
Amazon DynamoDB 
Amazon DynamoDB is a fully managed, serverless, key-value NoSQL database.
Like the API Gateway, you have to pay based on usage. Check out the pricing page for more information: https://aws.amazon.com/dynamodb/pricing/
The data model for this todo application is trivial. It only needs one table with one primary key (hash key). DynamoDB is schemaless, but we have to specify the shape of the primary key.
The following configuration tells Pulumi to create a DynamoDB table with the logical name todo-dynamodb-table,
and the primary key Id of data type string (S).
func createDynamoDbTable(ctx *pulumi.Context) (*dynamodb.Table, error) {
  todoDb, err := dynamodb.NewTable(ctx, "todo-dynamodb-table", &dynamodb.TableArgs{
    Attributes: dynamodb.TableAttributeArray{
      &dynamodb.TableAttributeArgs{
        Name: pulumi.String("Id"),
        Type: pulumi.String("S"),
      },
    },
    BillingMode: pulumi.String("PAY_PER_REQUEST"),
    HashKey:     pulumi.String("Id"),
  }, pulumi.IgnoreChanges([]string{"read_capacity", "write_capacity"}))
  if err != nil {
    return nil, err
  }
  return todoDb, nil
}
The BillingMode influences the cost of the service. Valid values include:
PROVISIONED- Amazon recommends this for predictable workloads.PAY_PER_REQUEST- For unpredictable workloads.
When you set the billing mode to PROVISIONED, you have to configure ProvisionedThroughput, which
consists of values for ReadCapacityUnits and WriteCapacityUnits.
For web applications, it's often difficult to predict the workload, so the
PAY_PER_REQUEST billing mode fits this kind of application.
But as always, it depends, and I recommend that you check out the DynamoDB developer guide where you can find more in-depth information about DynamoDB.
Especially the chapter about Read/Write Capacity Mode helps you understand how DynamoDB works and how AWS charges you for the service.
AWS Lambda Implementation 
AWS Lambda is a serverless, event-driven compute service that lets you run code for virtually any type of application or back end service without provisioning or managing servers.
The Lambda I wrote for this blog post handles all three HTTP requests. You could also implement this with one Lambda for each of the three endpoints. One important aspect when developing AWS Lambdas is that they are dormant until an event arrives. That means the first time a request arrives, the AWS Lambda runtime has to start the Lambda function. This takes some time until the Lambda is ready and can process incoming events. Because this Lambda needs a DynamoDB client for all requests and the overall code is very simple, it would make no difference to the startup time if this Lambda was split into three individual Lambdas.
The Lambda needs to access DynamoDB, and for that, the code creates a client in the init() function. In Go, init() is a special function that is called before any other part of a package. The init function is part of this application's main package. Therefore, it will be executed as soon as the application is loaded into memory. init() also runs before the main() function.
func init() {
  cfg, err := config.LoadDefaultConfig(context.Background())
  if err != nil {
    log.Fatalf("init: unable to load AWS config, %v", err)
  }
  dynamodbClient = dynamodb.NewFromConfig(cfg)
}
AWS recommends this pattern to initialize global variables in Lambdas.
Next, as with any Lambda implementation in Go, the main() function starts the application with a call to lambda.Start
and passes the handle function as an argument.
func main() {
  lambda.Start(handle)
}
An AWS Lambda that processes API Gateway requests receives an object of type events.APIGatewayV2HTTPRequest as a parameter and sends back an object of type events.APIGatewayV2HTTPResponse.
Because this code handles all three API endpoints, it must check which of the API routes sent the request.
The request object contains the RouteKey, the same string used in the API Gateway route configuration.
func handle(request events.APIGatewayV2HTTPRequest) (events.APIGatewayV2HTTPResponse, error) {
  switch request.RouteKey {
  case "GET /todos":
    return getTodos()
  case "POST /todos":
    return updateTodo(request)
  case "DELETE /todos/{id}":
    return deleteTodo(request)
  }

  return errorResponse, nil
}
The request object contains all information about the request, like headers, body, query parameters, and path parameters.
GET /todos 
The code sends back all the data from the DynamoDB table to show the todo entries in the list on the client. To fetch all entries, the Lambda sends a scan request to DynamoDB, which returns the data in a paged fashion (1MB per page). Be aware that scan is an expensive request because it reads all data from the table. Not a problem in this simple scenario where only a handful of entries are stored. But you should not send scan requests if the DynamoDB table contains millions of entries.
That will change in the second part of this article, so the final version of the application does not send a scan request anymore.
func getTodos() (events.APIGatewayV2HTTPResponse, error) {
  p := dynamodb.NewScanPaginator(dynamodbClient, &dynamodb.ScanInput{
    TableName: &tableName,
  })

  todos := make([]Todo, 0)
  for p.HasMorePages() {
    out, err := p.NextPage(context.Background())
    if err != nil {
      return errorResponse, err
    }

    var pTodos []Todo
    err = attributevalue.UnmarshalListOfMaps(out.Items, &pTodos)
    if err != nil {
      return errorResponse, err
    }
    todos = append(todos, pTodos...)
  }

  j, err := json.Marshal(todos)
  if err != nil {
    return errorResponse, err
  }

  return events.APIGatewayV2HTTPResponse{
    StatusCode: 200,
    Headers:    map[string]string{"content-type": "application/json"},
    Body:       string(j),
  }, nil

}
The function reads all entries into a slice, converts the slice into a JSON, and sends it in the body field of the response object to the API Gateway. Finally, the API Gateway converts the response object into an HTTP response and sends it back to the calling client.
POST /todos 
The update function first validates the input data. Id, description, and priority are mandatory. The client already checks the user input and always makes sure that these fields are filled. But when implementing an HTTP API back end, you should always validate incoming requests again and implement the same validation logic as the client. It is easy to forge HTTP requests and send invalid data to an HTTP API.
func updateTodo(request events.APIGatewayV2HTTPRequest) (events.APIGatewayV2HTTPResponse, error) {
  var todo Todo
  err := json.Unmarshal([]byte(request.Body), &todo)
  if err != nil {
    return errorResponse, err
  }

  errors := make(map[string]string)
  if todo.Id == "" {
    errors["id"] = "required"
  }
  if todo.Description == "" {
    errors["description"] = "required"
  }
  if todo.Priority == "" {
    errors["priority"] = "required"
  }
  if len(errors) > 0 {
    j, err := json.Marshal(TodoPostResponse{
      FieldErrors: errors,
    })
    if err != nil {
      return errorResponse, err
    }

    return events.APIGatewayV2HTTPResponse{
      StatusCode: 422,
      Headers:    map[string]string{"content-type": "application/json"},
      Body:       string(j),
    }, nil
  }
If the Lambda receives invalid data, it sends back an HTTP response 422 (Unprocessable Entity).
Otherwise, the Lambda stores the todo entry with PutItem in DynamoDB.
DynamoDB checks if an entry with the given primary key already exists. If yes, it updates the existing object; otherwise, it inserts a new object into the table.
  attributeValues, err := attributevalue.MarshalMap(todo)
  if err != nil {
    return errorResponse, err
  }

  _, err = dynamodbClient.PutItem(context.Background(), &dynamodb.PutItemInput{
    TableName: &tableName,
    Item:      attributeValues,
  })
  if err != nil {
    return errorResponse, err
  }

  return events.APIGatewayV2HTTPResponse{
    StatusCode: 204,
  }, nil
The update function returns the HTTP response code 204 (No Content) because this code does not send anything back in the response body.
DELETE /todos/{id} 
To delete an item in DynamoDB, the Lambda sends a DeleteItem request with the primary key (hash key)
as an argument.
Here you see how the API Gateway passes path variables to the Lambda.
The request object contains a field PathParameters, a map holding all path variables.
func deleteTodo(request events.APIGatewayV2HTTPRequest) (events.APIGatewayV2HTTPResponse, error) {
  id := request.PathParameters["id"]

  _, err := dynamodbClient.DeleteItem(context.Background(), &dynamodb.DeleteItemInput{
    Key:       map[string]types.AttributeValue{"Id": &types.AttributeValueMemberS{Value: id}},
    TableName: &tableName,
  })
  if err != nil {
    return errorResponse, err
  }

  return events.APIGatewayV2HTTPResponse{
    StatusCode: 204,
  }, nil
}
Like the update function, this function does not send anything back.
AWS Lambda Provisioning 
To save a bit of money, I provision an ARM64 Lambda. They are currently about 20% cheaper than their x86 counterparts. Thanks to the Go cross-compiler, it's straightforward to build the app for the ARM platform (see Makefile).
See also the AWS Lambda pricing page for more information: https://aws.amazon.com/lambda/pricing/
By default, an AWS Lambda does not have permission to access other AWS services. Because the application stores data in DynamoDB, we have to configure a service role with the required DynamoDB permissions. Additionally, the Lambda requires permissions to access CloudWatch for writing log statements.
func createIamRoleForLambda(ctx *pulumi.Context, table *dynamodb.Table) (*iam.Role, error) {

  dynamoDbPermissions := table.Arn.ApplyT(func(arn string) string {
    return fmt.Sprintf(`{
          "Version": "2012-10-17",
          "Statement": [
              {
                  "Effect": "Allow",
                  "Action": [
                      "dynamodb:PutItem",
                      "dynamodb:DeleteItem",
                      "dynamodb:Scan"
                  ],
                  "Resource": "%s"
              }
          ]
      }`, arn)
  }).(pulumi.StringOutput)

  role, err := iam.NewRole(ctx, "todo-lambda-exec-role", &iam.RoleArgs{
    AssumeRolePolicy: pulumi.String(`{
              "Version": "2012-10-17",
              "Statement": [{
                "Sid": "",
                "Effect": "Allow",
                "Principal": {
                  "Service": "lambda.amazonaws.com"
                },
                "Action": "sts:AssumeRole"
              }]
            }`),
    InlinePolicies: iam.RoleInlinePolicyArray{iam.RoleInlinePolicyArgs{
      Name:   pulumi.String("dynamodb"),
      Policy: dynamoDbPermissions,
    }},
  })
  if err != nil {
    return nil, err
  }

  _, err = iam.NewRolePolicyAttachment(ctx, "todo-lambda-exec", &iam.RolePolicyAttachmentArgs{
    Role:      role.Name,
    PolicyArn: pulumi.String("arn:aws:iam::aws:policy/service-role/AWSLambdaBasicExecutionRole"),
  })
  if err != nil {
    return nil, err
  }

  return role, nil
}
The AWS managed policy AWSLambdaBasicExecutionRole assigns the required CloudWatch permissions.
("logs:CreateLogGroup", "logs:CreateLogStream", "logs:PutLogEvents").
Like the Lambda, by default, does not have permission to access other services. Also, the API Gateway does not have permission to call a Lambda by default. Therefore, we need to permit the API Gateway with the following configuration.
func createInvokeLambdaPermission(ctx *pulumi.Context, lmbda *lambda.Function, api *apigatewayv2.Api) error {
  account, err := aws.GetCallerIdentity(ctx)
  if err != nil {
    return err
  }

  region, err := aws.GetRegion(ctx, &aws.GetRegionArgs{})
  if err != nil {
    return err
  }

  _, err = lambda.NewPermission(ctx, "todo-apigateway-invoke-lambda-permission", &lambda.PermissionArgs{
    Action:    pulumi.String("lambda:InvokeFunction"),
    Function:  lmbda.Name,
    Principal: pulumi.String("apigateway.amazonaws.com"),
    SourceArn: pulumi.Sprintf("arn:aws:execute-api:%s:%s:%s/*/*/*", region.Name, account.AccountId, api.ID()),
  })
  if err != nil {
    return err
  }

  return nil
}
To deploy the Go code, we need to compress the program into a zip file. The zip entry must be named bootstrap.
Pulumi has built-in support for creating zip files with the pulumi.NewAssetArchive method. Pulumi automatically uploads
the zip file to AWS when creating the AWS Lambda.
  codeArchive := pulumi.NewAssetArchive(map[string]interface{}{
    "bootstrap": pulumi.NewFileAsset("../lambda/main"),
  })

  args := &lambda.FunctionArgs{
    Runtime:       pulumi.String("provided.al2"),
    Handler:       pulumi.String("bootstrap"),
    Code:          codeArchive,
    MemorySize:    pulumi.Int(128),
    Name:          pulumi.String("todo"),
    Publish:       pulumi.Bool(false),
    Role:          role.Arn,
    Timeout:       pulumi.Int(3),
    Architectures: pulumi.StringArray{pulumi.String("arm64")},
    Environment:   &lambda.FunctionEnvironmentArgs{Variables: pulumi.StringMap{"TABLE_NAME": todoDb.Name}},
  }

  function, err := lambda.NewFunction(
    ctx,
    "todo",
    args,
    pulumi.DependsOn([]pulumi.Resource{role, logGroup}),
  )
  if err != nil {
    return nil, err
  }
  return function, nil
The Lambda needs to know the name of the DynamoDB table. This Pulumi configuration does not specify the table's physical name, just a logical name. Pulumi derives the physical name by appending a few random characters to the logical name. Because this name is random, we can't hardcode it into the Go code. So instead, the Pulumi code creates an environment variable with the table name.
Environment: &lambda.FunctionEnvironmentArgs{Variables: pulumi.StringMap{"TABLE_NAME": todoDb.Name}},
In the Go code, you find the following line that reads the value from the environment variable.
var tableName = os.Getenv("TABLE_NAME")
I also provision the CloudWatch log group with Pulumi.
  logGroup, err := cloudwatch.NewLogGroup(ctx, "todo", &cloudwatch.LogGroupArgs{
    Name:            pulumi.String("/aws/lambda/todo"),
    RetentionInDays: pulumi.Int(30),
  })
  if err != nil {
    return nil, err
  }
This configuration is optional because AWS automatically creates a log group when it provisions the Lambda. But doing it manually has
a few advantages. We can specify the name of the log group and set the expiration. AWS auto-generated log groups never expire. And when we destroy the infrastructure with pulumi destroy, the CloudWatch log group will also be deleted.
Check out my previous blog post about provisioning Lambdas with Pulumi and the AWS Lambda developer guide for more detailed information.
Run 
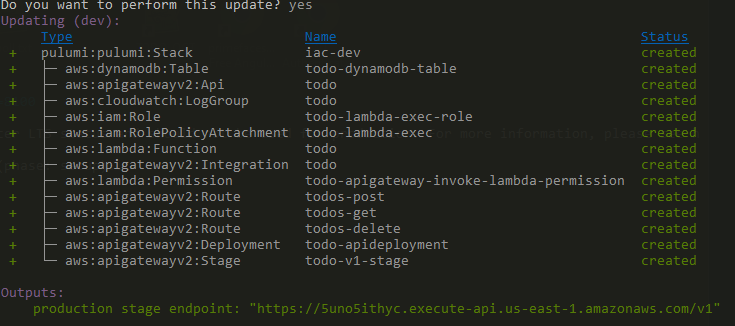
Everything is in place. First, compile the Lambda and run Pulumi to provision all configured resources. To simplify this process, I created two make files (Lambda Makefile, Pulumi Makefile). Then I can run the following commands to set everything up.
cd iac
make up
The up command creates all the configured resources on AWS and prints out the API Gateway URL at the end.
I use the provided Amazon URL for this example, but I recommend creating a custom domain for a production setup. Check out the Pulumi documentation and this API Gateway Guide for more information about setting up a custom domain.
Before starting the client application, we must configure the URL. Open the environment.ts file and insert the URL.
export const environment = {
  production: false,
  API_URL: 'https://58zdsr1br9.execute-api.us-east-1.amazonaws.com/v1'
};
Start the client application.
cd client
npm install
ionic serve -o
You should now be able to add and update todo entries.
If you no longer need the provisioned AWS resources, destroy them with pulumi destroy.
Note this command deletes everything, including the data in the database.
Conclusion 
You've reached the end of the first part of this tutorial. So far, we set up the API Gateway, built and installed the Lambda, and provisioned a DynamoDB table. The application works, but it is far from useful because everybody can access the HTTP endpoints and see all users' todo entries.
The second part of this blog post will change that. I will show you how to add user authentication to the application. After that, users can sign up and sign in and only see their todo entries.