In the first part of this article, I showed you how to build and deploy a back-end service on AWS with Go and Pulumi. The application uses the AWS services Amazon API Gateway, AWS Lambda, and Amazon DynamoDB. The first part of the blog post ended with a fully functional todo application. But the application is currently a single-user application. There is no login, and every user sees every todo entry from every other user.
In the second part, I show you how to add user authentication to the application. I will show you how to configure Amazon Cognito and use it as an OAuth2 authentication service provider and OIDC identity provider.
Overview 
The first part of this blog post laid the foundation by setting up Amazon API Gateway, AWS Lambda, and Amazon DynamoDB. This article adds one more AWS service to the mix: Amazon Cognito. The new architecture will look like this.

Amazon Cognito 
Amazon Cognito is a hosted user identity service. It enables you to easily add user sign-up, sign-in, and access control functionality to an existing application.
One benefit of Cognito is its price. The user pool feature of Cognito has a free tier of 50,000 MAUs. Amazon defines a MAU (monthly active user) as a user who interacted with the Cognito service in a given month (sign-up, sign-in, token refresh, password change, or user account attribute changed). AWS will not charge you for subsequent sessions or for inactive users within that month. The free tier does not expire at the end of the 12-month AWS free tier term and is available indefinitely to existing and new AWS customers.
See more information on the pricing page:
https://aws.amazon.com/cognito/pricing/
Cognito provides two services: User Pool and Identity Pool.
Identity pools are for authorization (access control). For example, you can use identity pools to create unique identities for users and give them access to other AWS services.
On the other hand, user pools provide a managed user database for sign-up and sign-in. This is the service we will leverage in this application.
Cognito user pools offer a standard OAuth2/OIDC interface, so they can be accessed with any OAuth2 library.
Cognito offers many configuration options. Therefore, to learn more about Cognito, I recommend creating a User Pool with the AWS Web Console. There, you have help texts and tooltips that explain what each option does.
This is also how I created the following Pulumi configuration. I built the User Pool manually in the AWS Web console and then imported the resource with the Pulumi import feature.
func createCognitoUserPool(ctx *pulumi.Context) (pulumi.IDOutput, pulumi.IDOutput, error) {
  userPool, err := cognito.NewUserPool(ctx, "pool", &cognito.UserPoolArgs{
    AccountRecoverySetting: &cognito.UserPoolAccountRecoverySettingArgs{
      RecoveryMechanisms: &cognito.UserPoolAccountRecoverySettingRecoveryMechanismArray{
        &cognito.UserPoolAccountRecoverySettingRecoveryMechanismArgs{
          Name:     pulumi.String("verified_email"),
          Priority: pulumi.Int(1),
        },
      },
    },
    AliasAttributes: pulumi.StringArray{
      pulumi.String("preferred_username"),
    },
    AutoVerifiedAttributes: pulumi.StringArray{
      pulumi.String("email"),
    },
    MfaConfiguration: pulumi.String("OFF"),
    Name:             pulumi.String("todo"),
    Schemas: cognito.UserPoolSchemaArray{
      &cognito.UserPoolSchemaArgs{
        AttributeDataType: pulumi.String("String"),
        Mutable:           pulumi.Bool(true),
        Name:              pulumi.String("email"),
        Required:          pulumi.Bool(true),
        StringAttributeConstraints: &cognito.UserPoolSchemaStringAttributeConstraintsArgs{
          MaxLength: pulumi.String("2048"),
          MinLength: pulumi.String("0"),
        },
      },
    },
  })
  if err != nil {
    return pulumi.IDOutput{}, pulumi.IDOutput{}, err
  }
Next, we need to create a client. This configuration is required before a client can access the user pool. A user pool can have multiple clients. This example only has one client, the Angular web application.
Each client configuration will generate an id that we have to configure in the client. This Pulumi code prints the client id out after provisioning the user pool.
  client, err := cognito.NewUserPoolClient(ctx, "client", &cognito.UserPoolClientArgs{
    CallbackUrls:         pulumi.StringArray{pulumi.String("http://localhost:8100")},
    AccessTokenValidity:  pulumi.Int(1),
    IdTokenValidity:      pulumi.Int(1),
    RefreshTokenValidity: pulumi.Int(30),
    TokenValidityUnits: cognito.UserPoolClientTokenValidityUnitsArgs{
      AccessToken:  pulumi.String("hours"),
      IdToken:      pulumi.String("hours"),
      RefreshToken: pulumi.String("days"),
    },
    EnableTokenRevocation:      pulumi.Bool(true),
    PreventUserExistenceErrors: pulumi.String("ENABLED"),
    AllowedOauthFlows: pulumi.StringArray{
      pulumi.String("code"),
    },
    AllowedOauthFlowsUserPoolClient: pulumi.Bool(true),
    AllowedOauthScopes: pulumi.StringArray{
      pulumi.String("openid"),
    },
    ExplicitAuthFlows: pulumi.StringArray{
      pulumi.String("ALLOW_REFRESH_TOKEN_AUTH"),
    },
    Name: pulumi.String("todo"),
    ReadAttributes: pulumi.StringArray{
      pulumi.String("email"),
    },
    SupportedIdentityProviders: pulumi.StringArray{
      pulumi.String("COGNITO"),
    },
    UserPoolId: userPool.ID(),
    WriteAttributes: pulumi.StringArray{
      pulumi.String("email"),
    },
  })
  if err != nil {
    return pulumi.IDOutput{}, pulumi.IDOutput{}, err
  }

  _, err = cognito.NewUserPoolDomain(ctx, "main", &cognito.UserPoolDomainArgs{
    Domain:     pulumi.String("todo-2021"),
    UserPoolId: userPool.ID(),
  })
  if err != nil {
    return pulumi.IDOutput{}, pulumi.IDOutput{}, err
  }

  ctx.Export("cognito client id", client.ID())
  ctx.Export("cognito user id", userPool.ID())

  return client.ID(), userPool.ID(), nil
This application leverages OAuth2 for the sign-in workflow and uses the hosted UI of Cognito. That means that pages for sign-in and sign-up are not implemented in the application. Instead, they are served from the Cognito service.
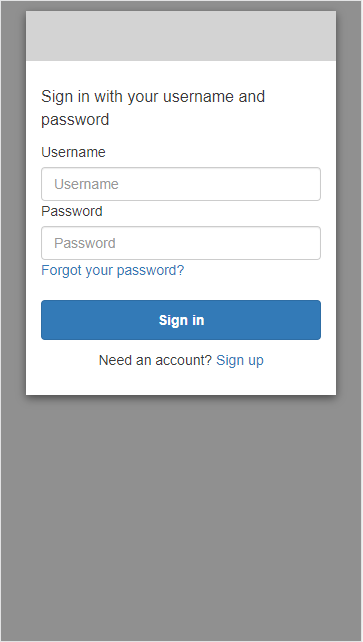
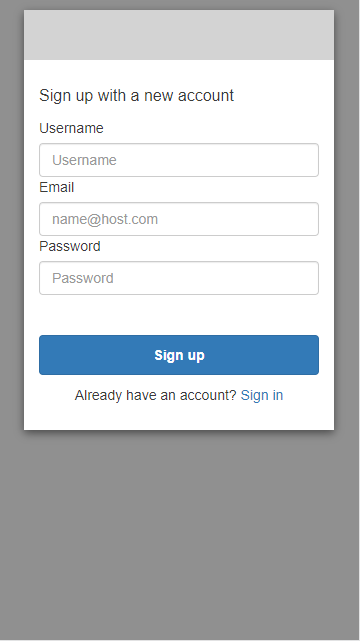
This example uses the standard HTML pages that Cognito provides, but you can (and should)
customize these pages to match the UI of your application.
Check out the Pulumi documentation and
the Cognito developer guide
for more information about customizing these pages.
For more in-depth information about Cognito User Pools visit the Cognito developer guide.
Client 
As mentioned before, Cognito provides a standard OAuth2 and OIDC interface, so the service can be accessed with any OAuth2/OIDC library. For the Angular/Ionic web application, I use the angular-oauth2-oidc library.
npm install angular-oauth2-oidc
The client library needs two pieces of information from Cognito: the issuer URL and the client id. The Pulumi code of this article will print out these two pieces of information after provisioning the resources.
export const environment = {
  production: false,
  API_URL: 'https://2m706iho0j.execute-api.us-east-1.amazonaws.com/v1',
  ISSUER: 'https://cognito-idp.us-east-1.amazonaws.com/us-east-1_L0C5wdEVM',
  CLIENT_ID: '6epfjfg0j2dc5bq2sa4lk60r05'
};
The issuer URL has the following structure:
https://cognito-idp.<region>.amazonaws.com/<YOUR_USER_POOL_ID>
Next, we need to create a configuration object for the angular-oauth2-oidc library.
import {AuthConfig} from 'angular-oauth2-oidc';
import {environment} from '../environments/environment';

export const authCodeFlowConfig: AuthConfig = {
  issuer: environment.ISSUER,
  redirectUri: 'http://localhost:8100',
  logoutUrl: 'http://localhost:8100/sign-out',
  clientId: environment.CLIENT_ID,
  responseType: 'code',
  scope: 'openid',
  showDebugInformation: !environment.production,
  timeoutFactor: 0.01,
  strictDiscoveryDocumentValidation: false
};
These are standard OAuth2/OIDC configuration options that you have to configure in any OAuth2 library.
I had to disable the validation of the discovery document (strictDiscoveryDocumentValidation: false).
The discovery document from Cognito does not precisely follow the OAuth2 standard. However, everything else works as expected.
This application leverages the OAuth2 Authorization Code Flow (responseType: 'code').
For more information about OAuth2 and the supported authorization flows, check out this guide: https://developer.okta.com/blog/2019/10/21/illustrated-guide-to-oauth-and-oidc
The angular-oauth2-oidc library needs to be configured. With the option sendAccessToken
set to true, the library automatically adds an interceptor to the Angular HTTP client that sends
the access token in the header with each request. The allowedUrls configuration is an array of one or more prefix URLs.
The HTTP client interceptor only adds the authorization header when one configured prefix matches the target URL.
Here, only requests sent to the API Gateway will contain the authorization header.
    importProvidersFrom(OAuthModule.forRoot({
      resourceServer: {
        allowedUrls: [environment.API_URL],
        sendAccessToken: true
      }
    })),
By default, the angular-oauth2-oidc library stores the tokens in sessionStorage. You can customize
this with the OAuthStorage provider in the app module.
}, AuthGuard /*, { provide: OAuthStorage, useValue: localStorage }*/, provideHttpClient(withInterceptorsFromDi())
For more in-depth information about the angular-oauth2-oidc library, check out the project page: https://github.com/manfredsteyer/angular-oauth2-oidc
Angular has a concept called guards to protect client-side routes.
The following class is the guard I wrote for this example. It checks if the user has a valid access and id token. If yes, it allows access to the route. Otherwise, it blocks access.
import {inject, Injectable} from '@angular/core';
import {Router} from '@angular/router';
import {OAuthService} from 'angular-oauth2-oidc';

@Injectable()
export class AuthGuard {
  private readonly router = inject(Router);
  private readonly oauthService = inject(OAuthService);


  canActivate() {
    if (
      this.oauthService.hasValidAccessToken() &&
      this.oauthService.hasValidIdToken()
    ) {
      return true;
    } else {
      this.router.navigate(['/']);
      return false;
    }
  }
}
I added this guard to the todo route in the route configuration.
    path: 'todo',
    canActivate: [() => inject(AuthGuard).canActivate()],
    children: [
I also added two new routes. The start component will initiate the OAuth2 "dance," and the sign-out component will be shown when the user logs out.
  {
    path: '',
    component: StartComponent
  },
  {
    path: 'sign-out',
    component: SignOutComponent
  },
The ngOnInit() method of the start component is one of the first methods that runs when a user opens the application. It configures the oauth2 library with the
configuration object. Internally, the oauth2 library downloads the needed information
from the provided issuer URL and then tries to log in.
If the user is already logged in, they will be automatically redirected to the todo application. Otherwise, the application redirects the user
to Cognito for displaying the sign-in dialog. Finally, Cognito redirects the user back to the application if the sign-in process is successful.
  ngOnInit() {
    this.oauthService.configure(authCodeFlowConfig);
    this.oauthService.loadDiscoveryDocumentAndLogin().then(success => {
      if (success) {
        this.oauthService.setupAutomaticSilentRefresh();
        this.router.navigate(['/todo']);
      }
    });
  }
Implementing a log-out feature is very simple. Inject the OAuthService into the component and call the logOut() method.
private readonly oauthService = inject(OAuthService);
  signout(): void {
    this.oauthService.logOut()
  }
Amazon API Gateway 
With the changes in the previous section, the web application now sends an access token in the authorization request header to the API Gateway. The application needs to verify this token on the back end somewhere. Fortunately, the API Gateway has built-in support for OAuth2 access token verification. So, we only have to enable it.
The API Gateway implemented this feature with a concept called "authorizers." One of the built-in authorizers is the JWT Authorizer. Note that this authorizer only works when the access token is a JSON Web Token (JWT); according to the OAuth2 standard, it does not have to be. The JWT Authorizer verifies the signature, decodes the token, and validates the claims. Visit the documentation page to learn more about what information the authorizer verifies.
The authorizer needs to know the client id and the issuer URL. This is the same information we had to configure on the client-side.
  authorizer, err := apigatewayv2.NewAuthorizer(ctx, "todo-jwt-authorizer", &apigatewayv2.AuthorizerArgs{
    ApiId:          api.ID(),
    AuthorizerType: pulumi.String("JWT"),
    IdentitySources: pulumi.StringArray{
      pulumi.String("$request.header.Authorization"),
    },
    JwtConfiguration: &apigatewayv2.AuthorizerJwtConfigurationArgs{
      Audiences: pulumi.StringArray{clientId},
      Issuer:    issuer,
    },
  })
  if err != nil {
    return nil, err
  }
Next, the authorizer must be linked to the routes with the AuthorizerId field.
  _, err = apigatewayv2.NewRoute(ctx, "todos-get", &apigatewayv2.RouteArgs{
    ApiId:             api.ID(),
    AuthorizationType: pulumi.String("JWT"),
    AuthorizerId:      authorizer.ID(),
    RouteKey:          pulumi.String("GET /todos"),
    Target:            target,
  })
  if err != nil {
    return nil, err
  }
Amazon DynamoDB 
Because we add user authentication to the application, we also want to store the todo entries per user. For this to work, we need to change the database's schema. The new hash key is the user id, and the sort key is the todo UUID. Together they form the primary key. In DynamoDB, you can access data only with the hash key or with the hash key plus sort key. Having the user id as the hash key allows the application to fetch all todo entries for one user. And having the todo id as the sort key enables the application to target a specific todo entry for the update and delete functionality.
The new Pulumi configuration for DynamoDB. Both UserId and Id are strings.
func createDynamoDbTable(ctx *pulumi.Context) (*dynamodb.Table, error) {
  todoDb, err := dynamodb.NewTable(ctx, "todo-dynamodb-table", &dynamodb.TableArgs{
    Attributes: dynamodb.TableAttributeArray{
      &dynamodb.TableAttributeArgs{
        Name: pulumi.String("UserId"),
        Type: pulumi.String("S"),
      },
      &dynamodb.TableAttributeArgs{
        Name: pulumi.String("Id"),
        Type: pulumi.String("S"),
      },
    },
    BillingMode: pulumi.String("PAY_PER_REQUEST"),
    HashKey:     pulumi.String("UserId"),
    RangeKey:    pulumi.String("Id"),
  }, pulumi.IgnoreChanges([]string{"read_capacity", "write_capacity"}))
  if err != nil {
    return nil, err
  }
  return todoDb, nil
}
Note that this change will delete the old database and the stored data when Pulumi provisions the resource.
AWS Lambda 
Lastly, we need to amend the Lambda Go code. The Lambda needs access to the user id for storing and
retrieving the data from DynamoDB. The access token that Cognito creates contains the sub claim
with the user id.
The JWT Authorizer in the API Gateway verifies and parses the JWT and then passes the information as fields in the event object to the Lambda. So, there is no need to parse the JWT in the Lambda code.
Instead, the code can directly access the sub claim from the Claims map.
func handle(request events.APIGatewayV2HTTPRequest) (events.APIGatewayV2HTTPResponse, error) {
  userId := request.RequestContext.Authorizer.JWT.Claims["sub"]

  switch request.RouteKey {
  case "GET /todos":
    return getTodos(userId)
  case "POST /todos":
    return updateTodo(request, userId)
  case "DELETE /todos/{id}":
    return deleteTodo(request, userId)
  }

  return errorResponse, nil
}
GET /todos 
The initial version of this function sends a scan request to DynamoDB. But now, each todo entry is assigned to a user, and the application should only fetch entries for the calling user.
So, instead of a scan, the application sends a query request and selects all entries where the UserId is equal to the user id from the access token. The query request returns the response in a paged fashion (1MB data each page).
func getTodos(userId string) (events.APIGatewayV2HTTPResponse, error) {

  userIdFilter := expression.Name("UserId").Equal(expression.Value(userId))
  expr, err := expression.NewBuilder().WithFilter(userIdFilter).Build()
  if err != nil {
    return errorResponse, err
  }

  queryInput := &dynamodb.QueryInput{
    TableName:                 &tableName,
    ConsistentRead:            aws.Bool(true),
    ExpressionAttributeNames:  expr.Names(),
    ExpressionAttributeValues: expr.Values(),
    KeyConditionExpression:    expr.Filter(),
  }
  p := dynamodb.NewQueryPaginator(dynamodbClient, queryInput)

  todos := make([]Todo, 0)
  for p.HasMorePages() {
    out, err := p.NextPage(context.Background())
    if err != nil {
      return errorResponse, err
    }

    var pTodos []Todo
    err = attributevalue.UnmarshalListOfMaps(out.Items, &pTodos)
    if err != nil {
      return errorResponse, err
    }
    todos = append(todos, pTodos...)
  }

  j, err := json.Marshal(todos)
  if err != nil {
    return errorResponse, err
  }

  return events.APIGatewayV2HTTPResponse{
    StatusCode: 200,
    Headers:    map[string]string{"content-type": "application/json"},
    Body:       string(j),
  }, nil

}
POST /todos 
The only change needed in the update function is assigning the user id from the access token to the struct that will be saved in DynamoDB (todo.UserId = userId).
func updateTodo(request events.APIGatewayV2HTTPRequest, userId string) (events.APIGatewayV2HTTPResponse, error) {
  var todo Todo
  err := json.Unmarshal([]byte(request.Body), &todo)
  if err != nil {
    return errorResponse, err
  }

  todo.UserId = userId

  errors := make(map[string]string)
  if todo.Id == "" {
    errors["id"] = "required"
  }
  if todo.Description == "" {
    errors["description"] = "required"
  }
  if todo.Priority == "" {
    errors["priority"] = "required"
  }
  if len(errors) > 0 {
    j, err := json.Marshal(TodoPostResponse{
      FieldErrors: errors,
    })
    if err != nil {
      return errorResponse, err
    }

    return events.APIGatewayV2HTTPResponse{
      StatusCode: 422,
      Headers:    map[string]string{"content-type": "application/json"},
      Body:       string(j),
    }, nil
  }

  attributeValues, err := attributevalue.MarshalMap(todo)
  if err != nil {
    return errorResponse, err
  }

  _, err = dynamodbClient.PutItem(context.Background(), &dynamodb.PutItemInput{
    TableName: &tableName,
    Item:      attributeValues,
  })
  if err != nil {
    return errorResponse, err
  }

  return events.APIGatewayV2HTTPResponse{
    StatusCode: 204,
  }, nil
}
DELETE /todos/{id} 
To delete an entry, the Lambda has to provide the todo id and the user id.
func deleteTodo(request events.APIGatewayV2HTTPRequest, userId string) (events.APIGatewayV2HTTPResponse, error) {
  id := request.PathParameters["id"]

  _, err := dynamodbClient.DeleteItem(context.Background(), &dynamodb.DeleteItemInput{
    Key: map[string]types.AttributeValue{
      "UserId": &types.AttributeValueMemberS{Value: userId},
      "Id":     &types.AttributeValueMemberS{Value: id},
    },
    TableName: &tableName,
  })
  if err != nil {
    return errorResponse, err
  }

  return events.APIGatewayV2HTTPResponse{
    StatusCode: 204,
  }, nil
}
Run 
This was the last change that introduced user authentication to the application. We can now compile the Lambda and deploy and modify all resources on AWS with Pulumi.
cd iac
make up
Before starting the client, we need to configure the issuer URL, API URL, and client id. Open environment.ts and change the values accordingly.
export const environment = {
  production: false,
  API_URL: 'https://2m706iho0j.execute-api.us-east-1.amazonaws.com/v1',
  ISSUER: 'https://cognito-idp.us-east-1.amazonaws.com/us-east-1_L0C5wdEVM',
  CLIENT_ID: '6epfjfg0j2dc5bq2sa4lk60r05'
};
Start the client
cd client
npm install
ionic serve -o
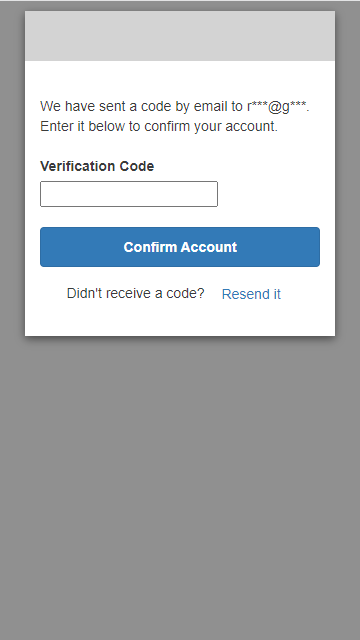
The first time you open the app with http://localhost:8100, you should see a sign-in screen. Because there are no pre-installed users, you have to sign up for a new account first. Then you receive an email with a verification code to confirm the email address. Enter the code, and Cognito redirects you to the todo application.
Conclusion 
This concludes the second and last part of this tutorial about setting up an HTTP API back end on AWS.
The last missing piece of a complete full-stack web application deployment is hosting the client web application. The Angular/Ionic application I built in this example consists of static resources, and they can be hosted on any static hosting service. If you are committed to the AWS platform, the apparent solution is Amazon S3 / Amazon CloudFront. Visit this page to learn more about setting up S3 and CloudFront with Pulumi.
But you can deploy these resources on any static host service; the client does not have to run on AWS to access the AWS resources we configured in this article.