In this post, we will take a closer look at Lovefield, a SQL database engine for the web. Written in JavaScript, the library works cross-browser and provides an easy-to-use, SQL-like API for web applications. Google developed Lovefield, and according to their documentation, it is used in the products Inbox and Google Play Movies & TV. You can find the source code of the library on GitHub: https://github.com/google/lovefield
Introduction 
To add Lovefield to an Ionic project, install it with npm:
npm install lovefield
And then add an import statement. In this example, we import everything into the namespace lf:
import * as lf from 'lovefield';
When an application wants to store data with Lovefield, it must first define a schema. Like any SQL database, Lovefield needs to know the tables, columns, constraints, and indices before it can insert, query, update, and delete data.
To create a schema, an application has to call the lf.schema.create function.
const schemaBuilder = lf.schema.create('users', 1);
The first parameter specifies the name of the database, and the second parameter, the version number. Lovefield supports database upgrades, and you need to increase this version number every time the schema changes. See more information about database upgrades in the official documentation.
With the schema object, an application can define tables and columns. Like in a regular SQL database, a table consists of columns, and every column has a name and a data type assigned to it.
  schemaBuilder.createTable('User').
  addColumn('id', lf.Type.INTEGER).
  addColumn('username', lf.Type.STRING).
  addColumn('email', lf.Type.STRING).
  addColumn('note', lf.Type.STRING).
  addColumn('age', lf.Type.INTEGER).
  addColumn('active', lf.Type.BOOLEAN).
  addColumn('created', lf.Type.DATE_TIME).
  addNullable(['note']).
  addPrimaryKey(['id'], true).
  addIndex('idxEmail', ['email'], false, lf.Order.ASC);
In addition to the data types we see in this example, Lovefield supports number, ArrayBuffer, and any JavaScript object. See a detailed description of the data types in the documentation.
By default, columns added with addColumn are not nullable. If the application needs to store null values in specific columns, it needs to mark these columns as nullable with a call to addNullable. The note column in this example may contain null values.
The schema defines the column id as the primary key. The second parameter of the addPrimaryKey function specifies that the primary key is an autonumber field. When you want to use autonumbers, the column needs to be of type integer. The number starts at 1 and is incremented by 1 every time Lovefield inserts a new row. When the primary key is configured as autonumber, you do not have to add the column in the insert statement.
Lovefield also supports indices. The first parameter of the addIndex function assigns a name to the index; the second parameter specifies the columns that are part of this index; the third parameter specifies if the index is unique, and the last parameter sets the order of the index. An application can add multiple indices to a table.
Lovefield also supports foreign keys with the function addForeignKey, and it is possible to add unique constraints with the addUnique function.
All schema-related functions are synchronous operations, and all the database operations, like connecting, querying, updating, and deleting, are asynchronous and return a Promise.
Connect 
With the schema object, an application can open the database with the connect function.
let userDb;
let user;

schemaBuilder.connect()
  .then(db => {
    userDb = db;
    user = db.getSchema().table('User');

    return userDb.delete().from(user).exec();
  })
Lovefield persists the data by default into IndexedDB. Alternatively, an application can choose a memory back end, which only stores the data in memory. This is useful when you want to use the powerful query capabilities of Lovefield but do not have the requirement to persist the data. The third back-end option is Firebase, which persists the data into a Firebase database.
To switch the storage provider, the connect function accepts a JavaScript object as a parameter.
schemaBuilder.connect({storeType: lf.schema.DataStoreType.MEMORY}).....

schemaBuilder.connect({storeType: lf.schema.DataStoreType.FIREBASE,
                       firebase: databaseRef}).....
If the Firebase option is chosen, the application must also supply the property firebase to provide an already connected and authenticated Firebase database reference.
The connect function returns a Promise with the database object. With that object, the application gets access to the table with db.getSchema().table('User').
Then the code executes a delete statement to remove every row that is currently stored in the table.
Lovefield does not support SQL statements in string form like you would expect from a regular SQL database. An application has to create the query with the builder-pattern-like API, but the result looks very similar to SQL statements.
SQL: delete from User
LoveField: userDb.delete().from(user).exec()
Insert 
For inserting rows, the application has to call the createRow function from the table schema object and provide the columns with their values as a JavaScript object. The keys of the object have to match the column names.
  const newRows = [];

  let row = user.createRow({
      username: 'john',
      email: 'john@test.com',
      age: 27,
      active: true,
      created: new Date()
  });
  newRows.push(row);
      row = user.createRow({
      username: 'ralph',
      email: 'ralph@test.com',
      age: 32,
      active: true,
      created: new Date(),
      note: 'the admin'
  });
  newRows.push(row);

  row = user.createRow({
      username: 'jodie',
      email: 'jodie@test.com',
      age: 23,
      active: false,
      created: new Date()
  });
  newRows.push(row);

  return userDb.insertOrReplace().into(user).values(newRows).exec();
To insert rows, an application calls either the insert or insertOrReplace function from the database object. insertOrReplace checks if the new row contains a value for the primary key and replaces the row with the same key in the table when it already exists. When the new row contains a primary key not already stored in the table, or the row does not specify a key, and the table uses an auto-number primary key, insertOrReplace inserts the row into the table.
Note: When the table did not specify a primary key in the schema, an application cannot call insertOrReplace.
The function values expects an array of rows. Even when the application wants to insert only one row, it has to wrap it in an array: values([row])
Select 
With a select query, an application can retrieve data from a database. A SQL query like this, select * from User, looks very similar in Lovefield:
userDb.select().from(user).exec().then(rows => .....)
Like all the other database operations, selects are asynchronous and return a Promise. The Promise contains the selected rows as an array of objects. For example, an application can access the id of the first row with this code: rows[0].id.
Lovefield supports projections by specifying the columns as parameters of the select function.
When you call select without any parameter, Lovefield assumes a select * statement. The result of a select statement can be sorted with the orderBy clause.
userDb.select(user.username)
      .from(user)
      .orderBy(user.username, lf.Order.DESC)
      .exec()

//select username from User order by username DESC
Lovefield supports multiple orderBy statements.
userDb.select(user.username)
      .from(user)
      .orderBy(user.username, lf.Order.DESC)
      .orderBy(user.id)
      .exec()
//select username from User order by username DESC, id ASC
This statement first sorts the rows by username in descending order, and when the usernames are equal, it orders them by id in ascending order.
Search conditions are supported by the where function. A query that selects all active users would look like this:
userDb.select()
      .from(user)
      .where(user.active.eq(true))
      .exec()
//select * from User where active = true
Lovefield supports the compare function as functions of the column object (e.g., user.active.eq). You can find a list of all the supported functions in the documentation.
To combine multiple predicates, Lovefield provides the helper functions lf.op.and, lf.op.or, and lf.op.not.
userDb.select()
      .from(user)
      .where(
          lf.op.and(
             user.active.eq(true),
             user.age.gt(30)
          )
       )
      .exec()
//select * from User where active = true AND age > 30
Lovefield includes support for groupBy and aggregate functions.
A query that calculates the average and number of rows:
userDb.select(lf.fn.avg(user.age), lf.fn.count(user.id))
      .from(user)
      .exec())
//select avg(age), count(id) from User
Group by conditions are added to the query with the groupBy function.
userDb.select(lf.fn.count(user.id), user.active)
      .from(user)
      .groupBy(user.active)
      .exec()
// select count(id), active from User group by active
Other features included in Lovefield are the limit and skip functions to limit the returning rows and to skip a certain amount of rows (documentation). Lovefield is also capable of executing queries with joins. See the documentation for more information.
Update 
Updates are executed with the update function:
userDb.update(user)
      .set(user.active, true)
      .where(user.active.eq(false))
      .exec()
//update User set active = true where active = false
Note: Lovefield does not support update statements with calculated values: update User set age = age + 1
Explain 
A debugging feature you find in SQL databases is the explain function. The database executes the query, but instead of returning rows, it gives back a detailed description of how the engine processed the query. This is, for example, useful if you want to know if a query uses an index or not.
To use explain in Lovefield, replace the exec call with a call to explain.
const info1 = userDb.select(user.id)
                    .from(user)
                    .where(user.username.eq('john'))
                    .explain());

const info2 = userDb.select(user.id)
                     .from(user)
                   .where(user.email.eq('john@test.com'))
                 .explain());
The explain function returns a string containing the execution plan of the query. The output has to be read from the bottom up. The first example uses a column in the where clause that is not covered by an index; therefore, the database engine has to do a table scan and load the complete data into memory. It processes the predicate, and in the end, it extracts the id and returns the result. The second query executes an index scan because the schema defined an index for the column email. An index scan is much faster than a full table scan.
// info1
project(User.id)
-select(value_pred(User.username eq john))
--table_access(User)

// info2
simple.html:125 project(User.id)
-table_access_by_row_id(User)
--index_range_scan(User.idxEmail, [john@test.com, john@test.com], natural)
Observers 
With Lovefield, it is possible to observe a select query for changes. An application can register a handler function to a select query, which then gets called whenever the results of the given query are modified.
const query = userDb.select().from(user);
userDb.observe(query, changes => console.log(changes));
The observer function is triggered every time the program inserts, updates, or deletes rows into the User table.
For example, an insert would result in an object that looks similar to this example:
[{
  "addedCount":1,
  "index":5,
  "object":[{"id":75,....},{"id":76,....},{"id":77,...},{"id":78,...},{"id":79,....},{"id":80, ....}],
  "removed":[],
  "type":"splice"
}]
Integrating Lovefield into an Ionic app 
In this part, we create an Ionic application and use Lovefield for storing and querying the data. The application imports a CSV file from the usgs.gov site that contains information on all earthquakes that happened worldwide during the last 30 days. When I tested it, there were over 7,500 entries in this file. https://earthquake.usgs.gov/earthquakes/feed/v1.0/summary/all_month.csv
The app consists of a list that displays the selected earthquakes and a popover with a form where the user can set filter and sort criteria.
We start developing the app with the Ionic CLI, add the PapaParse CSV library, and the Lovefield library.
ionic start lovefieldapp blank
ng generate service Earthquake

npm install papaparse
npm install lovefield
In the Earthquake service class, we add an init function that creates the database schema and imports the data from the USGS site.
This init method is called from the ngOnInit lifecycle method in the HomePage.
  async init() {
    this.createSchema();

    this.earthquakeDb = await this.schemaBuilder.connect();
    this.eqTbl = this.earthquakeDb.getSchema().table('Earthquakes');
    const result = await this.earthquakeDb.select(this.eqTbl['id']).from(this.eqTbl).limit(1).exec();

    if (result.length === 0) {
      return firstValueFrom(this.loadAndInsertData());
    }
    return Promise.resolve();
  }
The code assigns the database instance (earthquakeDb) and a reference to the table (eqTbl) to instance variables, so it has access to them in the other parts of the class. Before the app loads and inserts the data, it executes a select query to check if there are already entries stored in the database. For this demo, I only wanted to download and insert the file once. When the database is empty, it calls the loadAndInsertData function that downloads the CSV file and imports the data into the database.
The createSchema function builds the schema with the database name earthquake and a table name Earthquakes.
  createSchema() {
    this.schemaBuilder = lf.schema.create('earthquake', 1);

    this.schemaBuilder.createTable('Earthquakes')
      .addColumn('time', lf.Type.DATE_TIME)
      .addColumn('latitude', lf.Type.NUMBER)
      .addColumn('longitude', lf.Type.NUMBER)
      .addColumn('depth', lf.Type.NUMBER)
      .addColumn('mag', lf.Type.NUMBER)
      .addColumn('magType', lf.Type.STRING)
      .addColumn('nst', lf.Type.INTEGER)
      .addColumn('gap', lf.Type.NUMBER)
      .addColumn('dmin', lf.Type.NUMBER)
      .addColumn('rms', lf.Type.NUMBER)
      .addColumn('net', lf.Type.STRING)
      .addColumn('id', lf.Type.STRING)
      .addColumn('updated', lf.Type.DATE_TIME)
      .addColumn('place', lf.Type.STRING)
      .addColumn('type', lf.Type.STRING)
      .addColumn('horizontalError', lf.Type.NUMBER)
      .addColumn('depthError', lf.Type.NUMBER)
      .addColumn('magError', lf.Type.NUMBER)
      .addColumn('magNst', lf.Type.INTEGER)
      .addColumn('status', lf.Type.STRING)
      .addColumn('locationSource', lf.Type.STRING)
      .addColumn('magSource', lf.Type.STRING)
      .addPrimaryKey(['id'])
      .addIndex('idxMag', ['mag'], false, lf.Order.DESC)
      .addIndex('idxDepth', ['depth'], false, lf.Order.DESC)
      .addIndex('idxTime', ['time'], false, lf.Order.DESC);
  }
loadAndInsertData sends an HTTP GET request to the usgs.gov website and downloads the CSV file.
It extracts the text of the response, parses it with the PapaParse library, and calls the insert function.
  loadAndInsertData() {
    return this.http.get(this.DATA_URL, {responseType: 'text'})
      .pipe(
        map(data => parse<EarthquakeRow>(data, {header: true})),
        map(parsedData => this.insertData(parsedData))
      );
  }
The insertData function creates rows and calls the insertOrReplace function on the database object to insert all rows in one statement into the database.
  insertData(parsedData: ParseResult<EarthquakeRow>): Promise<Array<object>> {
    const rows = [];
    for (const parsedRow of parsedData.data) {

      if (!parsedRow.id) {
        continue;
      }

      const row = this.eqTbl.createRow({
        time: new Date(parsedRow.time),
        latitude: Number(parsedRow.latitude),
        longitude: Number(parsedRow.longitude),
        depth: Number(parsedRow.depth),
        mag: Number(parsedRow.mag),
        magType: parsedRow.magType,
        nst: Number(parsedRow.nst),
        gap: Number(parsedRow.gap),
        dmin: Number(parsedRow.dmin),
        rms: Number(parsedRow.rms),
        net: parsedRow.net,
        id: parsedRow.id,
        updated: new Date(parsedRow.updated),
        place: parsedRow.place,
        type: parsedRow.type,
        locationSource: parsedRow.locationSource,
        magSource: parsedRow.magSource,
        horizontalError: Number(parsedRow.horizontalError),
        depthError: Number(parsedRow.depthError),
        magError: Number(parsedRow.magError),
        magNst: Number(parsedRow.magNst),
        status: parsedRow.status
      });
      rows.push(row);
    }

    return this.earthquakeDb.insertOrReplace()
      .into(this.eqTbl)
      .values(rows).exec();

  }
The GUI of the app is built with these files:
HomePage: TypeScript / Template
DetailComponent: TypeScript / Template
FilterPopover: TypeScript / Template
The home page displays the list of selected earthquakes. Because a regular list built with ion-list and @for
was scrolling slowly with this massive amount of rows, I use the virtual list feature from the Angular CDK instead.
  <cdk-virtual-scroll-viewport itemSize="128" maxBufferPx="1350" minBufferPx="900">
    <ion-list>
      <ion-item *cdkVirtualFor="let earthquake of earthquakes">
        <ion-label>
          <app-detail [earthquake]="earthquake"></app-detail>
        </ion-label>
      </ion-item>
    </ion-list>
  </cdk-virtual-scroll-viewport>
This component does not render all items at once. Instead, it renders a small subset of the records to fill the viewport and then reuses the DOM elements when the user scrolls.
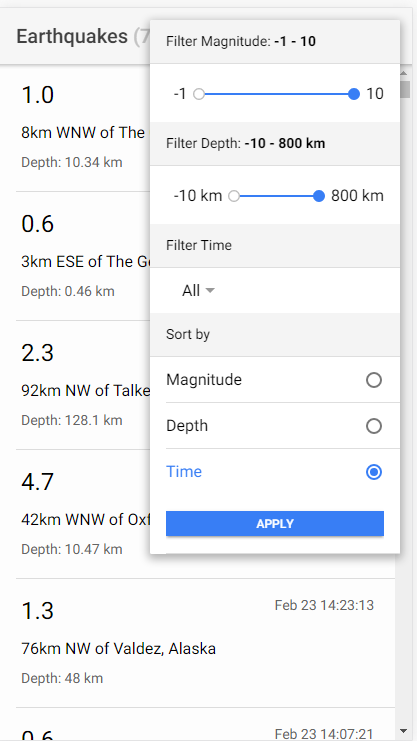
When the user taps on the three dots in the top right corner, the filter dialog is displayed as a popover.
  async presentPopover(event: any) {
    const popover = await this.popoverCtrl.create({
      component: FilterPopoverComponent,
      event,
      componentProps: {filter: this.filter}
    });
    await popover.present();

    popover.onDidDismiss().then(evt => {
      if (evt.data) {
        this.filter = evt.data;
        this.execSelectQuery();
      }
    });
  }
The FilterPopover is a form built with the template-driven approach. When the user taps on the Apply button, the popover is
dismissed, and the form values are sent back. The HomePage receives these values in the onDidDismiss function and calls the
execSelectQuery method, which calls select in the EarthquakeService and assigns the result to the earthquakes instance variable.
  execSelectQuery() {
    const start = performance.now();
    this.earthquakeService.select(this.filter).then(rows => {
      this.elapsedTime = performance.now() - start;
      this.earthquakes = rows;
    });
  }
The select method in the EarthquakeService class creates the select query and executes it.
  select(filter: Filter) {

    const query = this.earthquakeDb.select(this.eqTbl['id'], this.eqTbl['mag'], this.eqTbl['time'],
      this.eqTbl['place'], this.eqTbl['depth'])
      .from(this.eqTbl);

    switch (filter.sort) {
      case 'time':
        query.orderBy(this.eqTbl['time'], lf.Order.DESC);
        break;
      case 'mag':
        query.orderBy(this.eqTbl['mag'], lf.Order.DESC);
        break;
      case 'depth':
        query.orderBy(this.eqTbl['depth'], lf.Order.ASC);
        break;
    }

    const whereClauses = [];
    if (!(filter.mag.lower === -1 && filter.mag.upper === 10)) {
      whereClauses.push(this.eqTbl['mag'].gte(filter.mag.lower));
      whereClauses.push(this.eqTbl['mag'].lte(filter.mag.upper));
    }

    if (!(filter.depth.lower === -10 && filter.depth.upper === 800)) {
      whereClauses.push(this.eqTbl['depth'].gte(filter.depth.lower));
      whereClauses.push(this.eqTbl['depth'].lte(filter.depth.upper));
    }

    if (filter.time !== '-1') {
      const now = new Date();
      now.setHours(now.getHours() - parseInt(filter.time, 10));
      whereClauses.push(this.eqTbl['time'].gte(now));
    }

    if (whereClauses.length > 0) {
      query.where(lf.op.and(...whereClauses));
    }

    return query.exec();
  }
The application only displays a subset of the columns that are stored in the table. Therefore, the code specifies the columns it needs for the view. Then, the code specifies the orderBy statement according to the setting the user made on the filter page. Next, it builds the where clause. Because it is not possible to call query.where multiple times, the code pushes all the where statements to the whereClauses array and lastly combines them with the and operator and calls where.
query.where(lf.op.and(...whereClauses));
You can find the entire source code of the app on GitHub.