In this blog post, I will show you how to write a simple JavaScript application with PocketBase as the backend.
PocketBase is a lightweight, open-source backend solution that provides a real-time database, user authentication, and file storage. It is designed to be straightforward to use and can be integrated into various frontend frameworks. You can compare PocketBase with services like Firebase or Supabase, but it is self-hosted and can be run locally or on your own server.
Another main feature of PocketBase is that it can be used as a framework, which enables you to write your own custom app business logic in Go or JavaScript. Read more about this feature in the PocketBase documentation.
PocketBase provides a RESTful API, making it accessible from any programming language that can make HTTP requests. It also has a built-in admin dashboard for managing your data and users. The developers of PocketBase provide two official clients: one for JavaScript and one for Dart.
I split this blog post into two parts. In this first part, I will show you how to set up PocketBase and develop a simple JavaScript application with the PocketBase JS SDK. In the second part, I will show you how to deploy PocketBase to a server.
For this blog post, I created a simple todo application that demonstrates some features of PocketBase. It's a trivial todo application that allows users to register, log in, and manage their todos. The application is written with Ionic and Angular. Note that the PocketBase JS SDK can be used with any JavaScript framework or even vanilla JavaScript.
You can find the complete code for this example on GitHub.
Setting Up PocketBase 
Please keep in mind that PocketBase is still under active development and full backward compatibility is not guaranteed before reaching v1.0.0. PocketBase is NOT recommended for production-critical applications yet, unless you are fine with reading the changelog and applying some manual migration steps from time to time.
The example for this post is based on PocketBase v0.29.0. Expect changes in future versions, but the general concepts should remain the same.
To get started, open the release page of PocketBase on GitHub and download the latest version for your operating system. Extract the binary and store it in an arbitrary folder on your computer. Next, start the PocketBase server by running the binary.
# On Linux or macOS
./pocketbase serve

# On Windows
.\pocketbase.exe serve
The serve command starts the PocketBase server on http://127.0.0.1:8090. If the port is already in use, you can specify a different port with the --http flag:
# On Linux or macOS
./pocketbase serve --http=127.0.0.1:9999

# On Windows
.\pocketbase.exe serve --http=127.0.0.1:9999
When you start PocketBase for the first time, it creates two folders in the current directory: pb_data and pb_migrations.
The pb_data folder is where all your data will be stored. PocketBase stores the data in an embedded SQLite database. The pb_data folder should
be ignored by Git, so add it to your .gitignore file.
The pb_migrations folder is where PocketBase stores the migration files for your database schema. These files are created automatically when you make changes to your data models
in the admin dashboard and need to be applied to the database. This folder needs to be committed to your Git repository so that you can apply the migrations on your server later.
The next step is to open the admin dashboard in your browser. The admin dashboard is available at http://127.0.0.1:8090/_/. The first time you open the admin dashboard, you will be prompted to create an admin account. This account is used to manage your PocketBase instance and access the admin dashboard. Alternatively, you can set the admin account from the command line with this command:
./pocketbase superuser upsert EMAIL PASS
After you create the admin account, you will be redirected to the admin dashboard. Here you can manage the data models, users, and files. The dashboard also contains sections for managing the server settings and viewing the logs.
SMTP 
Certain features of PocketBase send emails to the users. This application uses the password reset feature, which requires an SMTP server to send emails.
By default, PocketBase sends emails with the sendmail command. You can configure PocketBase to use an SMTP server instead, in the dashboard under
Settings > Mail settings. For development, I set the SMTP server to localhost and port 2500 and then start Inbucket with docker compose.
services:
  inbucket:
    image: inbucket/inbucket:latest
    ports:
      - '2500:2500'
      - '9000:9000'
Inbucket is a simple SMTP server that accepts messages for any email address and makes them available to view via a web interface.
With this configuration, the web interface is available at http://localhost:9000.
Collections 
In PocketBase, data is organized into collections. A collection is a group of records that share the same structure. For example, you can create a collection for users, a collection for todos, and so on. Each collection has a set of fields that define the structure of the records. Collections are comparable to tables in a relational database, while records are rows, and fields are similar to columns in a table.
This example application stores the data in the todos collection. Here I will show you how to
create the collection using the admin dashboard. You can also manage collections using the PocketBase SDK or programmatically via the Go/JavaScript migrations.
Every change in the Dashboard is automatically saved to a migration JavaScript file in the pb_migrations folder. This allows us to easily apply the same changes to
a production server later. Make sure to commit the migration files to your Git repository. These files are part of the application code and should be versioned with your application.
PocketBase provides three different kinds of collections: Base, View, and Auth collections.
- Base collections are the most common type of collection. They store data and can be used to create, read, update, and delete records.
- View collections are read-only collections that are used to display data from other collections. They can be used to create custom views of your data.
- Auth collections are used to manage user authentication and authorization.
The first time you start PocketBase, it creates a default auth collection called users. The example todo application will leverage this collection to manage user accounts.
To create the todos collection, open the Collections tab in the admin dashboard and click on the "New collection" button.
Enter the name of the collection (todos) and select "Base" as the collection type. In the fields list, you see that PocketBase already
inserted three fields id, created, and updated. These fields are automatically managed by PocketBase.
Fields 
PocketBase supports a wide range of field types:
- Boolean: true/false
- Number: numeric values
- Text: text
- Email: email addresses
- URL: URLs
- Editor: HTML formatted text
- Date: date values
- Autodate: A field that automatically sets the current date and time when a record is created or updated. The two fields
createdandupdatedare of this type. - Select: For storing single or multiple string values from a predefined list.
- File: For managing record file(s). PocketBase stores in the database only the file name. The file itself is stored either on the local disk or in S3, depending on your application storage settings.
- Relation: For storing single or multiple collection record references.
- JSON: For storing any serialized JSON value, including null
- GeoPoint: For storing geographic coordinates (longitude, latitude) as a serialized JSON object. For example, {"lon":12.34,"lat":56.78}.
All collection fields (except the JSONField) are non-nullable and use a zero-default for their respective type as a fallback value when missing (empty string for text, 0 for number, etc.).
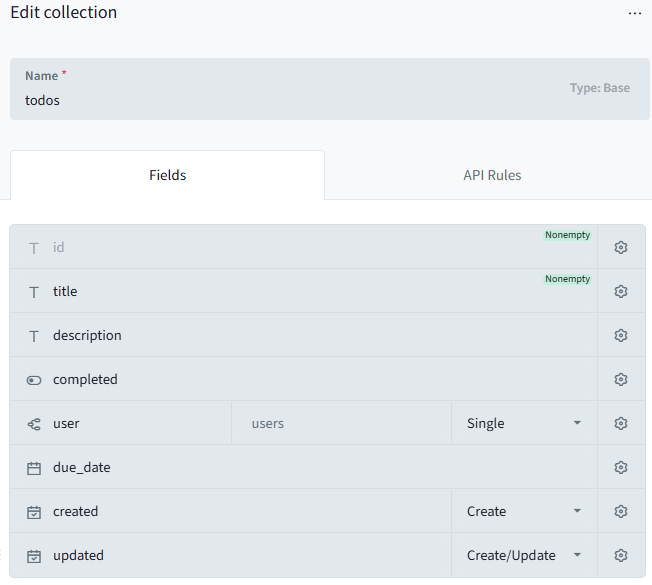
The todo application requires the following fields:
title: text, nonemptydescription: textcompleted: booleandue_date: dateuser: relation to theuserscollection (single relation)
On the dashboard, this looks like this:
API Rules 
Now follows a crucial step. We need to set the API rules for the todos collection.
API Rules control access to the collection and define filters for the data.
Without any rules, the collection can be accessed by anyone. Every user would see every other user's todos and could create, update, or delete any todo entry.
To prevent this, we set the following rules in the API Rules tab of the todos collection.
Each collection has five rules corresponding to the specific API action:
- listRule:
@request.auth.id != "" && user = @request.auth.id - viewRule:
@request.auth.id != "" && user = @request.auth.id - createRule:
@request.auth.id != "" && @request.body.user = @request.auth.id - updateRule:
@request.auth.id != "" && user = @request.auth.id - deleteRule:
@request.auth.id != "" && user = @request.auth.id
These rules ensure that only authenticated users can access the todos collection and that each user can only see and manage their own todos. The @request.auth.id variable contains the ID of the authenticated user, while @request.body.user contains the user ID from the request body when creating a new todo.
On the dashboard, this looks like this:

For more detailed information about the API rules, check out the PocketBase documentation. It's important to understand how the rules work, as they are crucial for securing your application and ensuring that users can only access their own data.
Everything is set up on the PocketBase side. Let's now move on to the client side.
Client development with PocketBase JS SDK 
The PocketBase JS SDK is a JavaScript library that provides an easy way to interact with the PocketBase API. It allows you to perform CRUD operations on collections, manage users, and handle file uploads. With npm, you add the PocketBase JS SDK to your project with the following command:
npm install pocketbase
In this Ionic/Angular example, I created a new field in the environment object to store the PocketBase URL. This makes it easy to switch between development and production environments.
export const environment = {
  production: false,
  pocketbaseUrl: 'http://127.0.0.1:8090'
};
In the following article, I will not cover the entire application; instead, I will focus on the parts that interact with the PocketBase API. The complete code can be found on GitHub.
All the PocketBase interactions are encapsulated in the PocketbaseService.
This service instantiates the PocketBase client with the URL from the environment object.
private pb = new PocketBase(environment.pocketbaseUrl);
Every request to PocketBase uses this client instance. For a complete overview of all the methods this client provides, check out the Web APIs reference.
User registration 
Before a user can log in, they need to create an account.
They enter their email, password, and name in a registration form.
The application stores this data in a RegisterRequest object.
export interface RegisterRequest {
  email: string;
  password: string;
  passwordConfirm: string;
  name?: string;
}
The application then sends this object to the PocketBase server using the create method of the users collection.
This creates a new record in the users collection with the provided data. Note that the fields email, password, and name correspond to
the field names in the users collection. passwordConfirm is only used for client-side validation.
const user = await this.pb.collection('users').create(userData);
The create method returns the created user record.
Authentication 
PocketBase supports authentication via email and password, one-time passwords (OTP), and OAuth2 providers like Google, GitHub, etc. This example only uses email and password authentication.
      const authData = await this.pb
        .collection('users')
        .authWithPassword(credentials.email, credentials.password);
The authWithPassword method sends the email and password to the PocketBase server and returns an object containing the authenticated user record and an authentication token.
export interface AuthData {
  token: string;
  record: User;
}
You don't have to store the return value in your application, as the PocketBase client automatically manages the authentication state.
You can access the authenticated user record at any time with the authStore property of the PocketBase client:
const user = this.pb.authStore.record;
This user record contains the user ID, email, name, and other fields defined in the users collection.
You can also check if a user is authenticated with the isValid property of the authStore:
const isAuthenticated = this.pb.authStore.isValid;
You can log out the user with the clear method of the authStore:
this.pb.authStore.clear();
For more information about the authentication support in PocketBase, check out the PocketBase documentation.
Password reset 
If a user forgets their password, they can request a password reset. The user enters their email address in a form, and the application sends a password reset request to the PocketBase server.
await this.pb.collection('users').requestPasswordReset(email);
This method sends a password-reset email to the user with a link to reset their password. The user can then click the link and enter a new password.
Todo list 
Accessing the todos collection is straightforward. Similar to accessing the users collection, the application calls the collection
method of the PocketBase client to get a reference to the todos collection and then calls the getFullList method to retrieve all todos.
Because we set the list API rule, this method only returns the todos of the authenticated user.
In this application, the user can choose to show all or only the incomplete todos.
This can be done by passing a filter to the getFullList method.
You can also specify a sort order with the sort option. In this example, todos are sorted by the created
field in descending order.
  async getTodos(hideCompleted: boolean): Promise<Todo[]> {
    try {
      let filter = undefined;
      if (hideCompleted) {
        filter = `completed = false`;
      }
      const result = await this.pb.collection('todos').getFullList({
        sort: '-created',
        filter: filter
      });
      return result as unknown as Todo[];
    } catch (error) {
      throw this.handleError(error);
    }
  }
Create todo 
To create a new todo, the user fills out a form with the title, description, and due date. The application then calls the create method of the todos collection to create a new todo record.
      const data = {
        ...todoData,
        user: this.currentUser()?.id
      };
      const todo = await this.pb.collection('todos').create(data);
Important here is that the code sets the user field to the ID of the authenticated user.
The create API rule we created earlier checks that the user ID in the request body matches the authenticated user ID.
Update todo 
To edit an existing todo entry, the user can select a todo from the list and fill out a form with the new data.
To populate the form, the application retrieves the todo record from the PocketBase server using the getOne method of the todos collection.
This method expects the ID of the record as an argument.
const todo = await this.pb.collection('todos').getOne(todoId);
The application then updates the todo record with the new data using the update method of the todos collection.
The first argument is the ID of the record to update, and the second argument is an object containing the new data.
const todo = await this.pb.collection('todos').update(todoId, data);
Delete todo 
To delete a todo entry, the application calls the delete method of the todos collection with the ID of the record to delete.
await this.pb.collection('todos').delete(todoId);
Real-time database 
This demo application does not use one of the big features of PocketBase: real-time notifications.
This feature allows an application to receive collection updates from the PocketBase server in real-time.
Calling the subscribe method and passing a callback function allows the application to receive updates when a record is created, updated, or deleted in a collection.
The method expects a topic as the first argument. If the topic is the wildcard "*", then this method will subscribe to any record changes in the collection.
If the topic is a record id, then this method will subscribe only to changes of the specified record id.
For example, an application can subscribe to the todos collection and receive updates when a todo is created, updated, or deleted:
this.pb.collection('todos').subscribe('*', (e) => {
  console.log('Todo event:', e);
});
When a program subscribes to a single record, the collection's ViewRule determines whether the subscriber has access to receive the event message. When the application subscribes to an entire collection with "*", the ListRule determines access.
To stop receiving updates, you call the unsubscribe method with the same topic name. If the topic name is not set, this method will unsubscribe all subscriptions associated with the current collection.
this.pb.collection('todos').unsubscribe('*');
The real-time feature allows you to build applications like chat applications, collaborative editing, or live dashboards.
File Uploading 
Another feature not used in this example is file uploading and storage. PocketBase allows you to upload files and associate them with records in a collection.
The PocketBase JS SDK supports file uploads by either providing a FormData instance or a plain object with File or Blob property values.
Using a plain object as a body
const data = {
  'title':    'lorem ipsum...',
  'document': new Blob(...),
};

await pb.collection('example').create(data);
Using FormData as body:
const data = new FormData();
data.set('title', 'lorem ipsum...')
data.set('document', new File(...))

await pb.collection('example').create(data);
By default, PocketBase stores uploaded files in the pb_data/storage directory on the local file system.
This is the fastest and easiest way to store files. If you have limited disk space, you can configure PocketBase to use an
external S3-compatible storage service. You configure this in the Dashboard > Settings > Files storage dialog in the admin dashboard.
You can find more information about file uploading here.
Other methods 
The PocketBase JS SDK also provides methods for accessing server settings, viewing serverlogs, listing and running cron jobs, backup management, and health checks.
These functions are available from the PocketBase admin dashboard. Accessing them via the SDK is useful if you want to integrate them into your application or automate certain tasks.
Conclusion 
In this blog post, I showed you how to set up PocketBase and develop a simple JavaScript application with the PocketBase JS SDK. PocketBase makes it easy to manage data, users, and files from a frontend application without writing a single line of server-side code.
Check out part two of this blog post, where I will show you how to deploy PocketBase to a server and make your application available to the public.