In this blog post, I will show you how to access OpenAI GPT-4o on Microsoft Azure and Stable Diffusion on AWS Bedrock using Go.
Azure OpenAI provides access to OpenAI's LLMs, such as GPT-4o, through Microsoft's cloud platform, Azure. This integration allows developers to leverage OpenAI's capabilities while benefiting from Azure's scalability, security, and integration with other Azure services.
AWS Bedrock is a fully managed service on Amazon Web Services (AWS) that allows you to call LLMs. On AWS Bedrock, you can find models from Amazon and other AI companies, such as Anthropic, Stability AI, Meta, and others. You can also upload models to AWS Bedrock and run them on the platform.
Pre-requisites 
This article does not cover deploying the models on Azure and AWS. It assumes that everything is already set up, and you have the necessary credentials for both cloud platforms.
For Azure OpenAI, we need the API key and endpoint address.
We need an access key and a secret key for AWS Bedrock. The user must have the bedrock:InvokeModel permission to call models on Bedrock.
For the following demo application, I store all this information in an app.env file that the application reads at startup. The file looks like this:
azureOpenAIKey=67....
azureOpenAIEndpoint=https://test.openai.azure.com/
awsBedrockUserAccessKey=AK....
awsBedrockUserSecretKey=vk....
It is crucial to keep this file secure and not commit it to a public repository.
Demo application 
The demo application consists of a mobile web application written with Ionic/Angular where the user can take a picture with the camera. The client then sends the image to the backend, where it is sent to GPT-4o on Azure to generate a text description of the image. The application next sends the image description to Stable Diffusion hosted on AWS Bedrock. The model generates an image based on the text description. The generated image is then returned to the web application and displayed to the user.
The web application is written in Ionic/Angular and uses the Capacitor Camera plugin to take a picture with the camera. I will not cover the code for the web application in this article, but you can find the complete code in this GitHub repository: https://github.com/ralscha/blog2022/tree/master/pix2sketch
The backend is written in Go and uses the Azure and AWS SDKs to call the models. The backend is a simple HTTP server that receives the image, calls the model on Azure, calls the model on AWS, and returns the generated image to the client. The Azure SDK uses the official Go SDK from OpenAI under the hood.
To install the necessary dependencies, run:
go get github.com/Azure/azure-sdk-for-go/sdk/ai/azopenai
go get github.com/openai/openai-go
go get github.com/aws/aws-sdk-go-v2/service/bedrockruntime
go get github.com/aws/aws-sdk-go-v2/credentials
go get github.com/aws/aws-sdk-go-v2/config
Image to text with GPT-4o 
GPT-4o is a multimodal model that can process both text and images. We use it here to generate a text description of an image.
The Azure OpenAI SDK provides a simple API to call the model.
First, the application creates a client for the Azure OpenAI service. For this, it needs the Azure OpenAI key and the Azure OpenAI endpoint.
  client := openai.NewClient(
    azure.WithEndpoint(cfg.AzureOpenAIEndpoint, "2024-10-21"),
    azure.WithAPIKey(cfg.AzureOpenAIKey),
  )
Next, we take a look at the handler for the image upload. The web application sends the image as binary data in the request body. The handler reads the body into a byte buffer.
func (app *application) sketch(w http.ResponseWriter, r *http.Request) {
  imageData := new(bytes.Buffer)
  _, err := imageData.ReadFrom(r.Body)
  if err != nil {
    app.serverError(w, r, err)
    return
  }
The next part of the application sends the request to the hosted LLM. It converts the image data to a
base64 encoded string and creates a user message consisting of a text message with the prompt and an image message with the base64 encoded image.
The 'Model' field must be set to the deployment name on Azure.
I usually name the deployment after the model. In this case, the deployment name is "gpt-4o".
The config parameter N specifies the number of completions to generate. We also set MaxTokens
to 4096, which is the maximum number of output tokens the model can generate.
  base64Image := base64.StdEncoding.EncodeToString(imageData.Bytes())
  imageUrl := "data:image/png;base64," + base64Image

  resp, err := app.azureOpenAIClient.Chat.Completions.New(r.Context(), openai.ChatCompletionNewParams{
    Model: "gpt-4o",
    Messages: []openai.ChatCompletionMessageParamUnion{
      {
        OfUser: &openai.ChatCompletionUserMessageParam{
          Content: openai.ChatCompletionUserMessageParamContentUnion{
            OfArrayOfContentParts: []openai.ChatCompletionContentPartUnionParam{
              {
                OfText: &openai.ChatCompletionContentPartTextParam{
                  Text: "What's in this image? Return a detailed description:",
                },
              },
              {
                OfImageURL: &openai.ChatCompletionContentPartImageParam{
                  ImageURL: openai.ChatCompletionContentPartImageImageURLParam{
                    URL: imageUrl,
                  },
                },
              },
            },
          },
        },
      },
    },
    MaxTokens:   openai.Int(4096),
    N:           openai.Int(1),
    Temperature: openai.Float(0.0),
  })
The response can be extracted from the response object. The response contains a list of choices, and we take the first one.
imageDescription := resp.Choices[0].Message.Content
Text to image with Stable Diffusion 
Stable Diffusion is a model from Stability AI that can generate images from text descriptions. Version 3 of the models has been available on AWS Bedrock since September 2024. You can find more information in the announcement blog post.
For this application, I selected the Stable Diffusion 3 Large model, which is the mid-sized model in the version 3 series.
To call models on AWS Bedrock, the application first creates a bedrock runtime client. When writing this blog post, the
Stable Diffusion v3 models are only available in the us-west-2 region. AWS deploys the models in different regions over time,
usually starting in one of the us regions.
  awsRegion := "us-west-2"

  // only when application runs outside AWS
  staticCredentials := aws.NewCredentialsCache(aws.NewCredentialsCache(credentials.NewStaticCredentialsProvider(app.config.AwsBedrockUserAccessKey, app.config.AwsBedrockUserSecretKey, "")))
  sdkConfig, err := config.LoadDefaultConfig(r.Context(), config.WithRegion(awsRegion),
    config.WithCredentialsProvider(staticCredentials))

  // use this config if application runs in AWS. For example: Lambda, EC2, ECS, ...
  // sdkConfig, err := config.LoadDefaultConfig(r.Context(), config.WithRegion(awsRegion))

  if err != nil {
    app.serverError(w, r, err)
    return
  }

  client := bedrockruntime.NewFromConfig(sdkConfig)
Note that this application runs outside AWS. Therefore, it uses the configuration with an access key and a secret key. Do not configure the client this way when the application runs inside AWS. In that case, you give the bedrock:InvokeModel permission to the container where the application runs (e.g., Lambda, ECS, EC2, ...) and configure the bedrock runtime client with the commented-out code in the above snippet.
The next step is to prepare the request for the model. The request consists of a prompt, the mode, the aspect ratio, and the output format. Each model on AWS Bedrock expects a different set of parameters. You can find more information in the documentation
  modelId := "stability.sd3-large-v1:0"

  requestImageDescription := "Create a high quality drawing based on the following description:\n\n" + imageDescription

  nativeRequest := map[string]any{
    "prompt":        requestImageDescription,
    "mode":          "text-to-image",
    "aspect_ratio":  "1:1",
    "output_format": "jpeg",
  }

  body, err := json.Marshal(nativeRequest)
  if err != nil {
    app.serverError(w, r, err)
    return
  }
In this demo application, we take the image description from GPT-4o and add an instruction to create a drawing. The aspect ratio is set to 1:1, and the output format is jpeg.
Next, the application calls the model using the InvokeModel method.
  response, err := client.InvokeModel(r.Context(), &bedrockruntime.InvokeModelInput{
    ModelId:     aws.String(modelId),
    ContentType: aws.String("application/json"),
    Accept:      aws.String("application/json"),
    Body:        body,
  })

  if response == nil {
    app.serverError(w, r, err)
    return
  }

  modelResponse := map[string]any{}
  err = json.Unmarshal(response.Body, &modelResponse)
The response from the model is a JSON object with the generated image as a base64 encoded string.
  modelResponse := map[string]any{}
  err = json.Unmarshal(response.Body, &modelResponse)
  if err != nil {
    app.serverError(w, r, err)
    return
  }

  images := modelResponse["images"].([]any)
  if len(images) == 0 {
    app.serverError(w, r, err)
    return
  }

  imageBase64 := images[0].(string)
Finally, the application sends the generated image back to the web application as a JSON response.
  sketchResponse := SketchResponse{
    Description: imageDescription,
    ImageBase64: imageBase64,
  }

  err = JSON(w, http.StatusOK, sketchResponse)
  if err != nil {
    app.serverError(w, r, err)
  }
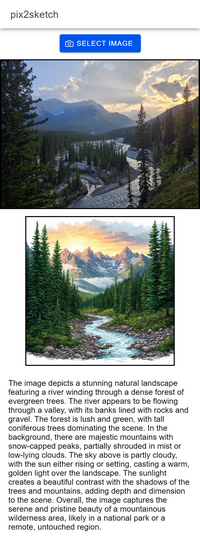
Here is a screenshot of the web application. The application shows the original image taken with the camera, the image generated by Stable Diffusion, and the text description generated by GPT-4o.
This concludes the walkthrough of the demo application. We have seen how to call models hosted on Azure and AWS from a Go application. Thanks to the SDKs provided by Azure and AWS, the integration is straightforward to implement.
The complete code for the application is available in this GitHub repository:
https://github.com/ralscha/blog2022/tree/master/pix2sketch