A CAPTCHA (Completely Automated Public Turing Test To Tell Computers and Humans Apart) is a way to determine whether a user of a website is a human or not. I'm sure everyone has encountered these tests on the web, where you have to type text or select pictures. The goal is to prevent bots from spamming a website. For example, to prevent bots from automatically adding comments to a blog or registering thousands of accounts.
Perhaps the most commonly used CAPTCHA library is reCAPTCHA from Google. However, there are alternatives if you are not keen on sending data to Google. In this blog, we will look at one of the alternatives: hCaptcha
Another reason to consider this library is the announcement a month ago from Cloudflare. They switched from reCAPTCHA to hCaptcha.
Registration 
Before you can use hCaptcha in your project, you have to create an account. Open the Sign-Up page of hCaptcha and enter the required information.
The service is free, according to the Plans section on the hCaptcha homepage. However, there is an enterprise plan for customers that need more control.
When you create the hCaptcha account, you initially get two keys: a site key and a secret key. The site key will be part of your web application and is therefore public. You can create multiple site keys, one for each of your websites. When you create a site key, you can specify the difficulty level of the CAPTCHA.
The secret key, on the other hand, is, as the name suggests, secret, and you should not make this key publicly available, for example, by committing it into a public Git repository.
Overview 
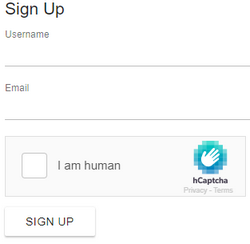
The demo application presents the following dialog to the user. The user starts the CAPTCHA process by clicking on the I am human checkbox.
From there, the CAPTCHA process comprises these steps:
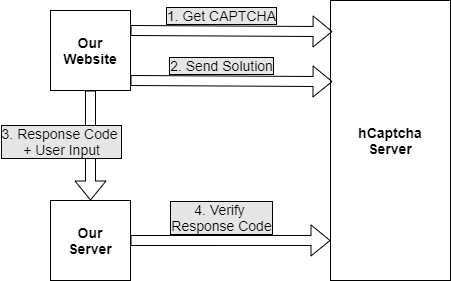
- Web application requests CAPTCHA from the hCaptcha server and displays it.
- User solves CAPTCHA. Application sends the solution to hCaptcha for verification. If the solution is correct, the hCaptcha server sends back a response code.
- Web application sends the response code together with user inputs to our server.
- Server sends the response code to hCaptcha for verification.
Server 
The example I present in this blog post is a trivial sign-up page with two input fields: username and email. We start with the server implementation, which in this demo application is a Spring Boot application. You can use any server-side technology; all you need is a way to send HTTP requests from your server and a JSON parser.
When the server sends the response code to hCaptcha, it also needs to send the secret key. In this application, I externalized the configuration of the secret key, so I don't need to hardcode the key into the application.
With the @Value annotation, you can inject application properties into a Spring application.
  @Value("${hCaptcha.secret.key}")
  private String hCaptchaSecretKey;
With this, you can start the server and pass a command-line argument (--hCaptcha.secret.key=0xA0...). Or
you can add hCaptcha.secret.key=0xA0.... to a properties file.
The application then creates a Java 11 HTTP client and a Jackson ObjectMapper instance for parsing the response.
  private final ObjectMapper om = new ObjectMapper();

  Application() {
    this.httpClient = HttpClient.newBuilder().connectTimeout(Duration.ofSeconds(5))
        .build();
  }
The POST endpoint that receives the sign-up request extracts the username, email, and the hCaptcha response
code sent from our web application. To verify a CAPTCHA response, you need to send a POST request to https://hcaptcha.com/siteverify and pass the parameters response, the CAPTCHA response code from the client, and secret, the secret key.
  @PostMapping("/signup")
  public boolean signup(@RequestParam(name = "username", required = true) String username,
      @RequestParam(name = "email", required = true) String email,
      @RequestParam("h-captcha-response") String captchaResponse)
      throws IOException, InterruptedException {
    if (StringUtils.hasText(captchaResponse)) {

      var sb = new StringBuilder();
      sb.append("response=");
      sb.append(captchaResponse);
      sb.append("&secret=");
      sb.append(this.hCaptchaSecretKey);

      HttpRequest request = HttpRequest.newBuilder()
          .uri(URI.create("https://hcaptcha.com/siteverify"))
          .header("Content-Type", "application/x-www-form-urlencoded")
          .timeout(Duration.ofSeconds(10)).POST(BodyPublishers.ofString(sb.toString()))
          .build();

      HttpResponse<String> response = this.httpClient.send(request,
          BodyHandlers.ofString());

      System.out.println("http response status: " + response.statusCode());
      System.out.println("body: " + response.body());
If everything is okay and the user solved the CAPTCHA correctly, your server gets back this response:
{
  "success":true,
  "challenge_ts":"2020-05-01T06:54:32",
  "hostname":"test.mydomain.com"
}
hCaptcha sends back a response like this if something went wrong:
{
  "success":false,
  "error-codes":["missing-input-secret"]
}
"error-codes" is an array of strings which contains one or multiple codes:
"missing-input-secret": Thesecretparameter is missing."invalid-input-secret": Thesecretparameter is invalid or malformed."missing-input-response": Theresponseparameter is missing."invalid-input-response": Theresponseparameter is invalid or malformed."bad-request": The request is invalid or malformed."invalid-or-already-seen-response": The response parameter has already been checked or has another issue."sitekey-secret-mismatch": The site key is not registered with the provided secret.
The following two web applications use the same server.
Plain JavaScript / HTML 
In a plain JavaScript/HTML project, you have to add two lines of code to enable hCaptcha.
First, import the hCaptcha JavaScript library:
<script src="https://hcaptcha.com/1/api.js" async defer></script>
Secondly, add an empty element to the body of your page. This can be any element; in this example, it's a <div>. Importantly, this element must have a class of h-captcha and a data-sitekey attribute set to the site key.
<div class="h-captcha" data-sitekey="3f7f821f-05b7-486b-a3d9-21395609a73e"></div>
After the user successfully solves the CAPTCHA, a hidden input with the name "h-captcha-response" is added to the form.
The demo application sends the user input and response code with the following JavaScript code to the server:
    async function submitForm() {
      const signUpForm = document.getElementById('signUpForm');
      const formData = new FormData(signUpForm);

      // Workaround, hCaptcha adds two keys with same value
      formData.delete('g-recaptcha-response');

      const response = await fetch('/signup', {
        method: 'POST',
        body: formData
      });

      const ok = await response.json();
      if (ok) {
        window.location.href = "ok.html";
      } else {
        console.log('something went wrong');
        window.location.href = "index.html";
      }

    }
In my tests, the hCaptcha library added two hidden input elements to the form with the same value ("h-captcha-response" and "g-recaptcha-response"). I assume this is to make migration from reCAPTCHA easier, so these projects don't have to change the server code.
When you test this on your local computer, you have to keep two things in mind. Serving the site from file:// does not work; you have to serve the website from an HTTP server. Also, http://localhost and http://127.0.0.1 are not supported by the hCaptcha CORS settings. An easy solution for this problem is to add an entry to your hosts file.
127.0.0.1 test.mydomain.com
/etc/hostson Linux/private/etc/hostson macOSC:\Windows\System32\Drivers\etc\hostson Windows
With this entry in place, you can access the local HTTP server with http://test.mydomain.com, and hCaptcha should work.
Angular 
hCaptcha provides integration libraries for popular frameworks like Angular, Node, Express, ReactJS, and Vue.js. In this section, we will look at the Angular integration.
This client is a simple Ionic / Angular application. It displays the same user interface that we saw in the previous section: a sign-up page with two input fields, username and email, and the CAPTCHA.
First, we have to install the library:
npm install ng-hcaptcha
Then, import the hCaptcha module into the Angular application and specify the public site key. Here, I added the site key to the environments file and imported it into the module.
    importProvidersFrom(NgHcaptchaModule.forRoot({
      siteKey: environment.SITE_KEY
    })),
And lastly, add the <ng-hcaptcha> component to your template.
<ng-hcaptcha name="captcha" ngModel></ng-hcaptcha>
After the user solves the CAPTCHA correctly, the library sets the hCaptcha response code to the value of the form field captcha.
Like in the example before, our application extracts the user inputs and response code from the form and sends them to the server for verification.
  submit(form: NgForm): void {
    const formData = new FormData();
    formData.append('email', form.value.email);
    formData.append('username', form.value.username);
    formData.append('h-captcha-response', form.value.captcha);

    this.httpClient.post<boolean>('/signup', formData).subscribe(
      ok => {
        if (ok) {
          this.toastController.create({
            message: 'Sign up successful.',
            duration: 4000
          }).then(toast => toast.present());
        } else {
          this.toastController.create({
            message: 'Something went wrong.',
            duration: 4000
          }).then(toast => toast.present());
        }
      }
    );
  }
For more information, check out the project site of ng-hcaptcha
That concludes this tutorial about integrating hCaptcha into web applications. Visit the homepage of hCaptcha to learn more about this project. If you are more interested in reCAPTCHA from Google, check out their home page.