In my previous blog post, I showed you how to build a simple chat application with Cettia. In this blog post, I show you how to modify this base chat application to create a chat app that automatically translates messages between users using the Google Cloud Translation API.
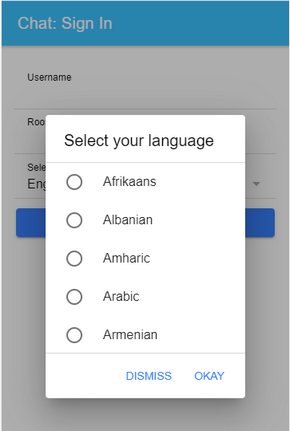
Here's how the application looks. When a user signs in, they enter not only their username and room but also their language.
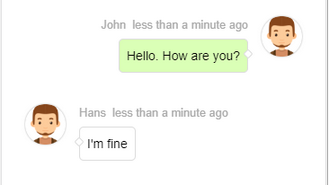
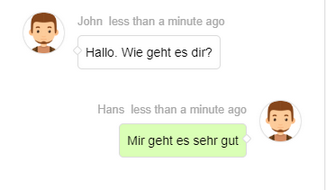
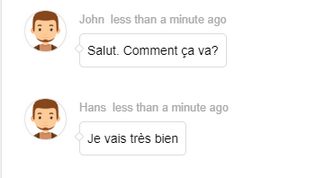
When a user writes and sends a message, the chat application translates this text into the language of each other user in the room. So each user in a chat room sees the messages in their language. Here's an example between an English, German, and French user.
In the following sections, I show you the code for this application. I already covered how the base application works in my last post. In this post, I walk you through the differences from the base chat application to make the translation feature work.
Application 
You can find the complete source code for the server (Java) and client (JavaScript) in this GitHub repository: https://github.com/ralscha/blog2020/tree/master/babelfishchat
First, you need a service account JSON file from Google. See the Quickstart guide on how to get this file.
When you have the service account file, change the path in server/src/main/resources/application.properties before you run
the application.
To run the application locally on your computer, you first need to install Java, Node.js, and the Ionic CLI.
Start the server with the following command:
cd server
./mvnw spring-boot:run
And the client with these commands:
cd client
npm install
ionic serve
Google Cloud Translation 
Cloud Translation is a service provided by Google. The service provides a basic and advanced translation service. Both services are not free. Currently (April 2020), you have to pay $20 per million characters, including whitespace characters. The price is prorated. If you translate 75,000 characters within a month, you pay $1.50.
Fortunately, you get $10 worth of free usage each month, which means you can translate up to 500,000 characters for free each month. See the pricing page for more and up-to-date pricing information.
To use the service, you need to open a Google account. Then you have to create a project, enable the Cloud Translation API, create a service account, and download the service account JSON file. The Quickstart guide will point you in the right direction.
Client 
Compared to the base application from my previous blog post, I added a dropdown to the sign-in page where the user can select their language.
This is just a hardcoded array with the name and code of the languages.
  supportedLanguages = [
    {language: 'af', name: 'Afrikaans'}, {language: 'sq', name: 'Albanian'}, {language: 'am', name: 'Amharic'},
In the HTML template, I use an <ion-select> to display the dropdown.
This is just a quick and dirty way because each time Google Cloud Translation adds or removes a language, you have to update this
array manually. The Translation API provides the listSupportedLanguages() method to fetch all supported languages directly from Google.
Visit the documentation page to learn more about this method.
So a better way would be to write an endpoint in your server application that fetches the languages from the API and sends them
to your front-end application.
The second change I had to make in the client application is to send the language the user selected in the join message to the server.
Together with the username and room, the signin method now also sends the language over the Cettia channel to the server.
  signin(username: string, room: string, language: string): Promise<boolean> {
    return new Promise<boolean>(resolve => {
      this.socket.send('join', {username, room, language}, (ok: boolean) => {
        if (ok) {
          this.room = room;
          this.username = username;
        }
        resolve(ok);
      });
    });
  }
That's everything I had to change in the client application. Most of the work is done on the server, and that's where I had to add and change a bit more code.
Server 
The Cloud Translation API provides an HTTP REST endpoint, but a better way to access the API is by using one of the provided client libraries. Google provides libraries for C#, Go, Node.js, Java, PHP, Python, and Ruby. See the documentation for more information.
For this Java application, I added the following library to the pom.xml.
    <dependency>
      <groupId>com.google.cloud</groupId>
      <artifactId>google-cloud-translate</artifactId>
      <version>2.70.0</version>
    </dependency>
    <dependency>
      <groupId>com.google.auth</groupId>
      <artifactId>google-auth-library-credentials</artifactId>
      <version>1.37.1</version>
    </dependency>
Then I created a service bean that handles the translation and calls the Google Cloud Translation API. The service is only free up to a certain number of characters, so this implementation uses a Caffeine cache to cache translated texts with the language pair (source, target language) to prevent sending the same translation request multiple times.
public class TranslateService {

  private final AppConfig appConfig;

  private final Translate translate;

  private final LongAdder noOfTranslatedCharacters;

  private MessageDigest messageDigest;

  private final Cache<String, String> translatedTexts = Caffeine.newBuilder()
      .expireAfterWrite(7, TimeUnit.DAYS).maximumSize(100_000).build();

  public TranslateService(AppConfig appConfig) throws IOException {

    try {
      this.messageDigest = MessageDigest.getInstance("MD5");
    }
    catch (NoSuchAlgorithmException e) {
      e.printStackTrace();
    }

    this.appConfig = appConfig;

    if (appConfig.getCredentialsPath() != null) {
      try (InputStream is = Files
          .newInputStream(Paths.get(appConfig.getCredentialsPath()))) {
        ServiceAccountCredentials credentials = ServiceAccountCredentials.fromStream(is);

        this.translate = TranslateOptions.newBuilder().setCredentials(credentials).build()
            .getService();
      }
    }
    else {
      this.translate = null;
    }

    this.noOfTranslatedCharacters = new LongAdder();
  }
The following method handles the translation. It accepts the text, the source, and
the target language as parameters. It first checks the cache to see if this text is already translated
for this language pair. If not, it sends a request to Google Cloud Translate (this.translate.translate(...))
and returns the response.
  public String translate(String text, String sourceLanguage, String targetLanguage) {
    if (text == null || sourceLanguage == null || targetLanguage == null
        || sourceLanguage.equals(targetLanguage)) {
      return text;
    }

    byte[] thedigest = this.messageDigest.digest(text.getBytes(StandardCharsets.UTF_8));
    String key = sourceLanguage + "-" + targetLanguage + "-"
        + Base64.getEncoder().encodeToString(thedigest);

    return this.translatedTexts.get(key, k -> {
      this.noOfTranslatedCharacters.add(text.length());
      if (this.translate != null && this.noOfTranslatedCharacters.sum() < this.appConfig
          .getLimitTranslationCharacters()) {
        Translation translation = this.translate.translate(text,
            TranslateOption.sourceLanguage(sourceLanguage),
            TranslateOption.targetLanguage(targetLanguage),
            TranslateOption.format("text"));

        return translation.getTranslatedText();
      }
      return text;
    });
  }
For demo purposes, this implementation counts the number of characters to prevent sending too many requests to the API. After a certain number of characters, configurable in
server/src/main/resources/application.properties, it stops sending requests to Google Cloud Translate.
With the translation process encapsulated in a separate service class, there are only two changes I had to make in the message handlers.
First, in the join message handler, I added code that extracts the language from the payload and adds it as an attribute to the socket, like the username and room. The application uses this attribute later when it translates messages.
      socket.set("room", room);
      socket.set("language", language);

      this.roomUsers.computeIfAbsent(room, k -> ConcurrentHashMap.newKeySet())
          .add(username);
The second change concerns the message handler. This handler is called whenever a user sends a message.
The handler extracts the language from the socket attribute "language". This is the language of the
writer of this message.
Then the handler uses find(), like in the base application, to find all users of this chat room, excluding the writer of
the message. The main difference here is that the application calls the execute() method instead of the send() method on the find result object. The difference is that send() sends a message to all selected clients, whereas execute() takes
a function as a parameter and calls this function for each client (socket) that matches the predicates in find().
In this chat application, we can't simply forward the message from the writer to all other users; the application has to translate the
message for each room participant individually. Inside the execute() method, the code has access to the socket of the
other clients. The code extracts the language from the socket attribute "language". This is the language of the recipient of the message (target).
The call to the translationService().translate() method translates the text from the source into the target language.
  private Action<Map<String, Object>> handleChatMessage(Server server,
      ServerSocket socket) {
    return message -> {
      String username = socket.get("username");
      String room = socket.get("room");
      String sourceLang = (String) socket.get("language");

      String msg = (String) message.get("msg");
      int ts = (int) message.get("ts");

      server.find(ServerSocketPredicates.attr("room", room)
          .and(ServerSocketPredicates.id(socket).negate())).execute(skt -> {
            String targetLang = (String) skt.get("language");
            String translatedMsg = translationService().translate(msg, sourceLang,
                targetLang);
            skt.send("message", Map.of("user", username, "msg", translatedMsg, "ts", ts));
          });
    };
  }
These are all the changes I had to apply on the server to make this chat application work. Note that this is a highly insecure implementation of a chat application. Not only does the server see all the messages in plain text, but also Google. Don't use this application for sending any classified information.
That concludes the tutorial about creating a translation chat application with Cettia and the Google Cloud Translation API. If you want to learn more about Cettia, check out the official documentation and my blog post. Check out the documentation page of Google Cloud Translation if you want to learn more about this service from Google.