In this blog post, I show you how to build a simple chat application with a JavaScript front-end and a Java backend. The example leverages the Cettia library to open a bidirectional message channel between client and server. The chat application I present here is very basic, and you can only send text messages, but it supports multiple chat rooms with multiple users.
Cettia is a real-time web framework that you can use to exchange messages between a server and a web client. It provides a Java library for the server and a JavaScript library for integration into your web application. Under the hood, Cettia uses WebSocket, and it falls back to EventSource and Long Polling if WebSocket connections don't work. You, as the developer, don't have to worry about the underlying transport mechanism. You can send and receive messages over the Cettia socket abstraction. Cettia handles communication with the underlying transport protocol. It also tries to reconnect when the underlying connection breaks.
Application 
You can find the complete source code for the server (Java) and client (JavaScript) in this GitHub repository: https://github.com/ralscha/blog2020/tree/master/chat
To run the application locally on your computer, you first need to install Java, Node.js, and the Ionic CLI.
Start the server with the following command:
cd server
./mvnw spring-boot:run
And the client with these commands:
cd client
npm install
ionic serve
In the following sections, I'll walk you through the code, focusing on the message exchange between client and server.
Setup 
Client 
The client application is an Ionic / Angular application based on the tabs starter template (ionic start chat tabs).
I installed the Cettia JavaScript library.
npm install cettia-client
The Cettia JavaScript library is not tied to Angular or Ionic; you can use it with any client-side framework or with no framework at all.
To finish the setup, I added an environment variable to src/environments/environment.ts:
SERVER_URL: 'http://localhost:8080'
When the application opens the Cettia channel, it needs the address of the server, and the environment file is a convenient way to configure this address.
Server 
The server is a Spring Boot application created with Spring Initializr. I added the "Spring Reactive Web" (WebFlux) dependency.
For Cettia support, I added the cettia-server library and the Asity bridge for WebFlux.
    <dependency>
      <groupId>io.cettia</groupId>
      <artifactId>cettia-server</artifactId>
      <version>1.2.0</version>
    </dependency>
    <dependency>
      <groupId>io.cettia.asity</groupId>
      <artifactId>asity-bridge-spring-webflux5</artifactId>
      <version>3.0.0</version>
    </dependency>
The Cettia Java library is framework-agnostic and supports Servlet, Spring WebFlux, Spring MVC, Play Framework, Vert.x, Netty, Grizzly, and Atmosphere.
Whatever framework you use, you always add the cettia-server library to your project, and the Asity bridge for your framework.
For more information, visit the Cettia homepage.
The next step is to add the configuration code that integrates Cettia into your server framework. For this application, I followed the description from here.
Here you can see the Cettia configuration used in this example
Overview 
The client application consists of three pages.
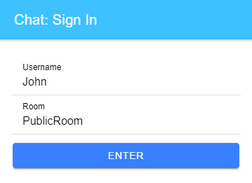
Sign in 
The user enters their username and the room name they want to join.
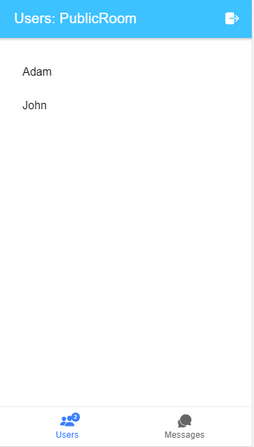
Users 
This page displays all users connected to the chat room.
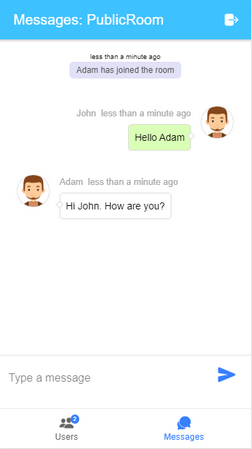
Messages 
The messages page displays the received and sent messages.
Messages 
The client and server exchange the following messages over the Cettia channel. All messages are sent in JSON format.
Note that Cettia does not automatically forward messages from one web client to all other clients. A message always flows from the client to the server or from the server to the client. If the server has to forward messages from one client to all others, you have to write code that handles this.
join (client -> server) 
When the user enters the chat room, the client sends the username and room to the server.
{username: "John", room: "PrivateRoom"}
join (server -> client) 
To inform the other users that a new user has joined, the server sends this message.
"John"
leave (client -> server) 
The client sends this message to the server when the user leaves the chat room.
leave (server -> client) 
To inform the other users that a user has left, the server sends this message.
"John"
message (client -> server) 
Whenever a user sends a message. Timestamp (ts) is in seconds since 01.01.1970.
{msg: "This is my message", ts: 1587623666}
message (server -> client) 
After a user has sent a message, the server has to forward the message to all other users in the same room. The message contains the username of the writer, the text of the message, and the timestamp.
{user: "John", msg: "This is my message", ts: 1587623666}
users (server -> client) 
A message sent from the server to a user whenever they join a room. The payload is an array of usernames currently connected to this chat room.
["John", "Adam"]
Connection 
The chat application opens a connection from the web client to the server with a call to open() on the cettia object.
import cettia from 'cettia-client/cettia-bundler';
this.socket = cettia.open(`${environment.SERVER_URL}/cettia`);
The application then installs message event handlers with on()
and sends messages to the server with send().
this.socket.on('join', username => .....);

this.socket.send('join', {username: 'John'});
Note that send() does not trigger the event handler, even when the event has the same name. send() sends a message to a server
and triggers the event handler on the server-side, while on() is listening for events coming from the server.
Offline handling 
Cettia automatically tries to reconnect when the connection breaks. It can take some time until a new connection is established, and your web client may try to send a message during this time. By default, Cettia discards these messages; it does not automatically cache messages if it can't deliver them.
However, Cettia gives you the tools to cache the messages in your application. Cettia emits the cache event whenever the client tries to send a message while the connection is broken. You can listen for this event and store the message.
Cettia emits the open event when the connection is open again, and then your application
can send the cached events to the server.
private cache: any[] = [];
    this.socket.on('cache', (args: any) => this.cache.push(args));
    this.socket.on('open', () => {
      while (this.socket.state() === 'opened' && this.cache.length) {
        const args = this.cache.shift();
        // eslint-disable-next-line prefer-spread
        this.socket.send.apply(this.socket, args);
      }
There is a similar mechanism in place on the server.
To learn more about this topic, check out the JavaScript and Java documentation:
- https://cettia.io/projects/cettia-javascript-client/1.0.1/reference/#offline-handling
- https://cettia.io/guides/cettia-tutorial/#disconnection-handling
Join 
After the user enters the username and room on the sign-in dialog, the client sends this information over the Cettia channel to the server.
{username: "John", room: "PrivateRoom"}
To send a message with Cettia, you use the send() method of the socket object and pass
the event name and the payload as the first and second arguments.
Furthermore, the application uses the acknowledgment feature of Cettia. This is a pattern where the server
sends back a response to a message. The client can listen for this response by passing a function
as the third argument to the send() method. As soon as the client receives the response, the
callback function is called.
  signin(username: string, room: string): Promise<boolean> {
    return new Promise<boolean>(resolve => {
      this.socket.send('join', {username, room}, (ok: boolean) => {
        if (ok) {
          this.room = room;
          this.username = username;
        }
        resolve(ok);
      });
    });
  }
The reason for the response is to prevent users with the same username in one chat room. The server
checks if the username is unique and sends back true, otherwise false.
The server keeps track of rooms and users in a Map. The key is the room name, and the value is a collection of usernames.
private final Map<String, Set<String>> roomUsers = new ConcurrentHashMap<>();
The server installs a handler for the "join" message.
socket.on("join", handleJoin(server, socket));
The handler extracts the username and room from the message payload (data().get(...)).
This is the name of the new user and the room they want to join.
  private Action<Reply<Map<String, Object>>> handleJoin(Server server,
      ServerSocket socket) {
    return reply -> {
      String username = (String) reply.data().get("username");
      String room = (String) reply.data().get("room");
The handler then gets the collection with all usernames of this room and checks if the name
is already taken. It sends back false if that is the case.
      Set<String> users = this.roomUsers.get(room);
      if (users != null && users.contains(username)) {
        reply.resolve(false);
        return;
      }
The method then assigns two attributes to the socket object and puts the username into the roomUsers collection.
      socket.set("username", username);
      socket.set("room", room);

      this.roomUsers.computeIfAbsent(room, k -> ConcurrentHashMap.newKeySet())
          .add(username);
Attributes are a feature of Cettia that allows you to set arbitrary key/value pairs to a socket. Attributes are only available on the server and are not propagated to client sockets.
The join handler then sends a list of all currently connected users to the new user.
Note that we use the socket.send() method, which sends the message to only this client.
      // send list of room users to new user
      socket.send("users", this.roomUsers.get(room));
In JavaScript, the following handler processes the users message. It adds the list to an RxJS subject, which is then displayed on the users tab.
this.socket.on('users', (users: string[]) => this.usersSubject.next(users));
The client receives this message only once after they sign in. After that, the list with the users
will be updated with the join and leave messages sent from the server.
The Java handler next sends a join message to all other users of this room with the username of the new user
as payload, and lastly sends back the true response, which is handled by the callback function we discussed
at the beginning of this section.
      // broadcast to other room users that new user joined
      server.find(ServerSocketPredicates.attr("room", room)
          .and(ServerSocketPredicates.id(socket).negate())).send("join", username);

      reply.resolve(true);
    };
Here you can see the purpose of the room attribute we set before. The application uses this attribute to find
all sockets (clients) for a room with the server.find() method. Cettia
internally keeps track of all connected clients and corresponding socket objects in the Server object.
find() is a convenient way to find sockets you want to send messages to.
We don't want to send this join message to the user that has just joined, so the code also uses the predicate
ServerSocketPredicates.id(socket).negate()) to exclude this socket.
On the object that find() returns, you can call send(), which sends a message to all the sockets that match the predicates.
The join message from the server is handled on the client-side with the following handler.
It receives the username of the newly joined user, adds it to the user list, and creates a special message
which is displayed on the messages tab.
this.socket.on('join', (username: string) => {
this.usersSubject.next([username, ...this.usersSubject.getValue()]);
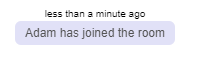
this.addMessage({type: 'SYSTEM', user: username, msg: 'has joined the room', ts: Math.floor(Date.now() / 1000)});
});
Leave 
The leave workflow can be triggered in two ways. Either the user clicks on the sign-out icon and leaves the chat room in an orderly fashion, or they close the browser without a proper sign-out.
A proper sign-out is handled by the following method. It sends a leave message without a payload to the server.
  signout(): void {
    if (this.socket !== null) {
      this.socket.send('leave', () => {
        this.socket.close();
        this.socket = null;
      });
    }
    this.username = null;
    this.room = null;
    this.usersSubject.next([]);
    this.messagesSubject.next([]);
  }
You can omit the second argument when you call the send() method if you don't need to send a payload. The client expects an answer from the server,
so it passes a callback function to the send() method. We want to wait here until the server has cleaned up everything
before we close the socket connection.
On the server, we have this code that handles the leave message.
socket.on("leave", handleLeave(server, socket));
The handler extracts the two socket attributes, username and room, that have been set during the join workflow.
  private Action<Reply<Void>> handleLeave(Server server, ServerSocket socket) {
    return reply -> {
      String username = socket.get("username");
      String room = socket.get("room");
      removeUser(server, socket, username, room);
      reply.resolve();
    };
  }
Then, it removes the user from the roomUsers Map and sends a leave message with the username as payload
to all other users of this room.
  private void removeUser(Server server, ServerSocket socket, String username,
      String room) {

    this.roomUsers.computeIfPresent(room,
        (k, set) -> set.remove(username) && set.isEmpty() ? null : set);

    // broadcast to other room users that a user left
    server.find(ServerSocketPredicates.attr("room", room)
        .and(ServerSocketPredicates.id(socket).negate())).send("leave", username);
  }
The leave message from the server is handled by this code on the client.
this.socket.on('leave', (username: string) => {
this.usersSubject.next([...this.usersSubject.getValue().filter(u => u !== username)]);
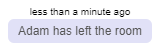
this.addMessage({type: 'SYSTEM', user: username, msg: 'has left the room', ts: Math.floor(Date.now() / 1000)});
});
The username gets removed from the user list, and the client displays a special message on the messages tab.
It is possible that the user does not sign out properly and just closes the browser or turns off the device
without clicking on the sign-out icon. In these cases, we can detect that a user is gone by installing
a delete listener on the server. The application runs the same code as in the proper sign-out workflow.
    socket.ondelete(msg -> {
      String username = socket.get("username");
      String room = socket.get("room");
      if (username != null && room != null) {
        removeUser(server, socket, username, room);
      }
    });
Note that the delete event is not triggered immediately after a connection has been closed. It will be emitted
about one minute after that. Learn more about the Socket Lifecycle in the Cettia documentation.
Messages 
When a user enters and sends a chat message, the following code will be called.
It sends a message message with the payload {msg: ..., ts: ...} to the server,
and it displays the message on the messages tab.
  send(msg: string): void {
    if (this.username === null) {
      throw new Error('username not set');
    }
    const ts = Math.floor(Date.now() / 1000);
    this.socket.send('message', {msg, ts});
    this.addMessage({ts, msg, user: this.username, type: 'MSG', img: 'guy1.png'});
  }
The server listens for the message message.
socket.on("message", handleChatMessage(server, socket));
The handler extracts the msg and ts properties and sends a new message message
to all other users of the same room with the payload {msg: ..., ts: ..., user: ...}
  private static Action<Map<String, Object>> handleChatMessage(Server server,
      ServerSocket socket) {
    return message -> {
      String username = socket.get("username");
      String room = socket.get("room");

      String msg = (String) message.get("msg");
      int ts = (int) message.get("ts");

      server
          .find(ServerSocketPredicates.attr("room", room)
              .and(ServerSocketPredicates.id(socket).negate()))
          .send("message", Map.of("user", username, "msg", msg, "ts", ts));
    };
  }
Note that this code does not send the message back to the sender (ServerSocketPredicates.id(socket).negate())).
That's the reason why the application displays the message in the send method with this.addMessage(...).
All the other clients of this room handle the new message with the following code.
    this.socket.on('message', (msg: Message) => {
      msg.img = 'guy1.png';
      msg.type = 'MSG';
      this.addMessage(msg);
    });
That concludes the tutorial about creating a basic chat application with Cettia, JavaScript, and Java. If you want to learn more about Cettia, check out the official documentation and my previous blog post.