This blog post will show you how to send push notifications from a Java back end to a web browser. I already wrote about this topic in a previous blog post where I used the Firebase Cloud Messaging service and the corresponding Java and JavaScript Firebase libraries.
This time, we are going to explore and use the native Push API and Notification API without depending on any third-party libraries. See the FAQ on Web Fundamentals, where they write about the differences between the Firebase web SDK and the native API.
Architecture 
Sending push notifications to a browser involves three parties.
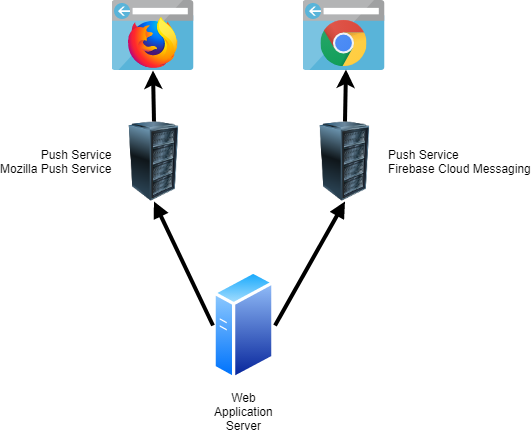
The browser receives and displays the push notifications.
The push service. Your back end can't directly send push notifications to a browser. It must always send them to a push service, which relays them to the browser. The address of this service is hardcoded into the browsers; you can't change it, and you can't self-host such a service. Each browser vendor runs its push service. For example, Mozilla calls its service Mozilla Push Service, and Chrome uses Firebase Cloud Messaging.
The last component of the push architecture is your back end. This is the application that creates and sends push notifications. The back end always has to send push notifications to the correct push server: for Firefox users to Mozilla's push service and for Chrome users to Google's service. You don't have to create an account for each push service, and they can be used for free without registration. Because all push services follow and implement the same API, you only need to implement the sending code once in your application. The payload of push notifications must be encrypted. Our back end encrypts the payload, and only the browser can decrypt it.
Note: The Push API requires HTTPS, except for localhost.
Workflow 
-
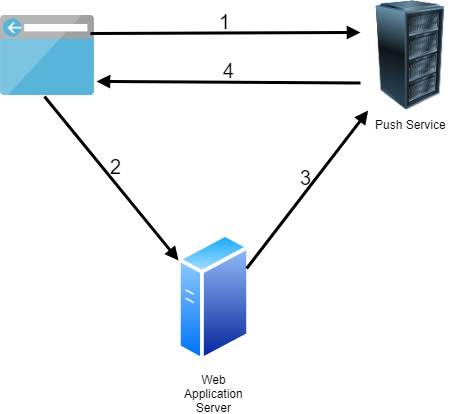
Push requires a Service Worker, so first, your application has to register a Service Worker. Then, it has to subscribe to the push service. To do that, the browser sends a request to the push service and receives an object with subscription information.
-
The browser sends the subscription information to our back end. This information contains a public key, a secret, and the address of the push service. Because each browser uses its push service, the back end must know this information before sending push messages to that client.
-
Our back end creates, encrypts, and sends push notifications to the push server. Our back end has to send a POST request to the push service to deliver a push message. It has to do that for each client individually. There is no support for addressing multiple clients. If you have 100,000 clients, you must send 100,000 POST requests to the push servers. Each message is encrypted with the corresponding key of the client. So, our back end not only has to send each message individually, but it also has to encrypt each message individually with the provided keys from the client.
-
To receive push notifications, the browser must register a
pushevent listener in the Service Worker code. This handler will receive push notifications even when the web application is not open. The browser then displays a notification with the Notification API in this handler. Note that a browser can only receive push notifications when it's running. So, when you completely close a desktop browser, it will not receive any messages. On mobile devices, the operating system wakes the corresponding app when a push notification arrives. So there it should always work even if you don't start the browser. Also, the browser must have a network connection to the push service. Because a browser is not always running and not always online, the push service tries multiple times to deliver the messages. When you create a push notification, you can specify the time-to-live time of the message. This time tells the push service how long it should queue and try sending the message until it can be discarded.
0. Initial Setup 
Because the client has to send subscription information to the server, we need to run an application
that listens for incoming HTTP requests. I created a trivial Spring Boot application
with the spring-boot-starter-web dependency for this demo. Because we need to create JSON Web Tokens (JWT), I added the java-jwt
library from Auth0 to the classpath.
    <dependency>
      <groupId>com.auth0</groupId>
      <artifactId>java-jwt</artifactId>
      <version>4.5.0</version>
    </dependency>
The JavaScript application consists of the index.html, main application, and the Service Worker. The Spring Boot web server serves all these files. The client application does not depend on any 3rd-party libraries.
Application server keys 
Next, we must create an application server key pair called the VAPID key (Voluntary Application Server Identification). This key pair is used by the push service to make sure that only our back end can send push notifications to our JavaScript application.
The client must send the public key with the subscription request to the push service. The push service stores the public key in its database. When our back end creates a push message, it signs it with the private key and then sends the message with the signature to the push service. The push service validates the signature with the stored public key, and if valid, relays the message to the recipient.
The generated key pair must be usable with the Elliptic Curve Digital Signature Algorithm (ECDSA) over the P-256 curve. You find more information in the corresponding RFC 8292.
This key pair should never change. Technically, you can change it when there are no active client subscriptions or find a way to ensure that all clients re-subscribe. However, usually, you create this key pair once for each application and never change it.
You can create this key pair in different ways. For example, you could do this beforehand with a command-line tool and then hardcode the public key into the JavaScript application and the private key into the application that sends the push notifications.
When the Spring Boot application starts up, it creates the key pair. The code first checks if the files with the public and private keys exist; if they do, it loads them. If not, it creates the key pair and stores it in the project's root into two files. This does not work if you run multiple instances of your application. In this case, you must store the key information in a central place, for example, in a Hashicorp Vault database.
  @PostConstruct
  private void initKeys() {
    Path appServerPublicKeyFile = Paths.get(this.appProperties.getServerPublicKeyPath());
    Path appServerPrivateKeyFile = Paths
        .get(this.appProperties.getServerPrivateKeyPath());

    if (Files.exists(appServerPublicKeyFile) && Files.exists(appServerPrivateKeyFile)) {
      try {
        byte[] appServerPublicKey = Files.readAllBytes(appServerPublicKeyFile);
        byte[] appServerPrivateKey = Files.readAllBytes(appServerPrivateKeyFile);

        this.publicKey = (ECPublicKey) this.cryptoService
            .convertX509ToECPublicKey(appServerPublicKey);
        this.privateKey = (ECPrivateKey) this.cryptoService
            .convertPKCS8ToECPrivateKey(appServerPrivateKey);

        this.publicKeyUncompressed = CryptoService
            .toUncompressedECPublicKey(this.publicKey);

        this.publicKeyBase64 = Base64.getUrlEncoder().withoutPadding()
            .encodeToString(this.publicKeyUncompressed);
      }
      catch (IOException | InvalidKeySpecException e) {
        Application.logger.error("read files", e);
      }
    }
    else {
      try {
        KeyPair pair = this.cryptoService.getKeyPairGenerator().generateKeyPair();
        this.publicKey = (ECPublicKey) pair.getPublic();
        this.privateKey = (ECPrivateKey) pair.getPrivate();
        Files.write(appServerPublicKeyFile, this.publicKey.getEncoded());
        Files.write(appServerPrivateKeyFile, this.privateKey.getEncoded());

        this.publicKeyUncompressed = CryptoService
            .toUncompressedECPublicKey(this.publicKey);

        this.publicKeyBase64 = Base64.getUrlEncoder().withoutPadding()
            .encodeToString(this.publicKeyUncompressed);
      }
      catch (IOException e) {
        Application.logger.error("write files", e);
      }
    }

  }

}
As mentioned, the client must send the application server public key in the subscription request to the push service. To pass the public key from the server to the JavaScript application, the Spring Boot application provides a GET endpoint that returns the public key.
  @GetMapping(path = "/publicSigningKey", produces = "application/octet-stream")
  public byte[] publicSigningKey() {
    return this.serverKeys.getPublicKeyUncompressed();
  }
This endpoint sends the raw bytes to the client. The subscription method we see in the next section accepts the key as a Base64-encoded string or stored in an ArrayBuffer object.
We use this code on the client to fetch the public key and store it in the global variable publicSigningKey.
  fetch('/publicSigningKey')
     .then(response => response.arrayBuffer())
     .then(key => this.publicSigningKey = key)
     .finally(() => console.info('Application Server Public Key fetched from the server'));
1. Client: Subscribe 
Before subscribing to the push service, we need to install a Service Worker.
  await navigator.serviceWorker.register("/sw.js", {
    scope: "/"
  });
To subscribe, we call the PushManager.subscribe() method.
  const registration = await navigator.serviceWorker.ready;
  const subscription = await registration.pushManager.subscribe({
    userVisibleOnly: true,
    applicationServerKey: this.publicSigningKey
  });
userVisibleOnly indicates that push notifications we send to this subscription will always be visible to the user. In Chrome, only
true is a valid value for this option; false throws an exception.
applicationServerKey is the ECDSA P-256 public key generated by our back end, either a Base64 encoded string or an ArrayBuffer.
subscribe() triggers a permission dialog. Your client application can only receive push notifications after the user allows it.
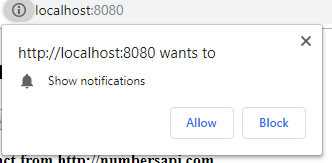
The browser shows this dialog only once per website. If the user denies the request, your application can't send push notifications, and your application has no way to ask again. The only way is when the user manually opens the browser settings and reverts the notifications settings.
subscribe() returns a PushSubscription object.
When we JSON.stringify() this object, we get a JSON string that looks like this.
{
 "endpoint":"https://fcm.googleapis.com/fcm/send/fPT8zxzPY6g:APA91bHhp...",
 "expirationTime":null,
 "keys":{
 "p256dh":"BNG_sBRGn6gJyRm...",
 "auth":"_X3GQkvU_tHAgMje2yxkyg"
 }
}
endpoint contains the URL that must be used for sending push notifications to this specific client. Each client gets a
unique URL. As mentioned before, each browser uses its push service. We get Firebase Cloud Messaging in this case because I ran this example on Chrome.
When you call subscribe(), the browser creates a key pair internally. The public key is exposed in the p256dh field. The
browser keeps the private key secret. The public key is used on the server for payload encryption, and the private key is used for payload decryption.
auth is an additional secret also used in the encryption/decryption process.
Instead of using JSON.stringify(), you can access these values with the endpoint property and the getKeys() method.
const endpoint = subscription.endpoint;
const p256dh = subscription.getKeys('p256dh');
const auth = subscription.getKeys('auth');
2. Client: Send subscription data 
We now need to send this information to the server with the subscription object. In this demo, we send the subscription object in a POST request to our Spring Boot server.
  await fetch("/subscribe", {
    method: 'POST',
    body: JSON.stringify(subscription),
    headers: {
      "content-type": "application/json"
    }
  });
We store this information in a map with the endpoint URL as the key on the server. The endpoint URL is unique for each browser.
  @PostMapping("/subscribe")
  @ResponseStatus(HttpStatus.CREATED)
  public void subscribe(@RequestBody Subscription subscription) {
    this.subscriptions.put(subscription.getEndpoint(), subscription);
  }
In a production application, you should store this information in persistent storage.
3. Server: Send push notification 
This section implements the code that creates, encrypts, and sends push notifications to the push service. We implement two examples, one without and one with a payload.
Without payload 
At first, sending push notifications without a payload might look strange. However, for trivial use cases, this could be a practical solution.
Because we can't send any data with this method, we use the push notification as a trigger to inform the client that there is new data available on the server. The client then sends an HTTP request to our back end to fetch the latest data. Be aware that this architecture has a downside. When you send thousands of push notifications simultaneously, all clients send an HTTP request at the same time back to your server, and it could easily overwhelm it. So, for a reliable architecture, you must spread the message delivery over time. Send a few messages, wait a few seconds, send the next bunch, and so on.
No encryption is involved because we don't have a payload. Therefore, p256dh and auth from the subscription object are not needed;
the only information we need is the push service endpoint URL.
Because there is no way to send one message to multiple recipients, we must create and send a message to each client individually.
Our code loops over the subscribed clients and calls sendPushMessage() for each client. This method creates and sends the message.
  private void sendPushMessageToAllSubscribersWithoutPayload() {
    Set<String> failedSubscriptions = new HashSet<>();
    for (Subscription subscription : this.subscriptions.values()) {
      boolean remove = sendPushMessage(subscription, null);
      if (remove) {
        failedSubscriptions.add(subscription.getEndpoint());
      }
    }
    failedSubscriptions.forEach(this.subscriptions::remove);
  }
JWT 
First, we need to create a JSON Web Token. The JWT must be signed with ECDSA using the P-256 curve and the SHA-256 hash algorithm and using the private key we created in Step 0 Initial Setup (also called VAPID key).
    this.jwtAlgorithm = Algorithm.ECDSA256(this.serverKeys.getPublicKey(),
        this.serverKeys.getPrivateKey());
We must specify the audience, the expiration date, and the subject. The expiration date determines when the JWT expires. It must be 24 hours at maximum. In this example, we set the expiration to 12 hours.
Lastly, the subject specifies either a mailto email address or a URL. Push services will reach out to this address if there is
a severe problem with the push message deliveries. So, the subject should point to somebody responsible for the application.
    Date today = new Date();
    Date expires = new Date(today.getTime() + 12 * 60 * 60 * 1000);

    String token = JWT.create().withAudience(origin).withExpiresAt(expires)
        .withSubject("mailto:example@example.com").sign(this.jwtAlgorithm);
The audience specifies who the JWT is for. For web push, the audience is the push service, so we set it to the origin of the push service.
    String origin = null;
    try {
      URL url = new URL(subscription.getEndpoint());
      origin = url.getProtocol() + "://" + url.getHost();
    }
    catch (MalformedURLException e) {
      Application.logger.error("create origin", e);
      return true;
    }
If we take our subscription from before, the audience is "https://fcm.googleapis.com"
Request headers 
In the 'Authorization' request header, we must send the JWT and our server public key (VAPID) in Base64-encoded format.
Authorization: vapid t=<JWT>, k=<application_server_key_in_base64>
    HttpRequest request = httpRequestBuilder.uri(endpointURI).header("TTL", "180")
        .header("Authorization",
            "vapid t=" + token + ", k=" + this.serverKeys.getPublicKeyBase64())
        .build();
Besides the mandatory Authorization header, we must also send a TTL header. Time to live is an integer specifying the number of seconds you want your push notification to live on the push service before it gets discarded. If the push service
cannot immediately send the message to the client because he is not reachable, the push service will retry sending the message until the TTL is reached and then discard the message.
If you set TTL to 0, the push service will try to send the message once, and if that attempt fails, it will immediately delete the message. According to the documentation, a push service may change the TTL. You can check that by examining the TTL header in the HTTP response. I set the TTL to 3 minutes (180 seconds) for demo purposes. You want to set this to a larger value in a production application. The maximum value for the TTL is four weeks.
Push services accept two additional optional request headers:
Topic
The topic is a string that replaces a pending message in the push service with a new message when the topic matches.
Imagine an application that sends game scores; each time the score changes, the application sends a new push notification.
Somebody's device that is offline for a few hours would receive many notifications when it comes back online. However, in this scenario, the only notification the user cares about is the last one with the latest scores.
To solve this situation, you send the same Topic header with each message. The push service checks if a message in the pending message queue exists with the same topic. If that is the case, the service overwrites the message in the queue with the new one.
When our fictional user comes online, he only receives one push notification.
Urgency
This is an indication to a client of how important a message is. This could conserve battery life on a mobile device by only waking up the device when an important message arrives.
Urgency: <very-low | low | normal | high>
Response 
After the application has sent the request to the push service, it needs to check the response's status code. A push service can send the following status codes:
| Code | Description |
|---|---|
| 201 | Created. The request to send a push message was received and accepted. This does not mean the client has already received or will never receive the message. It only means that the push service has received and put the message into its delivery queue. The push service now tries to deliver the message until the TTL is reached |
| 429 | Too many requests. Meaning your application server has reached a rate limit with a push service. The push service should include a Retry-After response header to indicate how long before another request can be sent. |
| 400 | Invalid request. This generally means one of your headers is invalid or improperly formatted. |
| 404 | Not Found. This indicates that the subscription is expired and can't be used. In this case, you should delete the subscription in your database and wait for the client to re-subscribe. |
| 410 | Gone. The subscription is no longer valid and should be removed from your database. |
| 413 | Payload size too large. According to the push specification, a push service must support up to 4096 bytes payloads. |
With payload 
Push messages with a payload are, without question, more practical and more common. Our back end must encrypt the payload before passing the message to the push service. We have to encrypt each message individually with the provided keys from the client.
Everything stated in the previous section also applies here. In addition, we have to create a JWT and add an Authorization and TTL request header.
Because we have a payload, we must add three more request headers.
Content-Type: application/octet-stream describes the body's content. In this case, an encrypted stream of bytes.
Content-Encoding: aes128gcm describes how the encrypted payload is formatted.
      httpRequestBuilder.POST(BodyPublishers.ofByteArray(body))
          .header("Content-Type", "application/octet-stream")
          .header("Content-Encoding", "aes128gcm");
We also have to add the Content-Length header. I'm using here the Java 11 HTTP client,
which automatically adds this header before it sends the request.
Payload encryption follows a series of operations that are described in RFC 8291, Chapter 3.4 Encryption Summary. Here is a brief overview of how this works.
- Create a public/private key pair with the ECDSA P-256 algorithm for each message. We call it
asPublicKeyandasPrivateKey. These keys are unrelated to the application server keys we created in the initial setup (VAPID). The VAPID key is not involved in the encryption process. - Create a shared secret with Elliptic-curve Diffie–Hellman (ECDH) and the
asPrivateKeyand the public key from the browsersubscription.p256dh. - Create a salt of 16 bytes.
- Run the salt, the ECDH secret, the
subscription.authsecret from the browser, theasPublicKey, and the public key from the browsersubscription.p256dhthrough a series of HMAC-SHA256 operations. The result of these operations is a secret key and nonce. - Encrypt the payload with AES128-GCM and with the secret key and nonce from step 4.
- Concatenate the salt (16 bytes), the length of the encrypted message (4 bytes), the length of the
asPublicKey(1 byte), theasPublicKey(65 bytes), and the encrypted blob into one byte array.
For the sake of brevity, I omit the code here, but you find the complete code on GitHub: https://github.com/ralscha/blog2019/blob/master/webpush/src/main/java/ch/rasc/webpush/CryptoService.java#L119-L213
I mentioned before that push services must accept messages up to 4096 bytes. This size refers to the length of the byte array we get as the result of step 6. Note that this array contains some additional header information. So, the actual payload size is less than the 4096 bytes.
4. Client: Receiving message 
When a push service delivers a push message, the browser emits the 'push' event. So, in our Service Worker, we need code that registers a handler for this event.
self.addEventListener('push', event => event.waitUntil(handlePushEvent(event)));
The event object passed as the argument to our listener is of type PushEvent.
We can access the message's payload through the data property. The data property is of type PushMessageData
which provides these four methods: arrayBuffer(), blob(), json(), and text() to extract the payload.
We have seen before that the payload is encrypted. On the client, we don't have to care about that. The browser automatically decrypts the payload before emitting the push event. The data property contains the payload in plain text.
Display notification 
The first thing our handler does is check if it must display a notification. The Web Push API demands that browsers must show a notification when the application is not visible to the user (application closed, browser minimized, tab not active). In this demo application, we check the visibility state of our application with the Page Visibility API.
const needToShow = await needToShowNotification();
async function needToShowNotification() {
  const allClients = await clients.matchAll({ includeUncontrolled: true });
  for (const client of allClients) {
    if (client.visibilityState === 'visible') {
      return false;
    }
  }
  return true;
}
To display the notification, we use the Notification API.
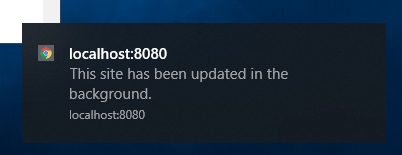
In the previous section, we implemented two types of messages, one without and one with a payload. So, we also show two different types of notifications. We show a notification with a hardcoded text when we receive the message without a payload. In the other case, we display the push notification payload in the dialog.
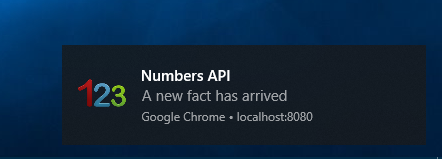
Without payload
    if (needToShow) {
      self.registration.showNotification('Numbers API', {
        body: 'A new fact has arrived',
        tag: 'numberfact',
        icon: 'numbers.png'
      });
    }
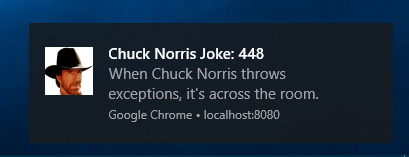
With payload
    if (needToShow) {
      self.registration.showNotification(msg.title, {
        body: msg.body,
        icon: 'chuck.png'
      });
    }
The Notification API supports many options. I recommend this article from Web Fundamentals for an in-depth look.
The browser will show a default notification if you don't display a notification. Here is a screenshot of this default notification in Chrome on Windows.
Response to click on notification 
We can also control what should happen when the user clicks or taps on the notification dialog.
For this purpose, we install a notificationclick event handler.
self.addEventListener('notificationclick', event => event.waitUntil(handleNotificationClick(event)));
In this demo application, we use the handler to open the web application or activate the tab or browser window when the application is already open.
The handler loops over all clients managed by this Service Worker. If it finds one, it calls the focus() on this client, which brings it to the front.
If the handler does not find a client, it opens a new browser context with clients.openWindow()
and loads the given URL.
const urlToOpen1 = new URL('/index.html', self.location.origin).href;
const urlToOpen2 = new URL('/', self.location.origin).href;

async function handleNotificationClick(event) {

  let openClient = null;
  const allClients = await clients.matchAll({ includeUncontrolled: true, type: 'window' });
  for (const client of allClients) {
    if (client.url === urlToOpen1 || client.url === urlToOpen2) {
      openClient = client;
      break;
    }
  }

  if (openClient) {
    await openClient.focus();
  } else {
    await clients.openWindow(urlToOpen1);
  }

  event.notification.close();
}
There is also a notificationclose event that is called if the user dismisses a notification.
Rather than clicking the notification, the user clicks the cross or swipes the notification away.
self.addEventListener('notificationclose', event => console.info('notificationclose event fired'));
Fetch and store data 
In case we receive the push notification without a payload, we need to send an HTTP request to our back end to fetch the updated data.
    const response = await fetch('lastNumbersAPIFact');
    const fact = await response.text();
There are many different ways how your application handles push notifications. In one case, just displaying the message in a notification is enough. In other cases, you want to store the payload in a database.
If you want to store the payload, you have the choice between the Cache API and IndexedDB. You only have access to these two databases from a Service Worker. localStorage and sessionStorage are not accessible from a Service Worker.
Because the payloads in this example are very trivial, we store them in the Cache API.
After the application has stored the payloads, we notify the foreground script with postMessage about the data change.
await dataCache.put('fact', new Response(fact));
await dataCache.put('joke', new Response(msg.body));
  const allClients = await clients.matchAll({ includeUncontrolled: true });
  for (const client of allClients) {
    client.postMessage('data-updated');
  }
Display data 
Note that the foreground script is not necessarily active when the push notification arrives.
When you close the tab of your web application, only the Service Worker of your app stays active in the
browser, so nobody might listen when your Service Worker code calls client.postMessage().
We only use the message event to update the GUI while the application is visible in this demo application.
When the user opens the web application in a new tab after receiving a push notification, our app
checks the Cache API and displays the latest messages.
navigator.serviceWorker.addEventListener('message', event => displayLastMessages());
function displayLastMessages() {
  caches.open('data').then(dataCache => {
    dataCache.match('fact')
      .then(response => response ? response.text() : '')
      .then(txt => factOutput.innerText = txt);

    dataCache.match('joke')
    .then(response => response ? response.text() : '')
    .then(txt => jokeOutput.innerText = txt);
  });
}
Client: Unsubscribe 
A client can unsubscribe from a push service by calling unsubscribe() on the subscription object.
You get the current subscription object with the PushManager.getSubscription() method.
This method returns null if there is no active subscription.
In this example, we also send a request to our back end to inform our application that we unsubscribed this client. Technically, this is not necessary because when our back end sends a push notification to the push service, it will return an HTTP status code of 410, which indicates that the client is no longer subscribed and should be removed from the subscription database.
  const registration = await navigator.serviceWorker.ready;
  const subscription = await registration.pushManager.getSubscription();
  if (subscription) {
    const successful = await subscription.unsubscribe();
    if (successful) {
      console.info('Unsubscription successful');

      await fetch("/unsubscribe", {
        method: 'POST',
        body: JSON.stringify({endpoint: subscription.endpoint}),
        headers: {
          "content-type": "application/json"
        }
      });
Another way to unsubscribe a client is by removing it from the back-end database. The client is still subscribed but no longer receives messages.
Further information 
Here is a collection of links that provide more information about the Web Push API
- Web Push Notifications from Google
- MDN documentation about Push API
- MDN documentation about Notification API
- Push API specification
- RFC 8030 Generic Event Delivery Using HTTP Push
- RFC 8291 Web Push Encryption
- RFC 8292 VAPID for Web Push
- Google Chrome Developers Video: Use VAPID to secure push messages
- Google Chrome Developers Video: Send and receive push messages
This concludes our Web Push API journey. You find the complete source code for the demo application presented in
this blog post on GitHub:
https://github.com/ralscha/blog2019/tree/master/webpush