A few months ago, I wrote a tutorial on installing WireGuard, a simple, fast, and modern VPN, on Linux and opening a VPN connection from an Android device. Because I work most of the time on Windows, I was also especially interested in connecting my computer to a WireGuard VPN, but there was no Windows client available at that time.
In the meantime, the developers of WireGuard released a Windows version. This blog post shows you how to install and configure WireGuard on Windows and establish a VPN connection to a WireGuard server running on a VPS.
This tutorial assumes that you already have a WireGuard server running somewhere. I connect the Windows client to a WireGuard server running on Amazon Lightsail, which is set up according to my previous blog post. If you follow my previous tutorial, skip the client setup section, and you also don't have to generate the public/private key pair for the client.
The topology of our VPN that we will build in this tutorial looks like this:

I'm using WireGuard in this example as a VPN and route all IP traffic from my Windows computer to the Internet through the Linux server.
You can also use WireGuard to connect to a private network like a company LAN or connect two private networks over the public Internet; however, I will not cover these use cases.
Installation 
The first step is to download the software from the download page: https://www.wireguard.com/install/
Install the msi file. After the installation, you should see the WireGuard icon in the icon bar.

WireGuard for Windows runs on Windows 7, 8, 8.1, 10, 2012, 2016, and 2019 and is available in a 64-bit and a 32-bit version. I'm testing the 64-bit version on Windows 10.
Be aware that all the WireGuard software packages are in a pre-release state and should only be used for testing. If you are concerned about security, I recommend waiting until the official release, and an independent third party has audited the software.
Configuration 
Next, we configure the VPN tunnel. This includes setting up the endpoints and exchanging the public keys.
Windows 
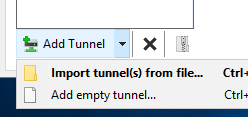
Open the WireGuard GUI and click on Add Tunnel -> Add empty tunnel...
The software automatically creates the public/private key pair and displays it on the screen.
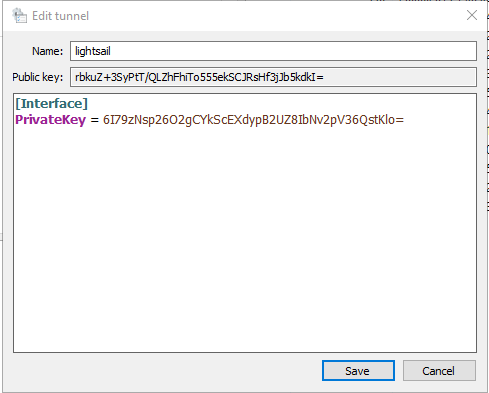
Give the tunnel a name and insert the following configuration. Change IP addresses and keys according to your environment.
[Interface]
PrivateKey = 6I79zNsp26O2gCYkScEXdypB2UZ8IbNv2pV36QstKlo=
Address = 192.168.2.2/32
DNS = 192.168.2.1

[Peer]
PublicKey = uZik78EWgYCLQRMdG6k6QK0mzHFqfr4uhOEjPyXe5WE=
AllowedIPs = 0.0.0.0/0
Endpoint = 35.174.118.17:54321
- PrivateKey: Private key of this client
- Address: IP address of this client. It must be unique among all clients.
- DNS: IP address of a DNS server. In this case, I use the DNS server running on the WireGuard server.
- PublicKey: Public key of the server
- AllowedIPs: Specifies what IP addresses should be routed over the VPN. For example, 0.0.0.0/0 is a catch-all configuration and routes everything over the VPN.
- Endpoint: External IP address of the server and listening port. Port must match the
ListenPortserver configuration.
Server 
On the server-side, you need to add a [Peer] section to the WireGuard configuration file (/etc/wireguard/wg0.conf)
[Peer]
PublicKey = rbkuZ+3SyPtT/QLZhFhiTo555ekSCJRsHf3jJb5kdkI=
AllowedIPs = 192.168.2.2/32
- PublicKey: Public key of the Windows client
- AllowedIPs: Specifies what IP addresses are allowed through this tunnel. This is the VPN IP address of the Windows computer.
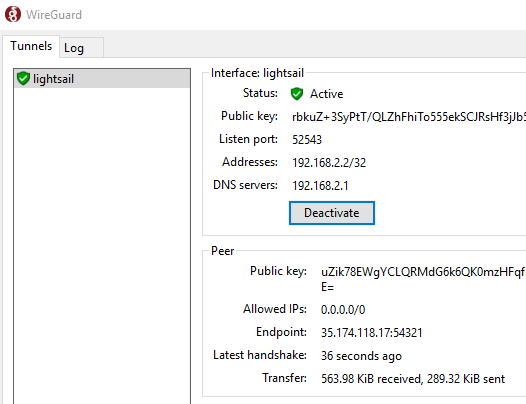
Here is a screenshot showing the Windows client (left) and the Linux server (right) configuration.
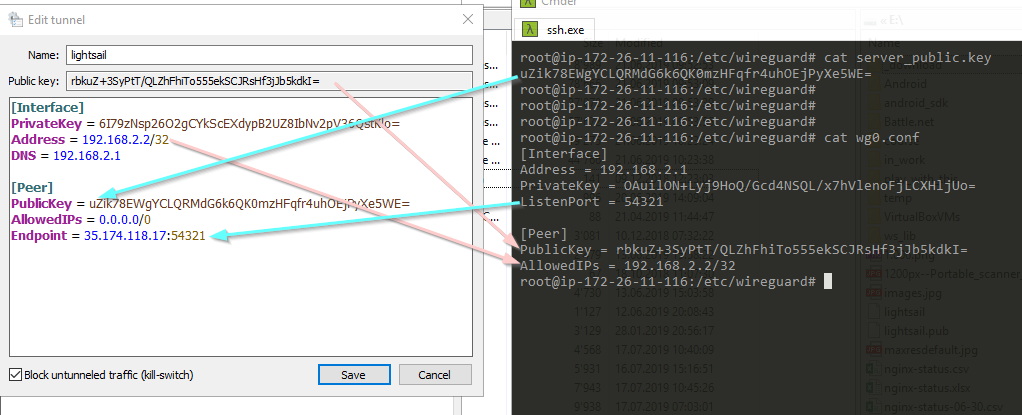
Ensure that you exchange the correct keys and the IP addresses are correct.
Block untunneled traffic 
You might notice the option Block untunneled traffic.
You can enable this option when your configuration has precisely one [Peer] section and AllowedIPs is set to a catch-all address.
If the option is enabled, the WireGuard client adds Windows Firewall rules to block all traffic that is neither to nor from the tunnel interface.
As mentioned before, I use this configuration to route all IP traffic through the VPN, so it makes sense to enable this option to prevent accidentally sending IP packets outside the VPN.
If you use WireGuard to connect to a private network, like a company LAN or your home network, you don't need to enable this option. Instead, configure AllowedIPs so that only your private network IP addresses are routed through the VPN.
Activate 
You should now be able to activate the VPN connection. Click on Activate.
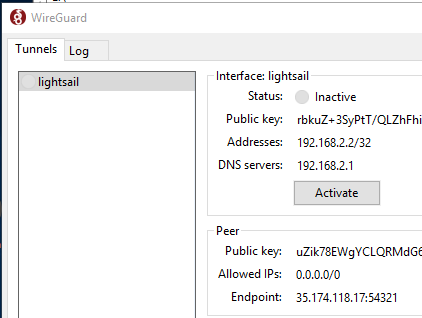
After a few seconds, the status should change to Active
If that's not the case, check the Log tab and double-check the client and server configuration.
Deactivate closes the VPN connection.
Checking VPN connection 
To check if the VPN works correctly, open a browser with the URL: https://www.whatismyip.com/ Or enter the search term "my ip" into the Google search.
If the connection is routed through the VPN, it should show the IP address of the WireGuard server as the public address.
If you run your own DNS server, as I do in this example, check if DNS requests are routed through the VPN. Go to https://www.dnsleaktest.com and run the extended test. The test runs for a few seconds and displays a list of servers that answered the DNS queries. Make sure that this list only contains the IP address of your DNS server.
Read this guide about DNS leaks to learn more about why you want to test for DNS leaks, and it also shows you other methods for preventing leaks.
Adding more clients 
You can connect multiple clients to one server. Follow the configuration above and add a [Peer] section to the server configuration file for each client. Make sure that you assign a unique IP address for each client.
Don't forget to restart WireGuard on Linux after you changed the configuration:
wg-quick down wg0 && wg-quick up wg0
I've been running the Windows client for a few days, and even though it's a pre-release, it is remarkably stable and works without any problems.
One feature I like is that the Windows version of WireGuard remembers the VPN connection state. So when you reboot Windows while WireGuard is connected to the server, the software automatically reconnects and re-establishes the VPN tunnel when it starts up. This prevents you from accidentally connecting without a VPN.