In my previous blog post, I showed you a simple neural network implementation in Java and JavaScript, built from scratch based on the algorithms described in Tariq Rashid's book, "Make Your Own Neural Network".
While writing a machine learning algorithm from scratch is interesting and useful for learning purposes, in practice, you will instead use one of the many machine learning libraries. Many of these libraries were written for the Python platform, the primary programming language in the Machine Learning area. But there are libraries available for other languages. In this blog post, we look at two JavaScript libraries: brain.js and Tensorflow.js.
We are going to recreate the MNIST example from my previous blog post and build a Multilayer perceptron with brain.js and a Convolutional neural network with Tensorflow.js.
An MLP is a feedforward neural network with at least three layers of nodes: input, hidden, and output layer. Basically, the same network I built from scratch in my previous blog post. A convolutional neural network is a special kind of neural network that works well in computer vision.
You can find the source code for this example on GitHub:
https://github.com/ralscha/blog2019/tree/master/mnistjs
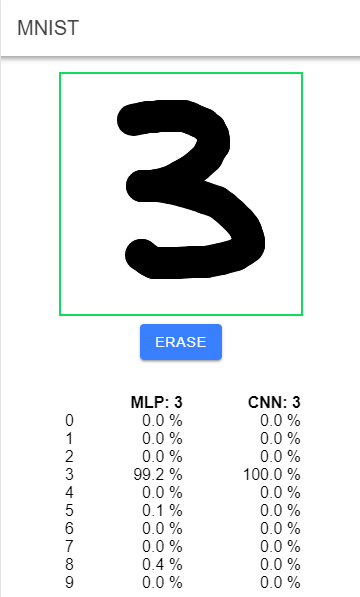
Draw a digit and see if the program can detect it correctly.
Training 
brain.js 
brain.js is a JavaScript library that runs on Node.js and in browsers. The source code of brain.js is hosted on GitHub and released under the MIT license. The current version (1.6.1) provides support for recurrent neural network (RNN), long short-term memory, and gated recurrent unit networks.
You add the library to your project, like any other JavaScript library, with npm or yarn.
npm install brain.js
For downloading the MNIST datasets, extracting, and converting them into arrays, I wrote a few utility methods. You can find the source code for these methods here: mnist.js
In the training program, we first require the necessary libraries and then call the utility methods from mnist.js to get the images and labels for the training and test datasets.
const fs = require('fs');
const mnist = require('./mnist');
const brain = require('brain.js');


async function run() {

    const trainLabels = await mnist.getTrainLabels();
    const trainDigits = await mnist.getTrainImages();

    const testLabels = await mnist.getTestLabels();
    const testDigits = await mnist.getTestImages();

    const labels = [...trainLabels, ...testLabels];
    const digits = [...trainDigits, ...testDigits];
In this example, I combine the training and test datasets into one array because we use CrossValidate from brain.js. CrossValidate internally splits the provided dataset into training and test datasets. Therefore, we feed all 70,000 images and let brain.js take care of the rest. CrossValidate provides a way to train larger data sets. Internally, it creates multiple neural networks, and after the training, we can access the network with the best accuracy.
labels and digits are one-dimensional JavaScript arrays. We can't feed them directly to brain.js in this form and first have to transform them into a structure that the library understands.
Each training object needs to be a JavaScript object with two properties: input and output. The values can be either an array of numbers between 0 and 1 or a hash of numbers between 0 and 1.
Example:
{input: [0, 0], output: [0]}
For this demo, we store the values into arrays. The input array consists of 784 entries (28 x 28) and represents the pixels of one scanned MNIST image. The output is a 10-element array and designates the digit the scanned image contains. For instance, if we feed a scanned image of a one, the training object looks similar to this:
{input: [0, 0, 1, 0, .......744 more entries], output: [0, 1, 0, 0, 0, 0, 0, 0, 0, 0]}
In the output array, at index position 1, the value 1 is set, denoting that the input contains the scanned image of a one.
Here is the code that transforms the one-dimensional arrays from the MNIST download into an array of training objects.
    const imageSize = 28 * 28;
    const trainingData = [];

    for (let ix = 0; ix < labels.length; ix++) {
        const start = ix * imageSize;
        const input = digits.slice(start, start + imageSize).map(mnist.normalize);
        const output = [0, 0, 0, 0, 0, 0, 0, 0, 0, 0];
        output[labels[ix]] = 1;
        trainingData.push({ input, output });

        trainingData.push({ input: mnist.rotate(input, 10), output });
        trainingData.push({ input: mnist.rotate(input, -10), output });
    }
This code also creates two additional images for each source image, one rotated 10 degrees clockwise, and the other rotated 10 degrees counterclockwise. In my tests, this improves the accuracy a tiny bit (0.3–0.4 %).
Next, we specify the topology of the network and set some training options. For the topology, the only mandatory option is the number of nodes in the hidden layer.
    const netOptions = {
        hiddenLayers: [150]
    };

    const trainingOptions = {
        iterations: 20000,
        log: details => console.log(details)
    };
brain.js stops training when either the training error has gone below a certain threshold (by default 0.005), or the maximum number of iterations has been reached. In my tests, the application reaches the training error threshold after a few iterations.
Lastly, we create the network, feed the training data, and train the model.
    const crossValidate = new brain.CrossValidate(brain.NeuralNetwork, netOptions);
    const stats = crossValidate.train(trainingData, trainingOptions);
After the training has finished, the application picks the best neural network from the cross-validation, exports it into a JavaScript object, converts it to JSON, and writes it into the file ./data/model.json.
    const net = crossValidate.toNeuralNetwork();

    const model = net.toJSON();
    fs.writeFile('./data/model.json', JSON.stringify(model), 'utf8', () => console.log('model has been written'));
To start the training, run the following command on the command line:
node --max-old-space-size=4096 ./train.js
The program reads a lot of data into memory. Therefore, I had to increase the memory that is available to Node.js from the default 512MB to 4GB.
The training takes about 1 hour on my notebook and reaches accuracy of about 98.3 %.
Tensorflow.js 
Tensorflow.js is a JavaScript library that runs on Node.js and in browsers. It was developed by the Google Brain team and based on the Tensorflow Python library. The source code is hosted on GitHub and released under the Apache License 2.0.
When you run Tensorflow.js in Node.js, you have two options. You can either import tfjs-node with native C++ bindings:
npm install @tensorflow/tfjs-node
or you can install a GPU (graphics processing unit) optimized version. Only NVIDIA GPUs with CUDA are supported. Because GPUs are optimized for calculations that are used in Tensorflow.js, you get much higher performance when doing machine learning on a GPU.
npm install @tensorflow/tfjs-node-gpu
See the Setup Page and GPU Setup Page for more information.
Import the required libraries into the training application:
const mnist = require('./mnist');
const tf = require('@tensorflow/tfjs');
Training with Tensorflow.js follows the same workflow as brain.js. Import the MNIST dataset, convert it into a form that Tensorflow.js understands, create the network, train it, and lastly, export the trained model to a file.
After downloading and reading the MNIST dataset, we have to convert it into tensors. Tensors are the core unit of work in Tensorflow.js and are essentially JavaScript objects that wrap a collection of numbers.
As input, we create a 4-dimensional tensor with a shape of [60,000, 28, 28, 1], and as the expected output, we create a 10-element array for each image and put all of them into a two-dimensional tensor. Unlike brain.js, we don't combine the training and test datasets because Tensorflow.js allows us to specify the training and test/validation dataset independently.
async function run() {

    const trainLabels = await mnist.getTrainLabels();
    const trainDigits = await mnist.getTrainImages();

    const testLabels = await mnist.getTestLabels();
    const testDigits = await mnist.getTestImages();

    const trainDigitsTensor = tf.tensor4d(trainDigits.map(mnist.normalize),
        [trainDigits.length / (28 * 28), 28, 28, 1]);

    const testDigitsTensor = tf.tensor4d(testDigits.map(mnist.normalize),
        [testDigits.length / (28 * 28), 28, 28, 1]);

    const outputs = [];
    for (let ix = 0; ix < trainLabels.length; ix++) {
        const output = [0, 0, 0, 0, 0, 0, 0, 0, 0, 0];
        output[trainLabels[ix]] = 1;
        outputs.push(output);
    }
    const trainLabelsTensor = tf.tensor2d(outputs);

    const testOutputs = [];
    for (let ix = 0; ix < testLabels.length; ix++) {
        const output = [0, 0, 0, 0, 0, 0, 0, 0, 0, 0];
        output[testLabels[ix]] = 1;
        testOutputs.push(output);
    }
    const testLabelsTensor = tf.tensor2d(testOutputs);
Next, the application creates the model:
const model = createConvModel();
This model is a copy from the official tensorflow MNIST example. On the Tensorflow.js homepage, you can find a description of all these layers and parameters, what exactly they do, and why they are configured this way.
I also recommend the following article as an introduction to convolutional networks: https://towardsdatascience.com/deep-learning-for-beginners-practical-guide-with-python-and-keras-d295bfca4487
function createConvModel() {
    const model = tf.sequential();

    model.add(tf.layers.conv2d({
        inputShape: [28, 28, 1],
        kernelSize: 3,
        filters: 16,
        activation: 'relu'
    }));

    model.add(tf.layers.maxPooling2d({ poolSize: 2, strides: 2 }));
    model.add(tf.layers.conv2d({ kernelSize: 3, filters: 32, activation: 'relu' }));
    model.add(tf.layers.maxPooling2d({ poolSize: 2, strides: 2 }));
    model.add(tf.layers.conv2d({ kernelSize: 3, filters: 32, activation: 'relu' }));
    model.add(tf.layers.flatten({}));
    model.add(tf.layers.dense({ units: 64, activation: 'relu' }));
    model.add(tf.layers.dense({ units: 10, activation: 'softmax' }));

    return model;
}
After setting up the model, the application starts the training with a call to the fit method. The first two parameters are the input and expected output tensors, and the third parameter is a configuration object. In this object, we specify the test/validation dataset with the validationData option.
    model.compile({
        optimizer: 'rmsprop',
        loss: 'categoricalCrossentropy',
        metrics: ['accuracy'],
    });

    const batchSize = 320;
    const trainEpochs = 20;

    await model.fit(trainDigitsTensor, trainLabelsTensor, {
        batchSize,
        validationData: [testDigitsTensor, testLabelsTensor],
        shuffle: true,
        epochs: trainEpochs
    });
Alternatively, we could combine the two MNIST datasets and then let Tensorflow.js do the split into training and validation/test datasets internally. To do that, you need to specify the validationSplit option instead of validationData. validationSplit expects a float between 0 and 1 and designates the fraction of the training data to be used as validation/test data (0.1 = 10%).
After the training has been completed, the application saves the model.
const saveResults = await model.save('file://./data/tfjsmnist');
To start the training, run the following command in a shell:
node --max-old-space-size=4096 ./tfjs.js
Training of this model takes about 20 minutes on my notebook. The accuracy of the model is about 99.2 %.
Web Application 
The web application is written in TypeScript and uses the Ionic and Angular frameworks.
When you follow this blog post and want to run the example locally, you need to copy the two models from the training step into the ./client/src/assets folder. The web application handles these models like any other static resources and loads them with GET requests.
brain.js 
Add the library to the project with npm or yarn.
npm install brain.js
In TypeScript, we need to import the library with the following statement.
import * as brain from 'brain.js/browser';
Note that we import the browser library. The library for Node.js does not run inside a browser.
During startup, the application loads the model and creates the network.
  async initBrain(): Promise<void> {
    const response = await fetch('assets/model.json');
    const brainModel = await response.json();
    this.net = new brain.NeuralNetwork();
    this.net.fromJSON(brainModel);
  }
Notice that we don't have to configure the topology of the network. In the training application, we had to specify the number of nodes in the hidden layer. We don't have to do that here because the file model.json contains metadata about the network, and brain.js automatically recreates the network based on this data.
The web application displays an empty canvas where the user can draw a digit. The application then tries to detect what number the user has drawn. To achieve that, the application extracts the pixel values from the canvas and feeds them into the models.
    copyContext.drawImage(canvas, drawBox[0] - 16, drawBox[1] - 16, drawBox[2] - drawBox[0] + 16, drawBox[3] - drawBox[1] + 16,
      dx, dy, scaledSourceWidth, scaledSourceHeight);
    const imageData = copyContext.getImageData(0, 0, 28, 28);

    const numPixels = imageData.width * imageData.height;
    const values = new Array<number>(numPixels);
    for (let i = 0; i < numPixels; i++) {
      values[i] = imageData.data[i * 4 + 3] / 255.0;
    }
The code then has to make sure that the data is transformed into the same shape and form as the input object used in the model training.
In this case, a one-dimensional array with 784 (28 * 28) entries. Then we pass this array to the run method, and brain.js returns
a 10-element array. Next, the application looks for the array index that contains the largest value (maxScore)
and shows this to the user as the most likely guess.
    const detection = this.net.run(values);
    this.detectedNumberMLP = this.maxScore(detection);
tensorflow.js 
Like brain.js, you install Tensorflow.js with yarn or npm:
npm install @tensorflow/tfjs
Then import it:
import * as tf from '@tensorflow/tfjs';
Loading a pre-trained model is even easier with Tensorflow.js because the library provides the loadModel method for this case.
  async initTf(): Promise<void> {
    this.tfModel = await tf.loadLayersModel('assets/tfjsmnist/model.json');
  }
We don't have to configure the model beforehand. The model.json file contains a description of the network topology, and Tensorflow.js automatically recreates all the network layers we used during the training.
Running the user-generated data through the model follows the same workflow as the brain.js code. Extract the image data from the canvas and transform it into a form that Tensorflow.js understands. We have to make sure that the tensor we pass to the predict method has the same dimensions as the tensors we used for training. In this case, it must be a 4-dimensional tensor. The method will complain if the tensor doesn't match the training tensor.
    const predictTensor = this.tfModel.predict(tf.tensor4d(values, [1, 28, 28, 1])) as tf.Tensor;
    const data = predictTensor.dataSync<'float32'>();
    this.detectedNumberCNN = this.indexMax(data);
    this.detectionsCNN = data;
To extract the array from the prediction tensor, we call the synchronous method dataSync, which returns, in this case, an array with 10 elements. Alternatively, you can extract the array with data, which is asynchronous and returns a Promise. The code then loops over the array and looks for the array index with the largest value (indexMax).
In this example, the application displays the 10 output elements to the user. If you are only interested in the index, you don't need to extract the underlying array from the tensor. Instead, you call argMax to extract the index with the largest value directly from the tensor. Like most methods in Tensorflow.js, this also returns a tensor, in this case, a one-dimensional tensor with just one element.
this.detectedNumberCNN = tf.argMax(predictTensor, 1).dataSync()[0];
This concludes this article. We created two neural networks with brain.js and Tensorflow.js, trained them with the MNIST dataset, and then used these models for detecting digits users draw into a canvas.