In this blog post, we will explore a way to expose services running on a computer that sits behind a NAT or firewall to the Internet. For example, you might have a small server at home and would like to access this server, or perhaps the entire network, from anywhere in the world.
If your ISP assigns a static public IP address to your router, you can forward ports in your firewall to the services you want to expose.
However, it's not very common for home users to get static IP addresses where I live. Instead, I typically get dynamic IP addresses from my ISP. With dynamic IP addresses, you can use a dynamic DNS service. This service maps your current external IP address to a domain name, and each time your ISP assigns a new IP address to your router, it updates the dynamic DNS service. This functionality is often implemented in firewalls and router operating systems. For example, pfSense, the firewall I use, includes a configuration page for setting up dynamic DNS.
One problem you might face is that ISPs sometimes block ports. Commonly, they block the outgoing port 25 to prevent spam email messages. This is especially a problem when you plan to run your email server at home.
Other solutions to expose services include tools like ngrok and localtunnel. They start a tunnel from your machine to an external server and assign a public URL to this tunnel. Traffic from this URL is forwarded through the tunnel to your service. They are very convenient to use. ngrok, for example, consists of just one binary. You download and run it without any installation.
The architecture of the solution we will build in this blog post is very similar to these tools' architecture.
Overview 
Here is an overview of the solution:

On the right side, you have a computer that sits behind a NAT router or firewall and cannot be directly accessed from the Internet. This could be a small server in your home; I am using a Raspberry Pi for this demo.
We set up a server with a static public IP address on the left side. For this demo, I rented a VPS from Amazon Lightsail. I chose the smallest VPS, with a price of 3.50 USD per month. These small VPSs are more than enough for running a VPN. This setup is not restricted to a Lightsail VPS; it works with any VPS from any provider and with any server with a static public IP address.
We set up a VPN between the two machines with WireGuard, so both computers can communicate with each other as if they are on the same local network.
When we want to access our private server, we connect to the public IP address of the VPS, and the connection gets forwarded over the VPN to our server at home.
VPN 
Now that we have seen the architecture of this solution, let's start by configuring the WireGuard VPN. If you want to follow this tutorial and also use a Lightsail VPS, go to my previous blog post and follow the instructions up to and including the section Install required packages.
I installed Debian 9.5 on my Lightsail VPS.
Install WireGuard and enable IP forwarding if you use another server.
Next, we install WireGuard on our home server as well. As mentioned before, I used a Raspberry Pi for this demo. I already have Raspbian Stretch Lite installed on the Pi and will follow the instructions from this tutorial for the WireGuard installation: https://github.com/adrianmihalko/raspberrypiwireguard
sudo apt-get update
sudo apt-get upgrade
sudo apt-get install raspberrypi-kernel-headers
echo "deb http://deb.debian.org/debian/ unstable main" | sudo tee --append /etc/apt/sources.list.d/unstable.list
sudo apt-get install dirmngr
sudo apt-key adv --keyserver hkp://keyserver.ubuntu.com:80 --recv-keys 8B48AD6246925553
sudo apt-key adv --keyserver hkp://keyserver.ubuntu.com:80 --recv-keys 7638D0442B90D010
sudo apt-key adv --keyserver hkp://keyserver.ubuntu.com:80 --recv-keys 04EE7237B7D453EC
printf 'Package: *\nPin: release a=unstable\nPin-Priority: 150\n' | sudo tee --append /etc/apt/preferences.d/limit-unstable
sudo apt-get update
sudo apt-get install wireguard
sudo reboot
Open an SSH connection to both machines. WireGuard uses public/private key cryptography, and we need to create a key pair on each machine and then exchange the public keys.
Run the following two commands on both computers. The first command creates the private key and writes it directly into the WireGuard configuration file. The second command creates the public key, writes it into the file publickey, and prints it to the console.
(umask 077 && printf "[Interface]\nPrivateKey = " | sudo tee /etc/wireguard/wg0.conf > /dev/null)
wg genkey | sudo tee -a /etc/wireguard/wg0.conf | wg pubkey | sudo tee /etc/wireguard/publickey
Make a note of both public keys and open the WireGuard configuration file on both machines.
sudo nano /etc/wireguard/wg0.conf
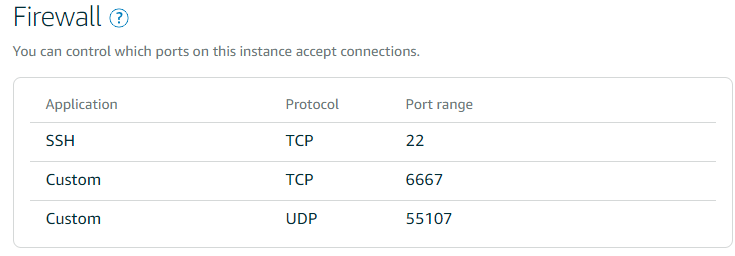
Enter the following configuration settings. For this example, I assign 192.168.4.1 to the VPS and 192.168.4.2 to the server at home. Choose a network not already assigned to your home network. My VPS server's external static IP address is 18.184.64.177, and the port I want WireGuard to connect to is UDP 55107. Make sure that you open a UDP port in the firewall of your VPS for WireGuard. Choose a random port.
VPS
[Interface]
PrivateKey = qHOQs4...
ListenPort = 55107
Address = 192.168.4.1

[Peer]
PublicKey =  ums9y... <--- public key from the machine at home
AllowedIPs = 192.168.4.2/32
Home Server (Pi)
[Interface]
PrivateKey = OKNAiUi/u...
Address = 192.168.4.2

[Peer]
PublicKey = GJtb+O7nnT... <---- public key from VPS
AllowedIPs = 192.168.4.1/32
Endpoint = 18.184.64.177:55107
PersistentKeepalive = 25
See the Quickstart Guide under the section NAT and Firewall Traversal Persistence for a description of why you sometimes need PersistentKeepalive. The tunnel closes after a few minutes without any traffic in my environment. The PersistentKeepalive solves that problem by periodically (every 25 seconds) sending packets over the VPN.
Start WireGuard on both machines and enable it so that it automatically starts up the next time you reboot the computer.
sudo systemctl start wg-quick@wg0
sudo systemctl enable wg-quick@wg0
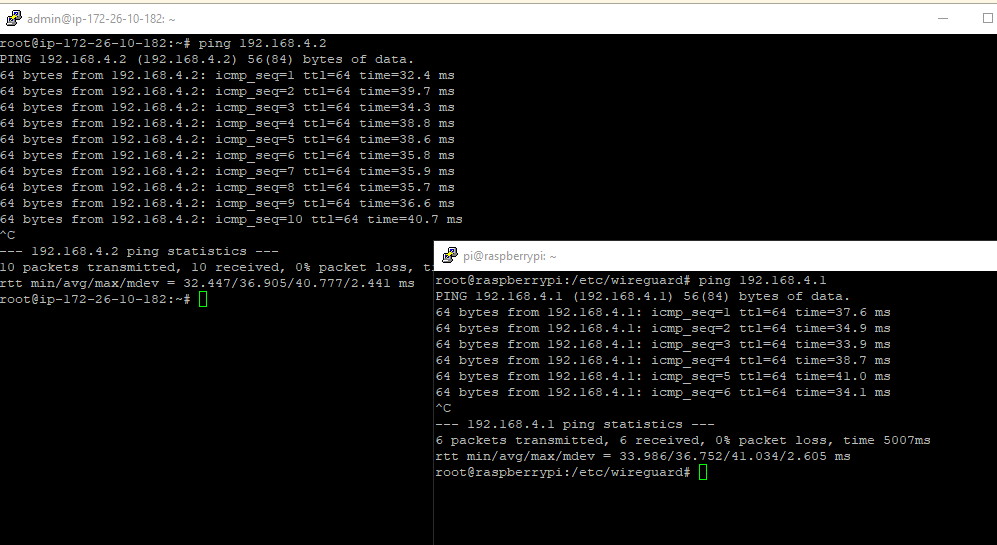
When everything is configured correctly, you should now be able to ping each computer from the other.
Forward traffic 
For this demo, I will install ngIRCd on the Raspberry Pi.
sudo apt install ngircd
This is a lightweight IRC server that listens, by default, on port TCP 6667.
I can connect to this service on my home network, but I want to expose it so that my friends can connect to it from anywhere.
For this purpose, I need to add some iptables rules to the VPS. Connect to the VPS with SSH and display the current network configuration.
sudo ip -4 addr show scope global
2: eth0: <BROADCAST,MULTICAST,UP,LOWER_UP> mtu 9001 qdisc pfifo_fast state UP group default qlen 1000
    inet 172.26.10.182/20 brd 172.26.15.255 scope global eth0
       valid_lft forever preferred_lft forever
3: wg0: <POINTOPOINT,NOARP,UP,LOWER_UP> mtu 8921 qdisc noqueue state UNKNOWN group default qlen 1
    inet 192.168.4.1/32 scope global wg0
       valid_lft forever preferred_lft forever
We need some of this information for setting up the iptables rules. Notice that on Amazon Lightsail, the servers have an internal IP address (in my case, 172.26.10.182). Packet forwarding from the external address (18.184.64.177) to this internal address is outside our control. Amazon handles this automatically.
Here, we set the default rule for the FORWARD chain to DROP so that nobody can forward packets. Then, we enable forwarding for packets coming from eth0 with a destination port of 6667.
sudo iptables -P FORWARD DROP
sudo iptables -A FORWARD -i eth0 -o wg0 -p tcp --syn --dport 6667 -m conntrack --ctstate NEW -j ACCEPT
sudo iptables -A FORWARD -i eth0 -o wg0 -m conntrack --ctstate ESTABLISHED,RELATED -j ACCEPT
sudo iptables -A FORWARD -i wg0 -o eth0 -m conntrack --ctstate ESTABLISHED,RELATED -j ACCEPT
Next, we need to add a rule that changes the destination address in the TCP packet to 192.168.4.2, the address of the Raspberry Pi on the other side of the VPN. This rule only applies to packets coming from eth0 and with a destination port of 6667. The second rule changes the source address so that the Raspberry Pi can send the response back to our server.
sudo iptables -t nat -A PREROUTING -i eth0 -p tcp --dport 6667 -j DNAT --to-destination 192.168.4.2
sudo iptables -t nat -A POSTROUTING -o wg0 -p tcp --dport 6667 -d 192.168.4.2 -j SNAT --to-source 192.168.4.1
I followed the description in this article to set up the rules:
https://www.digitalocean.com/community/tutorials/how-to-forward-ports-through-a-linux-gateway-with-iptables
You can find more information there if something is not working properly. Also, double-check if you enabled IP forwarding on this server (/etc/sysctl.conf). And make sure that you open the port of the service (6667) in the firewall of the VPS.
Forward SSH traffic 
You can forward any traffic from the VPS to your private server. In this section, I show you how to forward SSH traffic. The Lightsail VPS already uses port 22 for its SSH server, so we will choose another port (22222) and forward packets to this port to the other side of the VPN.
Make sure that you open the port in the firewall. Then, add the following rules. The PREROUTING rule in this example changes the destination address and the port from 22222 to 22 because the SSH server on the Raspberry Pi is listening on port 22.
sudo iptables -A FORWARD -i eth0 -o wg0 -p tcp --syn --dport 22 -m conntrack --ctstate NEW -j ACCEPT
sudo iptables -t nat -A PREROUTING -i eth0 -p tcp --dport 22222 -j DNAT --to-destination 192.168.4.2:22
sudo iptables -t nat -A POSTROUTING -o wg0 -p tcp --dport 22 -d 192.168.4.2 -j SNAT --to-source 192.168.4.1
Remember to harden your SSH server when you expose it like this. Choose a secure password, or even better, disable password authentication and use public/private key authentication. Also, disable root login over SSH.
Persistent iptables rules 
iptables rules are not persistent by default. If we want the rules to survive a reboot, we have to save them and load them during the boot process. The netfilter-persistent package takes care of all these tasks. Install it, then save the rules and enable the service so that it automatically starts up.
sudo apt install netfilter-persistent
sudo netfilter-persistent save
sudo systemctl enable netfilter-persistent