Google Cloud Vision is a service that analyzes pictures using machine learning algorithms. It can classify images, detect objects and faces, and read text within images. Cloud Vision is free for a limited number of requests each month. See the pricing page for more information.
Google Cloud Storage is a service for storing files, very similar to Amazon S3. It's an object storage where you can store and retrieve files. Cloud Storage is not free. Visit the pricing page for more information.
In this blog, we're going to develop a simple web application that takes a picture, sends it to Google Cloud Vision, and displays the result.
When you send a request to Cloud Vision, you have to specify one or more images for the service to analyze. There are two ways to send images to Cloud Vision: either attach the binary data of the images directly to the request or store the images on Cloud Storage beforehand and only send the storage locations to Cloud Vision. In the latter case, Cloud Vision fetches the files from Cloud Storage.
Theoretically, a web application could directly send requests to Cloud Vision from a browser. All these services are accessible over an HTTP API. The problem with this approach is that a client needs authorization to access any Google service. If you put these access and private keys into a web application, they would be publicly accessible, and someone could steal them and use them in their own application.
A better and more secure architecture is to hide these access and private keys behind a server back end. The web application primarily communicates with that server (1, 4), and the server communicates with the Google Cloud services (2, 3).

We're following this approach and writing a Spring Boot back end that runs on a VPS. There is just one downside to this architecture. We upload the image twice: first from the web application to our server (1) and from there to the Google Cloud (2). If our back end runs in the Google Cloud on Google Compute Engine or Google App Engine, this might not matter. But I usually, and for this example, use virtual private servers from other providers.
It would be ideal if a client could directly upload pictures to Google Storage without forcing each user to create a Google account or loosen access restrictions on the Cloud Storage bucket and allow everyone to upload files.
Fortunately, there is a solution to this problem. It's called signed URLs. It's a mechanism to give a client time-limited read or write access to a specific resource on Cloud Storage. A client that possesses this URL can either upload or retrieve a file. Signed URLs are a feature you may already know from Amazon S3. I wrote a blog post a couple of months ago about this topic and presented an upload example that sends files to a self-hosted Minio server.
With signed URLs, the web application can upload pictures directly to Cloud Storage, and the final architecture of our demo application looks like this.

The client asks our server for a signed URL (1), the server generates the URL and sends it back (2). The web application uploads the picture with this URL directly to Google Cloud Storage. After the upload, the client sends a request to our server (4) to indicate that the picture is stored on Cloud Storage, and our server can now send the Cloud Vision request. The server sends the Cloud Vision request to Google (5) and receives the response (6). The Spring Boot application then maps the response into a more suitable format and sends it to the web application (7), where the Ionic app displays the result on the screen.
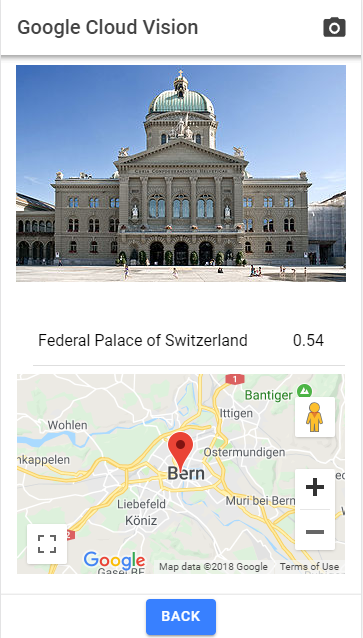
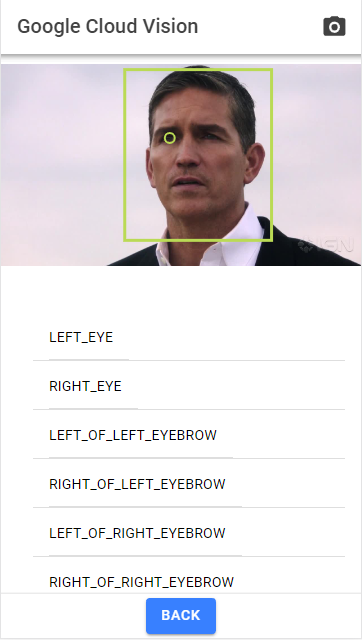
Two examples with a landmark and a face.
Source code for the Ionic web application and the Spring Boot server are hosted on GitHub: https://github.com/ralscha/blog/tree/master/googlevision
In the following sections, we're going to look at certain aspects of the app and see how they are implemented.
Setup 
Client 
The web application is written with the Ionic Framework and based on the blank starter template, and the Spring Boot is created with Spring Initializr.
Server 
Google provides Java client libraries for accessing their cloud services. For this example, we add the Cloud Storage and Vision library to our server project.
    <dependency>
      <groupId>com.google.cloud</groupId>
      <artifactId>google-cloud-storage</artifactId>
      <version>2.54.0</version>
    </dependency>

    <dependency>
      <groupId>com.google.cloud</groupId>
      <artifactId>google-cloud-vision</artifactId>
      <version>3.68.0</version>
    </dependency>
Now open the Google API console (you need a Google account for that) and create either a new project or choose an existing one.
In the Library menu, search for Cloud Vision API, Maps JavaScript API, and Google Cloud Storage JSON API and enable them.
Open the Credentials menu and create a Service account key (choose JSON as key type) and download the file to your computer. Also, in the Credentials menu, create an API key for Google Maps. Select HTTP referrers (websites) under Application restrictions and enter the URLs that are allowed to show the map. In my case, I added http://localhost:8100/* for development and https://demo.rasc.ch/* for production.
In the Spring Boot project, we need to import the Service account file before we can access Google services.
I created a class annotated with @ConfigurationProperties to externalize the path to the Service account file. You should not add this file to your project and push it into a publicly accessible source code management system. Anyone who has access to this file can access the Google services on your behalf.
The constructor of the rest controller handles the import of the service account file and the configuration of the Google client libraries. The constructor creates an instance variable storage (com.google.cloud.storage.Storage), which serves as the entry point to the Cloud Storage API, and imageAnnotatorSettings (com.google.cloud.vision.v1.ImageAnnotatorSettings), which we're going to use for creating a Cloud Vision client. Each time the application sends a request to Cloud Vision, it creates a new client.
  public VisionController(AppConfig appConfig) {
    Path serviceAccountFile = Paths.get(appConfig.getServiceAccountFile());

    try (InputStream is = Files.newInputStream(serviceAccountFile)) {
      GoogleCredentials credentials = GoogleCredentials.fromStream(is);
      StorageOptions options = StorageOptions.newBuilder().setCredentials(credentials)
          .build();
      this.storage = options.getService();
Also, in the constructor, the application creates a bucket on Cloud Storage. The important part here is that we configure CORS on this bucket because we're going to use signed URLs, and they only work when CORS is appropriately configured. This example only uploads pictures to Cloud Storage, so we only allow PUT requests. If you use signed URLs for downloading files, you need to allow GET.
        Cors cors = Cors.newBuilder().setMaxAgeSeconds(3600)
            .setMethods(Collections.singleton(HttpMethod.PUT))
            .setOrigins(appConfig.getOrigins().stream().map(Origin::of)
                .collect(Collectors.toList()))
            .setResponseHeaders(
                Arrays.asList("Content-Type", "Access-Control-Allow-Origin"))
            .build();
Take a Picture 
The user of the application needs a way to select a picture that they want to analyze. The web application is written with Ionic and Angular and primarily targets browsers on mobile devices.
A common way to access the camera and photo gallery on a mobile device is to wrap the HTML/JS and CSS code with a native wrapper, like Cordova and Capacitor. These wrappers provide interfaces to native APIs that are not implemented in mobile browsers.
As a challenge, I wanted to forgo the native wrapper approach and see if there is a practical way to access the camera and photo gallery from a pure web application running on a mobile browser.
On desktop browsers, the good old input type="file" tag provides the necessary functionality for selecting a file. Fortunately, this tag has learned a few tricks over the last couple of years.
With the proper configuration, the input file tag on a mobile device opens a dialog where the user can choose between selecting a picture from the gallery or taking a picture with the camera.
To enable this behavior, we only have to add the attribute accept="image/*" to the input tag.
  <input #fileSelector (change)="onFileCange($event)" accept="image/*" style="display: none;"
         type="file">
This works on iOS and Android, although I only tested it with the latest version of mobile Safari and Chrome. I don't know how this behaves on older versions.
To make this a bit more visually appealing, I hide the native input tag element and instead show a camera icon in the top right corner.
When the user taps on the icon, the TypeScript code calls the click() method on the native input tag.
The result is the same as if the user clicked/tapped on the input tag itself.
      <ion-button (click)="clickFileSelector()">
        <ion-icon name="camera-outline" slot="icon-only" />
      </ion-button>
  clickFileSelector(): void {
    this.fileInput().nativeElement.click();
  }
After the user selects a file, the code receives a reference to this picture in the form of a File object. From here, the application could display the image with an img tag on the HTML page.
But for this example, I wanted to draw the picture into a canvas element because the Cloud Vision API sends back x/y coordinates for detected faces, objects, texts, and logos, and the canvas provides an easy way to draw shapes.
To load the picture into a canvas element, the application first creates a URL from the File object with URL.createObjectURL and creates an Image object, registers an onload handler on this Image object, and assigns the URL to image.src. This triggers the loading of the picture into the Image object.
  onFileCange(event: Event): void {
    // @ts-ignore
    this.selectedFile = event.target.files[0];
    const url = URL.createObjectURL(this.selectedFile!);

    this.image = new Image();
    this.image.onload = async () => {
      this.drawImageScaled(this.image);

      const loading = await this.loadingController.create({
        message: 'Processing...'
      });

      this.visionResult = null;
      this.selectedFace = null;
      this.detail = null;
      this.markers = [];

      await loading.present();

      try {
        await this.fetchSignUrl();
      } finally {
        loading.dismiss();
      }
    };
    this.image.src = url;
  }
After the browser successfully loads the picture, the handler passes the image reference to drawImageScaled(), which draws the image into the canvas. drawImageScaled() also takes care of scaling the picture, so it fits into the visible display.
  private drawImageScaled(img: any): void {
    const width = this.canvasContainer().nativeElement.clientWidth;
    const height = this.canvasContainer().nativeElement.clientHeight;

    const hRatio = width / img.width;
    const vRatio = height / img.height;
    this.ratio = Math.min(hRatio, vRatio);
    if (this.ratio > 1) {
      this.ratio = 1;
    }

    this.canvas().nativeElement.width = img.width * this.ratio;
    this.canvas().nativeElement.height = img.height * this.ratio;

    this.ctx.clearRect(0, 0, width, height);
    this.ctx.drawImage(img, 0, 0, img.width, img.height,
      0, 0, img.width * this.ratio, img.height * this.ratio);
  }
Back in the onFileChange() method and after drawing the picture, the method calls fetchSignUrl(). This method is responsible for calling the Spring Boot server and requesting a signed URL.
To create a signed URL, the server needs to know the Cloud Storage bucket name, the object name, and the content type of the file. The bucket name is a string constant on the server. The object name is a random UUID that the server generates. So the only information our server needs from the client is the content type. This information is stored in the type property of the File object, and the web app sends it together with the POST request in the body to the server.
  private async fetchSignUrl(): Promise<void> {
    if (this.selectedFile === null) {
      return Promise.reject('no file selected');
    }

    const formData = new FormData();
    formData.append('contentType', this.selectedFile.type);

    const response = await fetch(`${environment.serverURL}/signurl`, {
      method: 'POST',
      body: formData
    });
    const {uuid, url} = await response.json();

    await this.uploadToGoogleCloudStorage(url);
    await this.initiateGoogleVision(uuid);
  }
Sign URL 
The implementation of the /signurl endpoint first creates a random UUID that serves as the filename on Google Cloud Storage.
Then it calls storage.signUrl() from the Cloud Storage client library, passing the bucket and object name and the file content type, that we get from the client, as arguments to the method call.
We also specify how long the signed URL is valid (3 minutes) and which HTTP methods are allowed with this URL (PUT). And lastly, we require that the HTTP header Content-Type is specified in the PUT request.
The Cloud Storage client library takes all this information and generates the requested signed URL. If you want to know how this works under the hood, you can find more information on this page: https://cloud.google.com/storage/docs/access-control/signing-urls-manually
    @PostMapping("/signurl")
    public SignUrlResponse getSignUrl(@RequestParam("contentType") String contentType) {
        String uuid = UUID.randomUUID().toString();
        String url = this.storage.signUrl(
                BlobInfo.newBuilder(BUCKET_NAME, uuid).setContentType(contentType)
                        .build(),
                3, TimeUnit.MINUTES, SignUrlOption.httpMethod(HttpMethod.PUT),
                SignUrlOption.withContentType()).toString();
        return new SignUrlResponse(uuid, url);
    }
The UUID and the signed URL are sent back to the client in the SignUrlResponse POJO.
Upload to Google Cloud Storage 
With the signed URL, the client now has the required permission to upload the picture to Cloud Storage. This is a straightforward PUT request with the Fetch API. The only requirement is that we add the Content-Type in the request header.
We can directly reference the File object from the input tag. The Fetch API takes care of reading the binary data and attaching it to the request body.
  private async uploadToGoogleCloudStorage(signURL: string): Promise<void> {
    if (this.selectedFile === null) {
      return Promise.reject('no file selected');
    }

    await fetch(signURL, {
      method: 'PUT',
      headers: {
        'Content-Type': this.selectedFile.type,
      },
      body: this.selectedFile
    });
  }
Google Cloud Vision 
After the client successfully uploads the file to Google Cloud Storage, they send a POST request to our Spring Boot back end to indicate that the file is now stored in the Google Cloud, and the server can send the request to the Cloud Vision API.
  private async initiateGoogleVision(uuid: string): Promise<void> {
    const formData = new FormData();
    formData.append('uuid', uuid);

    const response = await fetch(`${environment.serverURL}/vision`, {
      method: 'POST',
      body: formData
    });
    this.visionResult = await response.json();
  }
The client sends the UUID as a parameter, which is the file name of the picture on Cloud Storage.
Cloud Vision requires either the binary data of the picture directly attached to the request or a Cloud Storage location. When you specify a Cloud storage location, it has to follow this syntax: gs://bucket_name/object_name. In our example, the bucket name is a string constant, and the UUID is the file name.
Before we call the Cloud Vision API, we have to decide what feature the service should detect. For this example, we specify seven features (face, landmark, logo, label, text, safe search, and web). In a real-world application, you may only be interested in one or two features. For example, if you are developing an image gallery application, only the label detection might be interesting for your use case.
      Image img = Image.newBuilder()
          .setSource(
              ImageSource.newBuilder().setImageUri("gs://" + BUCKET_NAME + "/" + uuid))
          .build();

      AnnotateImageRequest request = AnnotateImageRequest.newBuilder()
          .addFeatures(Feature.newBuilder().setType(Type.FACE_DETECTION).build())
          .addFeatures(Feature.newBuilder().setType(Type.LANDMARK_DETECTION).build())
          .addFeatures(Feature.newBuilder().setType(Type.LOGO_DETECTION).build())
          .addFeatures(Feature.newBuilder().setType(Type.LABEL_DETECTION)
              .setMaxResults(20).build())
          .addFeatures(Feature.newBuilder().setType(Type.TEXT_DETECTION).build())
          .addFeatures(Feature.newBuilder().setType(Type.SAFE_SEARCH_DETECTION).build())
          .addFeatures(
              Feature.newBuilder().setType(Type.WEB_DETECTION).setMaxResults(10).build())
          .setImage(img).build();

      // More Features:
      // DOCUMENT_TEXT_DETECTION
      // IMAGE_PROPERTIES
      // CROP_HINTS
      // PRODUCT_SEARCH
      // OBJECT_LOCALIZATION
Note that only 1000 requests per feature per month are free. We can call this method 1000 times a month and stay within the free tier. The Product Search that we don't use here has a free tier of 100 units per day. These are the prices at the time of writing this blog post (December 2018). Check the pricing page https://cloud.google.com/vision/pricing first before starting to play with the API to prevent unexpected charges.
The client library for the Google Cloud Vision API supports multiple images in one request. Here we only send one image per request. For each image in the request, the API sends back an AnnotateImageResponse instance, which contains the detection results.
      BatchAnnotateImagesResponse response = vision.batchAnnotateImages(requests);
      List<AnnotateImageResponse> responses = response.getResponsesList();

      VisionResult result = new VisionResult();
      AnnotateImageResponse resp = responses.get(0);
The code then copies the values from the AnnotateImageResponse into the VisionResult POJO and sends it back to the client as JSON.
For the sake of brevity, I don't show the code here, but you can find everything on GitHub: https://github.com/ralscha/blog/blob/master/googlevision/server/src/main/java/ch/rasc/googlevision/VisionController.java#L161-L402
As the last step, the method deletes the uploaded image on Cloud Storage. We no longer need it, and to save money, we can remove it.
    finally {
      this.storage.delete(BlobId.of(BUCKET_NAME, uuid));
    }
Back on the client, the Ionic web application shows the response from the Cloud Vision call below the picture. The results are grouped by the requested feature. Lists for Label and Safe Search Detection are just read-only. The items in the other lists are tappable, and the application draws a rectangle or a small circle (face landmarks) on the picture to show the location where the Cloud Vision API detected this particular feature (see screenshots above).
One special case is the landmarks. When you tap on a detected landmark, the application shows you a Google Maps map with a marker where the Vision API thinks this landmark is.
Google Maps is integrated with the Angular Google Maps library. This library provides components that you can add to the HTML template. A straightforward way to integrate Google Maps into an Angular app.
  <div id="map">
    @if (markers.length > 0) {
      <google-map [options]="mapOptions">
        @for (m of markers; track m) {
          <map-marker [position]="{lat: m.lat, lng: m.lng}" />
        }
      </google-map>
    }
  </div>
This concludes our journey through the demo application. We learned how to select pictures in a web application, create signed URLs, upload files directly from a browser to Google Cloud Storage, and send requests to Google Cloud Vision.
If you have further questions or ideas for improvement, send me a message.