When you need to convert written text to speech in a web application, you can use the built-in Web Speech API. A look at the caniuse.com chart shows us that this API is widely supported in all modern browsers: https://caniuse.com/#feat=speech-synthesis
Create a SpeechSynthesisUtterance object with the text to convert, and then pass the object to the speechSynthesis.speak() method.
  const utterance = new SpeechSynthesisUtterance('Hello World!');
  window.speechSynthesis.speak(utterance);
Visit this MDN page for more information:
https://developer.mozilla.org/en-US/docs/Web/API/Web_Speech_API
I can also recommend this video from Traversy about the Speech API: https://www.youtube.com/watch?v=ZORXxxP49G8
For this blog post, I wanted to try something different. Instead of using the built-in API, I wanted to use a Google service: Google Cloud Text-to-Speech.
This service was made publicly available in August 2018 and complements the already existing Speech-to-text service (see my previous blog post).
The service is free up to a certain number of converted characters. At the time of writing this blog post, standard (non-WaveNet) voices are free up to 4 million characters and then cost USD 4.00 for each additional 1 million characters. WaveNet voices are free up to 1 million characters and then cost USD 16.00 per 1 million characters. Visit the homepage for the current prices: https://cloud.google.com/text-to-speech/
These limits should be more than enough for experimenting with the service without incurring any costs.
Server 
Like most Google services, you need to authenticate a call to the service. To do that, you first need to create a Google account (if you don't already have one). Then go to the API Console, create a project, and add the Cloud Text-to-Speech API to the project. Next, you have to create a Service Account Key in the Credentials menu. Select the Key type JSON and download the file.
We can't directly call the service from the browser. Although technically possible, it would expose the service account to the world, and you have to keep this information secret. Also, make sure that you don't accidentally commit this file to a public repository.
To access the service, we create a Spring Boot application that exposes an HTTP POST endpoint. This endpoint receives the request from our web application, sends the text to Google, waits for the response, and returns the sound file to the browser.
Google makes access to the service from Java straightforward by providing a client library. To use this library, we add the following dependency to the pom.xml in a Maven-managed project:
    <dependency>
      <groupId>com.google.auth</groupId>
      <artifactId>google-auth-library-credentials</artifactId>
      <version>1.37.1</version>
    </dependency>
Because I don't add the service account file to the project, I externalized the path setting. This allows me to configure the path to the service account file from outside the packaged application. For this reason, I wrote this class:
package ch.rasc.text2speech;

import org.springframework.boot.context.properties.ConfigurationProperties;
import org.springframework.stereotype.Component;

@ConfigurationProperties(prefix = "app")
@Component
public class AppConfig {
  private String credentialsPath;

  public String getCredentialsPath() {
    return this.credentialsPath;
  }

  public void setCredentialsPath(String credentialsPath) {
    this.credentialsPath = credentialsPath;
  }

}
and then configured the path in src/main/resources/application.properties:
app.credentialsPath = ./googlecredentials.json
In the controller, we inject the configuration bean, read the service account file, and create an instance of TextToSpeechClient. This object is the access point to the Google service.
@RestController
@CrossOrigin
public class Text2SpeechController {

  private TextToSpeechClient textToSpeechClient;

  public Text2SpeechController(AppConfig appConfig) {
    try {
      ServiceAccountCredentials credentials = ServiceAccountCredentials
          .fromStream(Files.newInputStream(Paths.get(appConfig.getCredentialsPath())));
      TextToSpeechSettings settings = TextToSpeechSettings.newBuilder()
          .setCredentialsProvider(FixedCredentialsProvider.create(credentials)).build();
      this.textToSpeechClient = TextToSpeechClient.create(settings);
    }
    catch (IOException e) {
      LoggerFactory.getLogger(Text2SpeechController.class)
          .error("init Text2SpeechController", e);
    }
  }
When you send a request to the Text-to-Speech service, you have to specify the voice used for the speech. We could hardcode this in the web application, but this can change over time, and it's better to use a dynamic approach. On the server, we add a GET endpoint that asks Google's service for a list of all supported voices and then returns this information to our web application. In JavaScript, we're going to call this endpoint with fetch and fill the values into select elements.
  @GetMapping("voices")
  public List<VoiceDto> getSupportedVoices() {
    ListVoicesRequest request = ListVoicesRequest.getDefaultInstance();
    ListVoicesResponse listreponse = this.textToSpeechClient.listVoices(request);
    return listreponse.getVoicesList().stream()
        .map(voice -> new VoiceDto(getSupportedLanguage(voice), voice.getName(),
            voice.getSsmlGender().name()))
        .collect(Collectors.toList());
  }
Next, we implement the POST endpoint that receives the request from our web application with the written text, sends it to Google, receives back a sound file, and sends it to the web application.
The code creates the request, configures the text, pitch, speaking rate, and encoding, then sends the request to Google with the textToSpeechClient instance we created in the constructor. The response contains the audio file as a byte array that the service returns to the caller.
  @PostMapping("speak")
  public byte[] speak(@RequestParam("language") String language,
      @RequestParam("voice") String voice, @RequestParam("text") String text,
      @RequestParam("pitch") double pitch,
      @RequestParam("speakingRate") double speakingRate) {

    SynthesisInput input = SynthesisInput.newBuilder().setText(text).build();

    VoiceSelectionParams voiceSelection = VoiceSelectionParams.newBuilder()
        .setLanguageCode(language).setName(voice).build();

    AudioConfig audioConfig = AudioConfig.newBuilder().setPitch(pitch)
        .setSpeakingRate(speakingRate).setAudioEncoding(AudioEncoding.MP3).build();

    SynthesizeSpeechResponse response = this.textToSpeechClient.synthesizeSpeech(input,
        voiceSelection, audioConfig);

    return response.getAudioContent().toByteArray();
  }
The Google service supports Linear PCM, Opus, and MP3 as output formats. In this example, we use MP3, which all browsers support.
Client 
The client is an Angular/Ionic web application. The application consists of just one page where the user can enter the pitch, speaking rate, select the voice and language, and enter the text to be converted to speech.
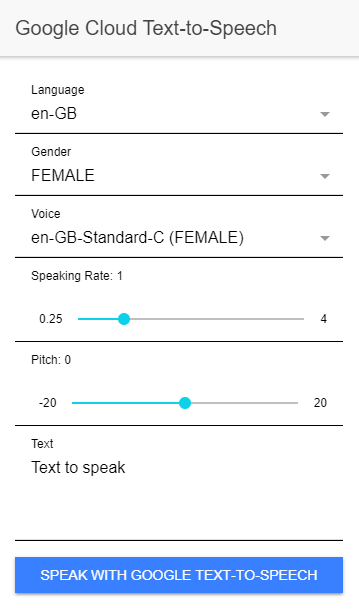
In the constructor of the page, the application first calls the loadVoices() method, which sends a request to the /voices endpoint of our Spring Boot server and then populates the select elements with the supported voices.
  private async loadVoices(): Promise<void> {
    const response = await fetch(`${environment.SERVER_URL}/voices`);
    this.voicesResponse = await response.json();
    this.languages = this.voicesResponse.map(v => v.language).filter(this.onlyUnique).sort();
    this.genders = this.voicesResponse.map(v => v.gender).filter(this.onlyUnique).sort();

    this.selectedGender = 'FEMALE';
    this.selectedLanguage = 'en-GB';
    this.selectedVoice = 'en-GB-Wavenet-A';
    this.text = 'Text to speak';
    this.voices = this.voicesResponse.filter(this.matches.bind(this));
  }
When the user enters text and clicks "Speak with Google Text-to-Speech," the speakWithGoogle() method is called. This method first creates a FormData object with all the necessary information and then sends it with a POST request to our server.
  async speakWithGoogle(): Promise<void> {
    if (this.selectedLanguage === null || this.selectedVoice === null) {
      return Promise.reject('no language or voice selected');
    }

    const formData = new FormData();
    formData.append('language', this.selectedLanguage);
    formData.append('voice', this.selectedVoice);
    formData.append('text', this.text);
    formData.append('pitch', this.pitch.toString());
    formData.append('speakingRate', this.speakingRate.toString());

    const loadingElement = await this.loadingController.create({
      message: 'Generating mp3...',
      spinner: 'crescent'
    });
    await loadingElement.present();

    let mp3Bytes = null;
    try {
      const response = await fetch(`${environment.SERVER_URL}/speak`, {
        body: formData,
        method: 'POST'
      });
      mp3Bytes = await response.arrayBuffer();
    } finally {
      await loadingElement.dismiss();
    }
When the call is successful, the application receives an MP3 file and plays it with the AudioContext API.
    if (mp3Bytes !== null) {
      const audioContext = new AudioContext();
      const audioBufferSource = audioContext.createBufferSource();

      audioBufferSource.buffer = await audioContext.decodeAudioData(mp3Bytes);

      audioBufferSource.connect(audioContext.destination);
      audioBufferSource.loop = false;
      audioBufferSource.start(0);
    }
This is all you need. Start the Spring Boot server, start the web application with ionic serve, and then you can experiment with the different input parameters.
According to Google, the WaveNet voices are powered by the machine learning project DeepMind and should sound more natural than the standard voices. Note that the WaveNet voices are also more expensive, and only 1 million characters each month are free.
You can find the complete source code for this example on GitHub:
https://github.com/ralscha/blog/tree/master/text2speech