Adding a service worker to an Angular app is quite easy. Issue the command ng add @angular/pwa, and it adds a
fully functional service worker to your project that caches all your assets. As convenient as this solution is,
it has the drawback that you have to use the code that the library provides, and there is no way to change it.
Depending on your use case, this might not be a problem, and the Angular service worker fits your needs.
There is a way to add additional custom code to the Angular service worker. If you want to learn more, visit my blog post that shows you how to add code for background synchronization to an Angular service worker.
Read more about the Angular service worker here: https://angular.io/guide/service-worker-intro
When the Angular service worker does not cover your use case, or you want to be in full control of the service worker, you have to write your own code. You can do this either from scratch or with the help of a library. Writing a service worker from scratch is not the easiest thing, and you have to be vigilant that your code covers all cases correctly. To simplify development, we choose the latter approach and write the service worker with the help of the Workbox library from Google. The library provides a high-level API that makes it very convenient to write service worker code.
This tutorial does not cover every aspect of the Workbox library. We only see a small part of the library that covers resource caching. We use that part of Workbox to cache all our resources so that the Angular application can run even when it does not have a network connection.
Manifest 
Every PWA needs a manifest file. This is a JSON file that tells the browser about your Progressive Web App (PWA) and configures things like the name and paths to the icons.
For this application, I created the manifest file with this online generator: https://app-manifest.firebaseapp.com/
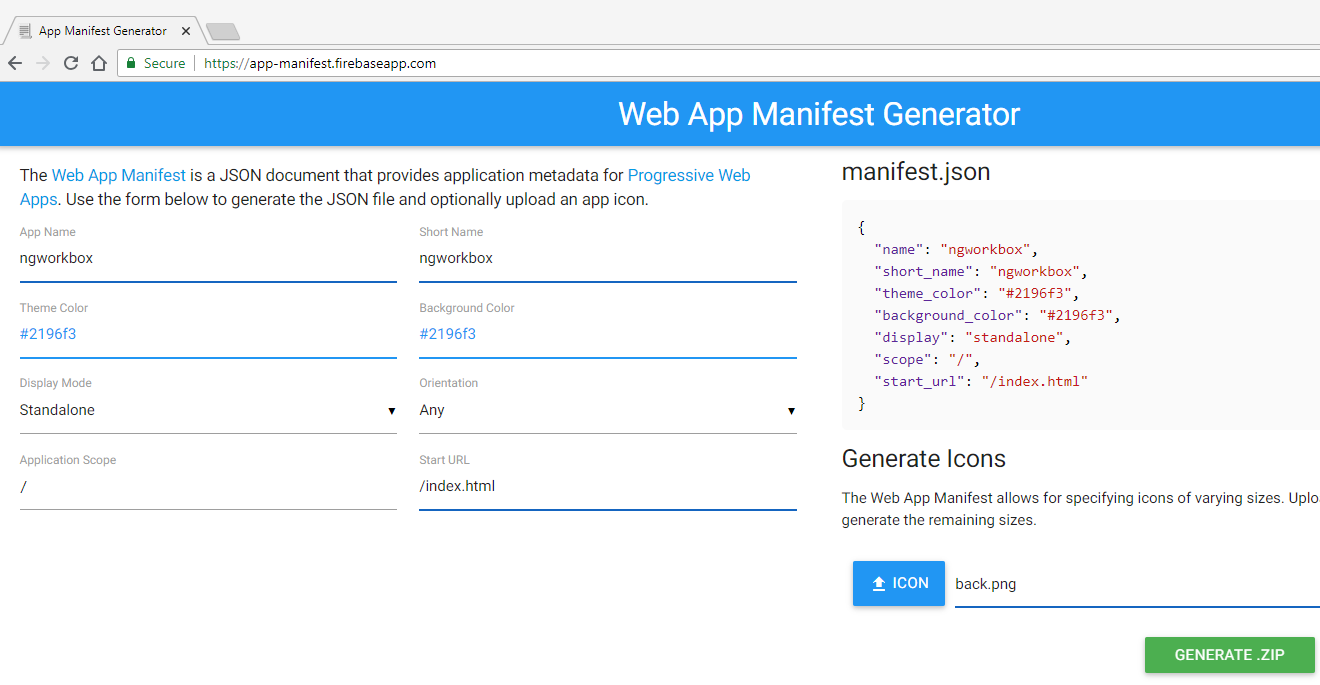
Enter the requested information and upload an image with a size of 512x512 pixels. The service creates the JSON file and icons in different sizes.
Copy manifest.json into the src folder. Copy the icons anywhere in the assets folder.
I copied them into the src/assets/icons directory. If necessary, change the path to the icons in the manifest file.
We have to tell Angular about the new file. Add "src/manifest.json" to the assets array.
Angular CLI ignores the file if it's not listed there.
            "assets": [
              "src/favicon.ico",
              "src/assets",
              "src/manifest.json",
              "src/service-worker.js"
            ],
And lastly, we add a link to the manifest file in the index.html file
<link href="manifest.json" rel="manifest">
I recommend this website if you want to learn more about manifest files: https://web.dev/articles/add-manifest
Service Worker 
Before we write our service worker, we install the Workbox library with npm
npm install workbox-core workbox-precaching workbox-routing workbox-strategies workbox-window
npm install workbox-cli -D
Next, create the file src/service-worker.ts. You can also create a subfolder inside src if your service worker is composed
of different files, and you want to group them. The service worker we are going to write is a regular TypeScript application.
We can import 3rd party libraries, and we can split the code into multiple files and import them.
Paste the following code into src/service-worker.ts
/// <reference lib="es2018" />
/// <reference lib="webworker" />
import {precacheAndRoute} from 'workbox-precaching';
import {clientsClaim, skipWaiting} from 'workbox-core';
import {registerRoute} from 'workbox-routing';
import {CacheFirst} from 'workbox-strategies';

declare const self: ServiceWorkerGlobalScope;

skipWaiting();
clientsClaim();

registerRoute(
  /assets\/images\/icons\/icon-.+\.png$/,
  new CacheFirst({
    cacheName: 'icons'
  })
);

precacheAndRoute(self.__WB_MANIFEST);
The code for this example is straightforward. We import the required objects and functions from the Workbox
library. Then the application calls skipWaiting(), which forces the waiting service worker to become the active one,
and, together with clientsClaim(), makes sure that the new service worker immediately takes over for both the current client
and all other active clients. Be aware that this can lead to problems in certain circumstances.
Read more about these methods on MDN: https://developer.mozilla.org/en-US/docs/Web/API/ServiceWorkerGlobalScope/skipWaiting https://developer.mozilla.org/en-US/docs/Web/API/Clients/claim
And I recommend this article about the lifecycle of service workers: https://web.dev/articles/service-worker-lifecycle
Next, our service worker registers a cache-first route for the icons. This route watches for requests from the browser that fetches icons. If the icon is already stored in the cache, the service worker sends back the cached resource. If it's not in the cache, the service worker sends the request to the server, caches the response, and then forwards the response back to the browser. We don't want to load all icons into the cache, only the ones the browser needs. That's the reason we handle them differently than the other application resources.
The important line is precacheAndRoute(self.__WB_MANIFEST);. With this method, the service worker registers routes, loads, and caches all
the resources (CSS, JavaScript, Fonts, Images, ...) that are needed to run the Angular application.
You might be wondering why we pass self.__WB_MANIFEST as the argument to the method.
Shouldn't we pass a list of resources? That's correct, and it is what we have to do. But we don't know the names of the resources
until the Angular CLI builds the application. The Angular build system creates versioned file names with a hash in their names,
so the filenames are different each time we do a production build of our application.
This is the job of the Workbox CLI. It is going to run after Angular's production build, collect all the resources
we want to precache, open the service worker file, and replace the string self.__WB_MANIFEST with an array of paths.
Note that your service worker does not have to look exactly like the example above. The only code you have to add is the declare line if you want to use self in your code. The TypeScript compiler complains and fails with an error if this statement is missing.
And when your goal is to create an offline application, you have to add the precacheAndRoute(self.__WB_MANIFEST); line.
In this blog post, we only use a small fraction of the Workbox library. If you want to learn more, visit the project page, there you find comprehensive documentation about all the provided modules and functions.
Load Service Worker 
In this section, we add code that loads the service worker into the browser.
We can do this in different ways. A simple way is to add the following code to index.html.
<script>
if ('serviceWorker' in navigator) {
  window.addEventListener('load', () => {
    navigator.serviceWorker.register('/service-worker.js');
  });
}
</script>
Another approach is to load the worker in main.ts. The method bootstrapApplication(AppComponent) loads
the Angular application and returns a Promise that allows us to add code in then() that runs after the application has been
initialized. This has the benefit that we can write the code in TypeScript. A simple loader could look like this.
function loadServiceWorker(): void {
  // if (environment.production && ('serviceWorker' in navigator)) {
  if ('serviceWorker' in navigator) {
    navigator.serviceWorker.register('service-worker.js')
      .catch(err => console.error('Service worker registration failed with:', err));
  }
}

bootstrapApplication(AppComponent, {
  providers: []
})
  .then(() => loadServiceWorker())
  .catch(err => console.error(err));
Another benefit is that we have access to environment.production. We could wrap the code with an if statement
and only load the service worker when the application runs in production.
In this example, I choose a slightly different approach. The application loads the service worker in main.ts,
but uses another Workbox package: workbox-window
Unlike the other Workbox modules, workbox-window runs in the window context, and the goal is to simplify the service worker registration process and to prevent common mistakes. I recommend visiting the project page to learn more about this module.
The following code shows you an example of how you can load a service worker with workbox-window. You can use this module with any service worker; it does not have to be a worker written with Workbox.
function loadServiceWorker(): void {
  // if (environment.production && ('serviceWorker' in navigator)) {
  if ('serviceWorker' in navigator) {
    const wb = new Workbox('service-worker.js');

    wb.addEventListener('activated', (event) => {
      if (!event.isUpdate) {
        console.log('Service worker activated for the first time!');
      } else {
        console.log('Service worker activated!');
      }
    });

    wb.addEventListener('waiting', (event) => {
      console.log(`A new service worker has installed, but it can't activate` +
        `until all tabs running the current version have fully unloaded.`);
    });

    wb.addEventListener('installed', (event) => {
      if (!event.isUpdate) {
        console.log('Service worker installed for the first time');
      } else {
        console.log('Service worker installed');
      }
    });

    wb.register();
  }
}

bootstrapApplication(AppComponent, {
  providers: []
})
  .then(() => loadServiceWorker())
  .catch(err => console.error(err));
Make sure that you install the package workbox-window. We already did that in a previous step. Import the Workbox object from
the library, create a new object, pass the path to the worker, and then call the method register() to load and install the service worker.
The example above also shows you how to listen to events.
Workbox CLI configuration 
In our service worker, we added code to precache the application resources (precacheAndRoute). Workbox
does not magically know what resources we want to cache. Instead, we have to tell the CLI which files
belong to our application. This is what we do in this section.
In the root of our project, we create the file workbox-config.js and paste the following code:
module.exports = {
  globDirectory: "dist/app/",
  globPatterns: ["**/*.{css,eot,html,ico,jpg,js,json,png,svg,ttf,txt,webmanifest,woff,woff2,webm,xml}"],
  globFollow: true,
  globStrict: true,
  globIgnores: ['3rdpartylicenses.txt', 'assets/images/icons/icon-*.png'],
  dontCacheBustURLsMatching: new RegExp('.+.[a-f0-9]{20}..+'),
  maximumFileSizeToCacheInBytes: 5000000,
  swSrc: "dist/app/service-worker.js",
  swDest: "dist/app/service-worker.js"
};
This file tells the Workbox CLI what resources we want to precache.
You find a detailed description of all supported options on this page:
https://developer.chrome.com/docs/workbox/modules/workbox-build#.injectManifest
For this example, the CLI looks in the dist/app/ folder for every file that matches the
globPatterns but does not match the globIgnores pattern.
We also ignore the icons in the assets folder. We only want to cache the icons
that the browser needs, which is why we added registerRoute to our service worker code.
Workbox adds, by default, a cache-buster to URLs when it loads resources, but the Angular CLI already
creates files with a hash in their name when we do a production build. Therefore, we tell Workbox CLI, with
the option dontCacheBustURLsMatching, to not add a cache-buster to URLs of resources that already have a hash in their name.
The regular expression looks for a 20-character hex string in the filename.
Webpack 
Our service worker is written in TypeScript and does not run as is in a browser. So we have to add a build step that transpiles the code into JavaScript and bundles everything together into one file. We do this with Webpack.
First, we install the required packages
npm install rimraf ts-loader webpack webpack-cli -D
Because we only need the packages during build time, we install them as development dependencies.
Next, we create the configuration file for Webpack. The name and location of this file are not relevant. In this example,
the file is called sw-prod-webpack.config.js and located at the root of the project.
Paste the following code into the file. Change the entry path if your service-worker.ts file is located somewhere else.
const path = require('path');

module.exports = {
  mode: 'production',
  entry: path.join(__dirname, 'src', 'service-worker.ts'),
  output: {
    path: path.join(__dirname, 'dist', 'app'),
    filename: 'service-worker.js'
  },
  module: {
    rules: [
      {
        test: /\.ts$/,
        loader: 'ts-loader',
        exclude: /node_modules/,
        options: {
          onlyCompileBundledFiles: true
        }
      }
    ]
  },
  resolve: {
    extensions: ['.ts', '.wasm', '.mjs', '.js', '.json']
  }
};
This configuration tells Webpack to use the production mode, which includes a minification step (Terser).
The output is stored in dist/app/service-worker.js, and the ts-loader rule is responsible for
compiling the TypeScript code into JavaScript.
Scripts 
We have configured the Workbox and Webpack CLI, and now we need a way to start both programs.
We do this with a npm script. Open package.json and add the following script.
"sw-prod-webpack": "rimraf ./dist/app/service-worker.js && webpack --config ./sw-prod-webpack.config.js --progress --color && workbox injectManifest ./workbox-config.js"
The script first deletes an old build output. Then it runs Webpack. Change the --config parameter if the path and
name of the Webpack configuration file are different in your project.
Lastly, the script starts the Workbox CLI, which replaces self.__WB_MANIFEST in the file
/dist/app/service-worker.js with an array of resources.
Because we want to start this script after every production build, we add the following scripts to package.json.
    "build": "ng build",
    "postbuild": "npm run sw-prod-webpack",
We can now start a production build with npm run build, and npm automatically starts the postbuild script when
the build finished successfully.
If everything is set up correctly, a production build should create the compiled and bundled service worker in the dist folder.
Open /dist/app/service-worker.js to check if the injection of the precache resources worked and if all necessary resources are listed.
The part with the resources should look like this. In this example, you find the code at the end of the file.
...

addToCacheList(e),e.length>0&&(self.addEventListener("install",x),self.addEventListener("activate",O))}
([{"revision":"b9aa7c338693424aae99599bec875b5f","url":"favicon.ico"},{"revision":"ddebce2a9b41bf0f8db6c50d7341e18a","url":"index.html"},
{"revision":null,"url":"main-es2015.542658ea6f5085762cfd.js"},{"revision":"97bd9ac47500d696788eb4e82d2f5eb3","url":"manifest.json"},
{"revision":null,"url":"polyfills-es2015.bbb42ff2e1c488ff52d5.js"},{"revision":null,"url":"runtime-es2015.c9afb3256f2870e161de.js"},
{"revision":null,"url":"styles.09e2c710755c8867a460.css"}]),K(A)}]);
If you still see the string self.__WB_MANIFEST or the wrong set of resources are listed, check the build output and
the patterns in the Workbox CLI file workbox-config.js.
Test production build 
If you want to test the production build, you have to serve the files from an HTTP server because you can't load service workers via the file:// protocol. Either deploy the build artifacts to an HTTP server or install an HTTP server locally on your development computer.
In this project, I use the local-web-server package that I installed with this command.
npm install local-web-server -D
You can then either start it with npx
npx ws --hostname localhost -d dist/app -p 1234
or add a script to package.json.
"serve-dist": "ws --hostname localhost -d dist/app -p 1234 -o --log.format stats",
and then start it with
npm run serve-dist
With this code, the HTTP server listens on port 1234, and it automatically opens the browser (-o).
Development 
All the code and configurations we created so far target production. If you only use the service worker for caching, this might already be everything you need. But a service worker can also do other things like receiving push notifications or handling background sync requests. If you start working with these parts, you may also want to try them out during development.
In this section, we look at a way to amend the build system so that we can test the service worker during development.
When we start our application with ng serve, the Angular CLI
creates the build artifacts in memory. So we can't inject anything into the precache
route of the service worker. And even if we could, it would make development inconvenient because we always have
to clear the service worker cache to make sure we load the latest code.
Because we don't inject anything, the code precacheAndRoute(self.__WB_MANIFEST) throws an error because self.__WB_MANIFEST
is undefined, and the method can't handle this case; it expects an array of strings as the argument.
To solve that, we wrap the caching code with an if and check the process.env.NODE_ENV environment.
If the application runs in development, it skips the caching code.
if (process.env['NODE_ENV'] === 'production') {
  registerRoute(
    /assets\/images\/icons\/icon-.+\.png$/,
    new CacheFirst({
      cacheName: 'icons'
    })
  );

  precacheAndRoute(self.__WB_MANIFEST);
}
Webpack automatically sets process.env.NODE_ENV based on the mode option.
Next, we create a Webpack configuration for development. As with the production config file, the name is not essential.
I called it sw-dev-webpack.config.js and stored it in the root of the project.
const path = require('path');

module.exports = {
  mode: 'development',
  entry: path.join(__dirname, 'src', 'service-worker.ts'),
  output: {
    path: path.join(__dirname, 'src'),
    filename: 'service-worker.js'
  },
  watch: true,
  watchOptions: {
    ignored: /node_modules/
  },
  module: {
    rules: [
      {
        test: /\.ts$/,
        loader: 'ts-loader',
        exclude: /node_modules/,
        options: {
          onlyCompileBundledFiles: true
        }
      }
    ]
  },
  resolve: {
    extensions: ['.ts', '.wasm', '.mjs', '.js', '.json']
  }
};
Differences from the production build are mode, which is set to development instead of production,
watch is enabled, and the build output is src/service-worker.js.
In development mode, Webpack does not run the TerserPlugin, which minifies the JavaScript code, and
it sets the process.env.NODE_ENV environment variable to development instead of production.
In watch mode, the Webpack process runs forever and observes the input file for changes.
Every time the file service-worker.ts changes, Webpack compiles it into JavaScript and bundles everything together.
Webpack writes the compiled file to src/service-worker.js, but, by default, we can't access this file from a browser when
we run the application with ng serve. To make it accessible, we have to add it to the assets array in the Angular configuration
            "assets": [
              "src/favicon.ico",
              "src/assets",
              "src/manifest.json",
              "src/service-worker.js"
            ],
This entry also tells the Angular CLI to copy the file to the dist folder during a production build. This is not a problem because, in the production build, we run the Webpack process that bundles the service worker after the Angular build step, so it overwrites
the development service-worker.js with the production build.
Because src/service-worker.js is a generated file, I added it to .gitignore, so it will not be stored in the git repository.
/service-worker.js
The last thing we have to solve is the problem of how to start the development build. We need to start two background processes:
ng serve to start the Angular application in development mode and the Webpack process that watches and compiles src/service-worker.ts.
To solve that, we install the npm-run-all package.
This package allows us to start multiple scripts in parallel.
npm install npm-run-all
Then we add a script that runs Webpack with the development configuration
"sw-dev-webpack": "rimraf ./src/service-worker.js && webpack --config ./sw-dev-webpack.config.js",
And we add a script that starts ng serve and the Webpack build in parallel with npm-run-all.
    "dev": "npm-run-all --parallel sw-dev-webpack start",
    "start": "ng serve -o",
The command npm run dev starts both processes.
This concludes the tutorial about writing a simple caching service worker with Workbox and integrating it into an Angular application. Writing the service worker in this way gives us the most flexibility. We can write the code in TypeScript. We can import other modules, and, thanks to the Workbox library, we can write the code with a high abstraction level API and don't have to deal with the low-level service worker API.
If you are interested in a more extensive example, check out my blog post about background sync. The example there uses the approach described in this article, but it also imports a 3rd party library and other modules into the service worker.