In this blog post, we are creating an application that loads location data from a MongoDB database and displays it on a map within an Ionic application.
Instead of sending all location data at once, the client sends a request to the server with the bounds of the currently visible map. The server then returns the data points located inside this area. Each time the user zooms and moves the map, the client sends a new request to the server with the updated map bounds. To find the requested locations, the server application leverages the built-in geospatial query support in MongoDB.
This application is based on two blog posts by Joshua Morony: Dynamically loading markers with MongoDB: Part 1 and Part 2.
You should check out Josh Morony's website when you are learning Ionic or want to improve your Ionic skills: https://www.joshmorony.com.
He has written a beginner's book about Ionic and offers a course on advanced Ionic topics. He has also posted many free and interesting blog posts about Ionic.
Compared to Joshua's example, I have made two changes to the application. Instead of a Node.js server, we are creating a Spring Boot server using Spring and the reactive web programming model. We are also going to use OpenStreetMap and Leaflet to display the data points instead of Google Maps.
As an example, I chose the earthquakes data collected by the United States Geological Survey (USGS) agency. This dataset might not be the best use case for this architecture because the data points are static. Each time the user zooms and moves the map to the same location, the client loads the same data points multiple times. For static data, it might be more useful to load everything at once. However, this architecture might be interesting for an application that has to display many data points where the location of each point changes frequently. For example, you might need to track vehicles or other assets that move around a lot.
Server 
For the server, I use Spring and Spring Boot with the reactive programming model. Go to https://start.spring.io, enter a group and artifact name, add the dependencies "Reactive Web" and "Reactive MongoDB", and download the zip file. After the download is complete, extract the file and import the project into your favorite IDE.
The data we are going to download from the USGS site is stored in CSV (comma-separated values) format. To parse it, we are going to use the Univocity parser library. Therefore, we add this dependency to our pom.xml.
    <dependency>
      <groupId>org.springframework.boot</groupId>
      <artifactId>spring-boot-starter-webflux</artifactId>
    </dependency>
Next, we have to tell Spring Boot where to find the MongoDB instance and the name of the database.
spring.data.mongodb.database=earthquakes
By default, Spring Boot connects to MongoDB on localhost. If your database is running on a different server, add the spring.data.mongodb.host property to the properties file. Also, specify the port, username, and password if required.
spring.data.mongodb.host=...
spring.data.mongodb.port=...
spring.data.mongodb.username=...
spring.data.mongodb.password=...
As usual with MongoDB, you don't have to create the database beforehand. The database is automatically created with the first write request.
Next, we create an entity class that holds all the properties for an earthquake. Spring Data uses this class to deserialize and serialize the documents from and to MongoDB. We only store a few selected fields from the USGS file. These are all the fields the client application displays in a small popup window on the map.
@Document
public class Earthquake {

  @Id
  private String id;
  private String time;

  @GeoSpatialIndexed(type = GeoSpatialIndexType.GEO_2DSPHERE)
  private GeoJsonPoint location;
  private float depth;
  private float mag;
  private String place;

  public Earthquake() {
    // default constructor
  }

  public Earthquake(Record record) {
    this.id = record.getString("id");
    this.time = record.getString("time");
    this.mag = record.getFloat("mag");
    this.depth = record.getFloat("depth");
    this.place = record.getString("place");
    this.location = new GeoJsonPoint(record.getDouble("longitude"),
        record.getDouble("latitude"));
  }
During application startup, Spring Data automatically scans for classes annotated with @Document and internally creates a mapping from the MongoDB collection to the Java class. Because we want to execute geospatial queries in MongoDB, we have to create a special index. Spring Data makes this very convenient by providing the GeoJsonPoint class and the @GeoSpatialIndexed annotation. With this setup, Spring Data automatically creates the index in the database during the bootstrap process if it does not already exist.
The default constructor in the Earthquake class is necessary for Spring Data to deserialize the object when it reads data from the database.
The Earthquake(Record record) constructor is used during the initial import, where the application converts the CSV record into an entity class and then passes it to Spring Data to save it.
The geo support in MongoDB is not limited to the longitude and latitude coordinate system. You can use any coordinate system, but when you use longitude and latitude, always specify longitude first. The 2d spherical index only recognizes this ordering.
Next, we create a Spring Data repository interface and extend the ReactiveSortingRepository interface. This provides our application access to CRUD methods like findAll(), save(), and delete().
We add one additional method that returns a collection of earthquakes within a bounding box.
public interface ReactiveEarthquakeRepository
    extends ReactiveCrudRepository<Earthquake, String>,
    ReactiveSortingRepository<Earthquake, String> {

  Flux<Earthquake> findByLocationWithin(Box box);
ReactiveEarthquakeRepository.java
Because we use the reactive programming model, where all code has to run in a non-blocking manner, the method returns a stream of Earthquake instances as a Flux. Fortunately for us, the underlying MongoDB Java driver already supports asynchronous interactions with the database, and Spring Data uses this driver to support the reactive programming model.
The Box class is part of the Spring Data library that describes a box spanning two given points.
We do not have to implement the query logic. Spring Data automatically creates the necessary code for this query derived from the method name. The findBy keyword specifies a search query. The Within keyword results in a geoWithin query, and the word Locations matches the name of the field in the Earthquake entity class.
The query that Spring Data sends to MongoDB when our code calls the method looks like this:
{
  "location": {
     $geoWithin: {
        $box: [
          [ bottom left longitude, bottom left latitude],
          [ upper right longitude, upper right latitude ]
        ]
     }
  }
}
Next, we write the code that downloads and imports the earthquake data. We do this once during the startup of the application. As an enhancement, you could add a scheduled job that periodically imports the latest earthquake data. USGS updates the available public files every 15 minutes.
@Service
public class EarthquakeImporter {

  private final ReactiveEarthquakeRepository repository;

  private final CsvParser parser;

  EarthquakeImporter(ReactiveEarthquakeRepository repository) {
    this.repository = repository;

    CsvParserSettings settings = new CsvParserSettings();
    settings.setHeaderExtractionEnabled(true);
    settings.setLineSeparatorDetectionEnabled(true);
    this.parser = new CsvParser(settings);
  }

  @PostConstruct
  public void read() throws IOException, InterruptedException {
    HttpClient httpClient = HttpClient.newHttpClient();

    HttpRequest request = HttpRequest.newBuilder().GET()
        .uri(URI.create(
            "https://earthquake.usgs.gov/earthquakes/feed/v1.0/summary/2.5_month.csv"))
        .build();

    HttpResponse<String> response = httpClient.send(request,
        HttpResponse.BodyHandlers.ofString());

    List<Record> records = this.parser.parseAllRecords(new StringReader(response.body()));
    List<Earthquake> earthquakes = records.stream().map(Earthquake::new)
        .collect(Collectors.toList());
    insertData(earthquakes);
  }

  private void insertData(List<Earthquake> earthquakes) {
    this.repository.deleteAll().then(this.repository.saveAll(earthquakes).then())
        .subscribe();
  }

}
The importer is a Spring-managed bean, and we inject the ReactiveEarthquakeRepository instance into this class to insert the data into MongoDB.
In the constructor, we create an instance of the Spring 5 WebClient and the Univocity CsvParser. The earthquake CSV file contains a header on the first line with the field names. Therefore, we set setHeaderExtractionEnabled(true), and Univocity automatically creates keys in the result with the names of the columns.
You saw the result of this earlier in the Earthquake constructor where we use the name of the column to extract the data (this.id = record.getString("id");).
To run the import, we annotate the method with @PostConstruct, and Spring automatically calls the method when the application context is set up.
The importer first fetches the data with an HTTP GET request, then calls the parseAllRecords method from the CSVParser, converts each record into an Earthquake instance, deletes all the old data in the database with deleteAll(), and saves the newly created entity instances with saveAll().
deleteAll() and saveAll() are methods we get for free from the super interface ReactiveSortingRepository of our repository interface.
The last piece of the server is the controller that handles the requests from the client and sends back the earthquakes located in the requested area.
@RestController
@CrossOrigin
public class EarthquakeController {

  private final ReactiveEarthquakeRepository repository;

  public EarthquakeController(ReactiveEarthquakeRepository repository) {
    this.repository = repository;
  }

  @GetMapping("/earthquakes/{lng1}/{lat1}/{lng2}/{lat2}")
  public Flux<Earthquake> findNear(@PathVariable("lng1") double lng1,
      @PathVariable("lat1") double lat1, @PathVariable("lng2") double lng2,
      @PathVariable("lat2") double lat2) {

    Box box = new Box(new Point(lng1, lat1), new Point(lng2, lat2));
    return this.repository.findByLocationWithin(box);

  }
}
The bean is annotated with @RestController, which tells Spring to convert the response of all mapping methods to JSON automatically. The server runs during development on localhost:8080, and the Ionic application runs on localhost:8100, so we have to add the @CrossOrigin annotation to allow requests from different origins (CORS).
Like in the importer bean, we inject our Spring Data repository. Then we add the method that handles the GET request. The client sends four parameters as path variables. Thanks to the @PathVariable annotation, Spring automatically extracts the values from the path and assigns them to the method parameters. The code then creates a Box instance and calls the findByLocationWithin() method. The first parameter of the Box constructor represents the coordinates of the bottom left corner, and the second parameter, the upper right corner. Remember, when you use the longitude/latitude coordinate system with MongoDB, always specify the longitude first.
Like the methods in the data repository, the methods in this controller have to run in a non-blocking manner and return either a Mono or a Flux.
Client 
When it comes to maps, you will find many examples that use Google Maps. It's an excellent service, and it's free up to a certain amount of requests. However, Google Maps is not the only map solution on the Internet. In this example, we use the map from OpenStreetMap. OpenStreetMap is a community-driven map project where everyone can help collect data and improve the quality of the map. The data collected by OpenStreetMap is open and free to use for any purpose. You can even run your own map server with it.
Unlike Google Maps, OpenStreetMap does not provide an official JavaScript library to display the map in a browser. That's not a problem because there are two popular open-source JavaScript libraries we can choose from that are able to read and display OpenStreetMap data: OpenLayers and Leaflet. Both libraries are provider-agnostic, which means they support different map providers as long as you conform to the terms of use, and the server sends the data in a format these libraries understand.
Which of the two libraries you choose depends on the functionality you need in your application. Leaflet is a lightweight solution (38KB); OpenLayers has more features built-in and, therefore, is bigger.
Both libraries are straightforward to integrate with Angular. For OpenLayers, you can use the ngx-openlayers library, and for Leaflet, ngx-leaflet. These Angular libraries provide directives that make integration into your application straightforward.
I chose Leaflet and ngx-leaflet for this project because the application only needs to display a basic map and draw some circles on it. Leaflet handles this in a straightforward and lightweight way.
The client we create in this project is an Ionic app and is based on the blank starter template.
ionic start dynamicpos start
Next, we add the Leaflet library and the Angular adapter for Leaflet.
npm install @asymmetrik/ngx-leaflet
npm install leaflet
npm install -D @types/leaflet
Leaflet needs a few CSS rules to display the map properly. For this, we add the leaflet.css to the angular.json file. The Angular CLI then adds this CSS file to the build.
            "styles": [
              "src/styles.scss",
              "src/variables.scss",
              "./node_modules/leaflet/dist/leaflet.css"
            ],
Next, we create the HTML template. We use the generated home page and overwrite the code the ionic start command created. Open home.page.html and overwrite it with this code.
<ion-header>
  <ion-toolbar>
    <ion-title>
      M2.5+ Earthquakes (Past 30 days)
    </ion-title>
  </ion-toolbar>
</ion-header>

<ion-content class="ion-padding">
  <div (leafletMapReady)="onMapReady($event)"
       [leafletOptions]="options"
       id="map"
       leaflet>
  </div>
</ion-content>
To make the map work, we have to add the leaflet directive to an existing DOM element, style the element with a height property, and provide an initial zoom factor and center with either the leafletOptions or the more specific leafletZoom and leafletCenter input directives.
In our application, we set the height and width of the map to 100% to fill the entire screen.
#map {
  height: 100%;
  width: 100%;
}
In the TypeScript code, we import a few objects from the Leaflet library.
Objects starting with a lowercase character are factory methods that create an object.
For instance, layerGroup creates a LayerGroup.
import {circleMarker, latLng, LatLngBounds, LayerGroup, layerGroup, Map, tileLayer} from 'leaflet';
import {IonContent, IonHeader, IonTitle, IonToolbar} from "@ionic/angular/standalone";
import {LeafletDirective} from "@bluehalo/ngx-leaflet";
In the component, we inject the HTTP client. We need the client to send requests to our Spring Boot application and request the earthquakes for the visible map area.
private readonly httpClient = inject(HttpClient);
The options instance variable specifies the initial configuration parameters for Leaflet.
  options = {
    layers: [
      tileLayer('http://{s}.tile.osm.org/{z}/{x}/{y}.png', {
        maxZoom: 18,
        attribution: '© <a href="http://osm.org/copyright">OpenStreetMap</a> contributors'
      })
    ],
    zoom: 5,
    center: latLng([46.879966, -121.726909])
  };
The most important configuration is the layers. You have to tell Leaflet from where it should download the map data. This is very different from a Google Maps solution because there, the JavaScript library and the server are tightly coupled. Leaflet, on the other hand, supports many map providers. For this example, we load the data from the OpenStreetMap (OSM) server. It's essential that you additionally specify a zoom factor and a center. Leaflet throws an exception when one of them is missing.
In the template, we added a listener to the leafletMapReady event (leafletMapReady)="onMapReady($event)". Leaflet emits this event as soon as the map is loaded and ready for use.
  onMapReady(map: Map): void {
    this.map = map;
    this.loadEarthquakes(map.getBounds());

    map.on('zoomend', evt => this.loadEarthquakes(evt.target.getBounds()));
    map.on('moveend', evt => this.loadEarthquakes(evt.target.getBounds()));
  }
In the TypeScript code, we store the reference to the map in an instance variable and call the loadEarthquakes() method with the bounds of the map.
We also install two event listeners for the zoom and move end event. Each time the user zooms and moves the map, Leaflet emits these events, and each time, the application needs to load the earthquakes that are visible in this new area.
As a workaround, I had to add the following code. Leaflet would not display the map correctly without this code.
  ngAfterViewInit(): void {
    setTimeout(() => this.map.invalidateSize(), 10);
  }
loadEarthquakes() is responsible for loading the data from the Spring Boot application.
  private loadEarthquakes(bounds: LatLngBounds): void {
    const wrappedBounds = this.map.wrapLatLngBounds(bounds);
    const southWest = wrappedBounds.getSouthWest();
    const northEast = wrappedBounds.getNorthEast();
    this.httpClient.get<Earthquake[]>(`http://127.0.0.1:8080/earthquakes/${southWest.lng}/${southWest.lat}/${northEast.lng}/${northEast.lat}`)
      .subscribe(data => this.drawCircles(data));
The application sends the bottom left (southwest) and upper right (northeast) position of the visible map to the server and receives back all the earthquakes that are visible inside this box.
When the data comes back from the server, the app calls the drawCircles() method.
  private drawCircles(earthquakes: Earthquake[]): void {
    if (this.markerGroup) {
      this.markerGroup.removeFrom(this.map);
    }
    this.markerGroup = layerGroup().addTo(this.map);
    for (const earthquake of earthquakes) {
      const info = `${earthquake.time}<br>${earthquake.place}<br>${earthquake.mag}`;

      circleMarker([earthquake.location.coordinates[1], earthquake.location.coordinates[0]], {
        color: '#000000',
        fillOpacity: 0.4,
        fillColor: this.getFillColor(earthquake.mag),
        weight: 1,
        radius: earthquake.mag * this.map.getZoom()
      })
        .bindPopup(info)
        .addTo(this.markerGroup);
    }
  }
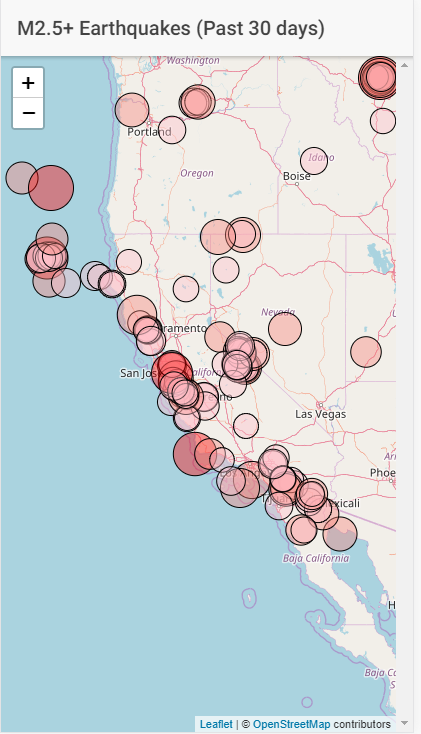
We mark each earthquake with a circle on the map. The radius and color property change, according to the magnitude of the earthquake. Bigger circles and darker colors represent more powerful earthquakes. Instead of adding each circle individually to the map, we add the circles to a marker group and add this group to the map. This simplifies the removal of the circles. We only have to remove the group from the map and, consequently, remove all the contained markers of this group.
It is worth mentioning here that the circleMarker factory method expects the location in the order latitude/longitude, which is different from the order MongoDB expects the location.
We also add a small popup window to each circle. You see this information when you click or tap on the circle. The bindPopup method makes this straightforward. The method expects a string that contains HTML code. The info window in this example displays the time, a description of the place, and the magnitude of the earthquake.
Now we are ready to test our application. Make sure that the MongoDB instance is up and running. Start the Spring Boot application, either from inside your IDE or from the command line with mvn spring-boot:run. Finally, build the Ionic app and open it in a browser with ionic serve.
If there are no errors, you should see the earthquakes of the last 30 days. When you move and zoom the map, you will see the circles dynamically appearing and disappearing depending on the visible area of the map.
You can find the complete source code for the Spring Boot and Ionic application on GitHub: https://github.com/ralscha/blog/tree/master/dynamicpos