In this blog post, we are going to implement a Spring Boot application that sends push messages and an Ionic/Cordova app that receives and displays these messages. As the message service, we're going to use Firebase Cloud Messaging (FCM). If you want to follow this blog post and test the application, you need to create an account with Firebase (it's free) if you do not already have one. Go to https://firebase.google.com/ to sign up.
According to the Firebase pricing page, sending push messages is free of charge, and it looks like there is no limit on the number of messages an application is allowed to send (at least I haven't found any information about that).
Server Setup 
The server is a Spring Boot application created using the https://start.spring.io/ website. Web is the only dependency we need for this application.
Next, we add the Firebase Client SDK for Java to our project. This library allows us to send push messages to FCM from Java.
    <dependency>
      <groupId>com.google.firebase</groupId>
      <artifactId>firebase-admin</artifactId>
      <version>9.4.1</version>
    </dependency>
To send messages with FCM, an application needs a service account from Firebase. This is a JSON file that contains all the necessary information (client id, private key, ...) a client needs to connect to Firebase. Because I don't want to hardcode the location of this file into the code, I create a simple configuration class that allows me to externalize this information into the file src/main/resources/application.properties.
package ch.rasc.push;

import org.springframework.boot.context.properties.ConfigurationProperties;
import org.springframework.stereotype.Component;

@ConfigurationProperties(prefix = "fcm")
@Component
public class FcmSettings {
  private String serviceAccountFile;

  public String getServiceAccountFile() {
    return this.serviceAccountFile;
  }

  public void setServiceAccountFile(String serviceAccountFile) {
    this.serviceAccountFile = serviceAccountFile;
  }

}
Firebase 
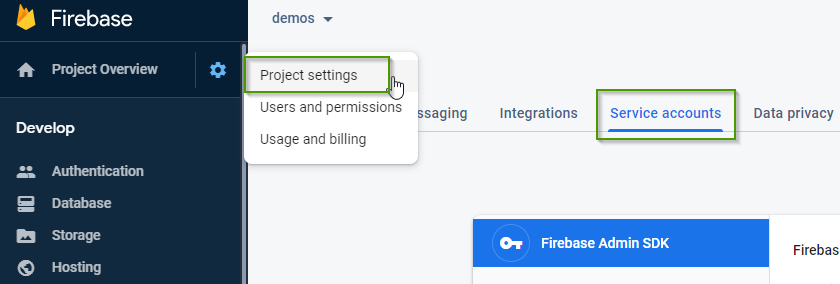
Before we continue with coding, we need to set up a Firebase project. Log in to your Firebase Console and create a new project or use an existing one. On the project page, open the settings page by clicking on the cogwheel icon and click on Project settings, and then open the Service Accounts tab.
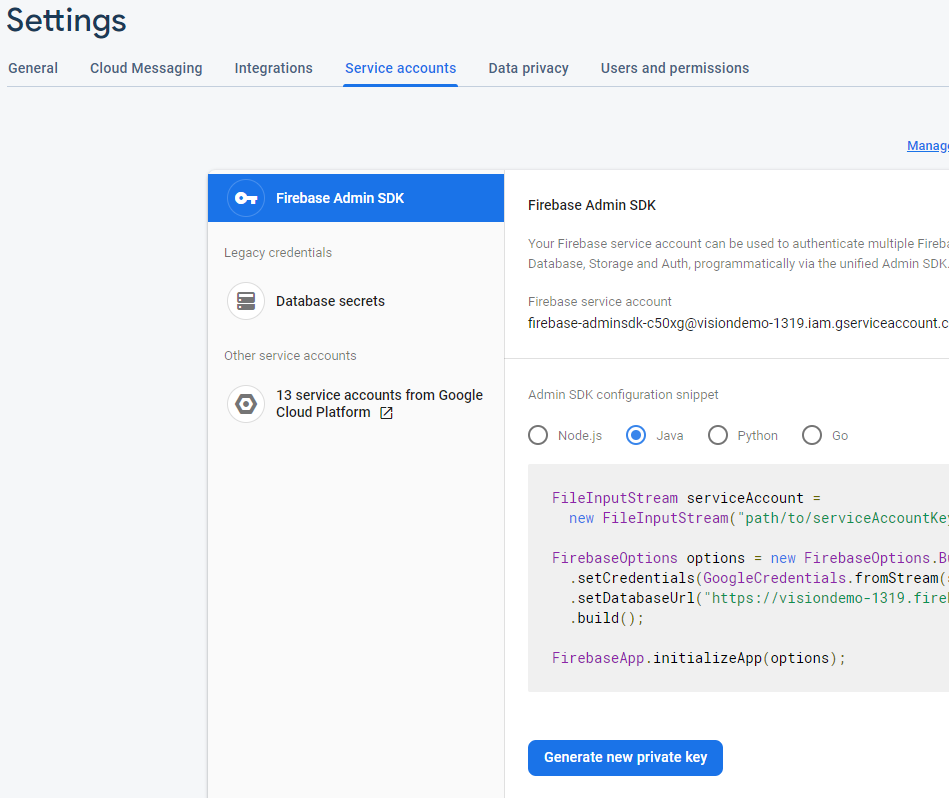
On the Service Accounts tab, click on "Generate new private key" and download the file with "Generate key".
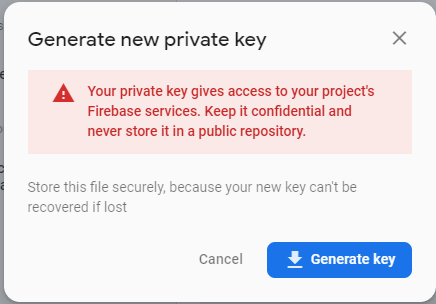
Keep this file safe and don't commit it to a public repository. Everybody that has access to this file also has full access to the Firebase project.
Server Setup 
Back in Java, we add the path to the service account JSON file to src/main/resources/application.properties
fcm.service-account-file=D:/ws/blog/push/server/visiondemo-1319-firebase-adminsdk-c50xg-dd7ba361a2.json
Next, we create a service bean and inject FcmSettings. In the constructor, the application reads the service account file and initializes the Firebase library.
  public FcmClient(FcmSettings settings) {
    Path p = Paths.get(settings.getServiceAccountFile());
    try (InputStream serviceAccount = Files.newInputStream(p)) {
      FirebaseOptions options = FirebaseOptions.builder()
          .setCredentials(GoogleCredentials.fromStream(serviceAccount)).build();

      FirebaseApp.initializeApp(options);
    }
    catch (IOException e) {
      Application.logger.error("init fcm", e);
    }
  }
Client Setup 
The client is an Ionic application we create with the Ionic CLI. We don't need any additional pages or providers. We're adding all the necessary code to the HomePage that the start command creates.
ionic start push blank
cd push
ionic integrations enable cordova --add
ionic cordova prepare android
To test the application, we have to run it on a real device or in the emulator. I tested the app on an Android device, but FCM is not limited to Android; it supports iOS devices as well.
First, we need to create and download the Firebase configuration file for a client. The Cordova plugin we install later needs this configuration file for connecting to FCM. Each platform has its own configuration file (Android: google-services.json, iOS: GoogleService-Info.plist).
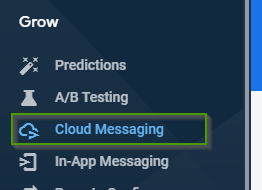
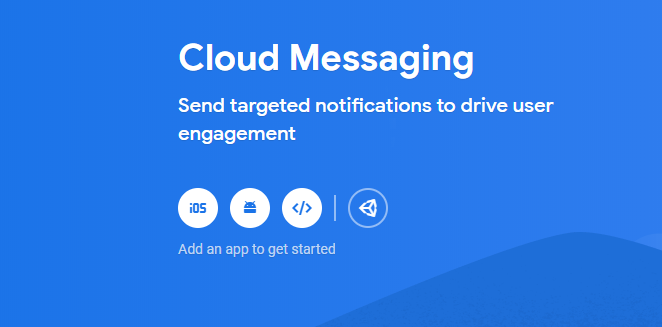
Open the Firebase Console and click on the menu Cloud Messaging.
You should see the following screen.
Click on the Android icon.
In the following dialog, you have to enter the package name of your client project. You find the package name of your app in the file config.xml in the root folder of the app. The package name is the widget id; copy and paste this string into the Android package name text field.
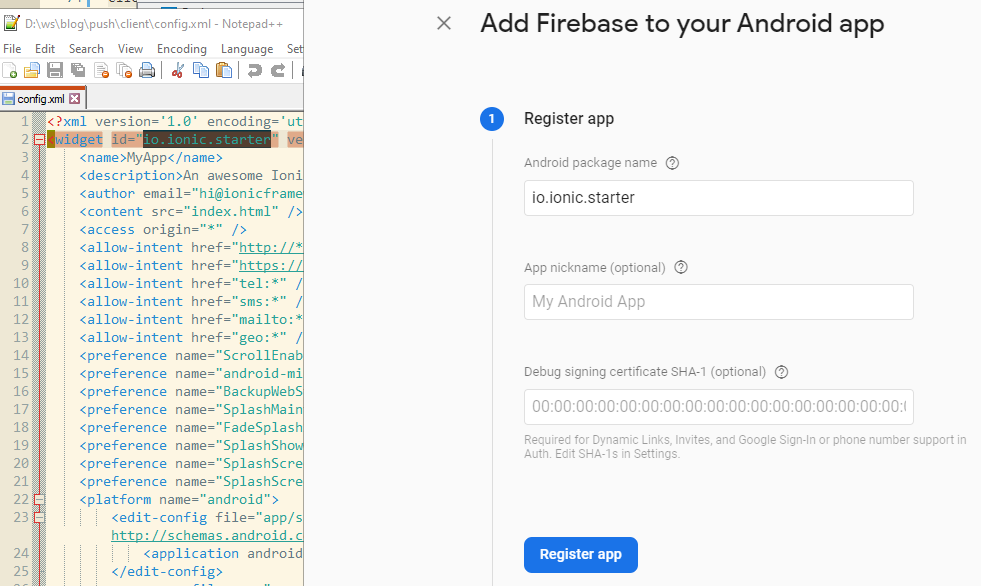
Click on Register app and then on Download google-services.json. You can skip the other steps.
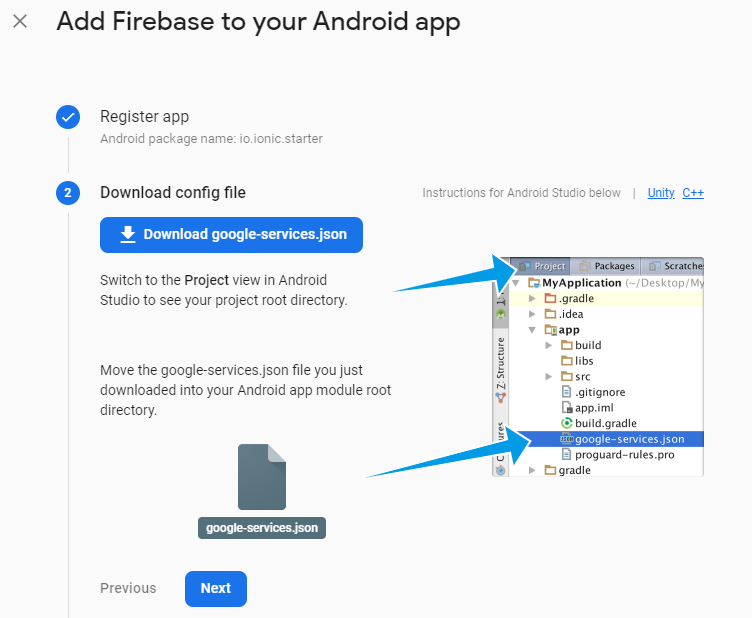
The browser downloads the file to your computer. Copy the file into the root folder of your Ionic/Cordova project.
If you need to support iOS as well, add an iOS app to the Firebase project, download the GoogleService-Info.plist file, and copy it to the root folder as well.
Next, we install the Cordova plugin that handles FCM on the client-side. For this example, I use cordova-plugin-firebase-messaging.
ionic cordova plugin add cordova-plugin-firebase-messaging
Open config.xml and insert the following two <resource-file> tags. These entries make sure that during a Cordova build, the config file will be copied into the Android and iOS projects.
<platform name="android">
    <resource-file src="google-services.json" target="app/google-services.json" />
    ...
</platform>
<platform name="ios">
    <resource-file src="GoogleService-Info.plist" />
    ...
</platform>
Visit cordova-support-google-services for more information.
Send options 
FCM supports two ways of sending messages to clients. One way is message sending based on the publish/subscribe model. Clients subscribe to one or more topics, and the sender publishes messages to these topics. Each subscriber of a topic receives the messages. FCM automatically creates topics when a client subscribes to it, keeps track of all the subscribed clients, and routes incoming messages from a publisher to the right device.
The other option is sending messages directly to one specific device. For this scenario, the sender needs to know the FCM registration token of the receiver. The Cordova plugin provides functionality to access this token.
We're going to create an example for each of these options.
Topic: Server 
Sending messages to a topic is straightforward because neither the server nor the client needs to know the registration token. As an example, we create a Spring service with a scheduled method that runs every 30 seconds, fetches a joke from the Chuck Norris Database, and sends it to the topic "chuck".
@Service
public class PushChuckJokeService {

  private final RestTemplate restTemplate;

  private final FcmClient fcmClient;

  private int id = 0;

  public PushChuckJokeService(FcmClient fcmClient) {
    this.restTemplate = new RestTemplate();
    this.fcmClient = fcmClient;
  }

  @Scheduled(fixedDelay = 30_000)
  public void sendChuckQuotes() {
    IcndbJoke joke = this.restTemplate.getForObject("http://api.icndb.com/jokes/random",
        IcndbJoke.class);
    sendPushMessage(HtmlEscape.unescapeHtml(joke.getValue().getJoke()));
  }

  void sendPushMessage(String joke) {
    Map<String, String> data = new HashMap<>();
    data.put("id", String.valueOf(++this.id));
    data.put("text", joke);

    // Send a message
    System.out.println("Sending chuck joke...");
    try {
      this.fcmClient.sendJoke(data);
    }
    catch (InterruptedException | ExecutionException e) {
      Application.logger.error("send joke", e);
    }
  }

}
Spring injects the FcmClient bean, we created earlier, into this class. The scheduled method sendChuckQuotes first fetches a joke, then calls the private method sendPushMessage that composes and sends the message to FCM with the sendJoke method from the FcmClient.
  public void sendJoke(Map<String, String> data)
      throws InterruptedException, ExecutionException {

    AndroidConfig androidConfig = AndroidConfig.builder()
        .setTtl(Duration.ofMinutes(2).toMillis()).setCollapseKey("chuck")
        .setPriority(Priority.HIGH)
        .setNotification(AndroidNotification.builder().setTag("chuck").build()).build();

    ApnsConfig apnsConfig = ApnsConfig.builder()
        .setAps(Aps.builder().setCategory("chuck").setThreadId("chuck").build()).build();

    Message message = Message.builder().putAllData(data).setTopic("chuck")
        .setApnsConfig(apnsConfig).setAndroidConfig(androidConfig)
        .setNotification(Notification.builder().setTitle("Chuck Norris Joke")
            .setBody("A new Chuck Norris joke has arrived").build())
        .build();

    String response = FirebaseMessaging.getInstance().sendAsync(message).get();
    System.out.println("Sent message: " + response);
  }
The Firebase library allows us to set different configuration options for Android (AndroidConfig) and iOS (ApnsConfig).
For Android, we set the time to live to 2 minutes. When a device is offline for longer than this specified period, it is not going to receive the message. FCM supports a maximum time to live of 4 weeks, which is the default value when the application does not specify anything.
The Notification object configures what the notification dialog should display when the client receives the message while the app is in the background. You can find a detailed description of all the supported options on this page: https://firebase.google.com/docs/cloud-messaging/http-server-ref
When you configure the Notification in the Message instance, the library uses it as default for Android and iOS. Alternatively, you may specify the notification options in the AndroidConfig and ApnsConfig object and use different values for the two platforms.
The data object contains the payload of the message and is the object the receiver has access to. The receiver does not receive or have access to the message option and notification payload objects. The data object does not have to be a Map; it may be any POJO that can be serialized into JSON.
Next, the application sends the message with the sendAsync method to FCM.
Topic: Client 
To receive topic messages, the client has to subscribe to the topic. The Cordova plugin provides the method subscribe for this purpose.
It expects the name of the topic as a string parameter.
cordova.plugins.firebase.messaging.subscribe(this.TOPIC_NAME);
To handle the incoming push messages, we have to register two listeners.
    cordova.plugins.firebase.messaging.onMessage((payload: any) => {
      console.log('New foreground message: ', payload);
      this.handleNotification(payload);
    });

    cordova.plugins.firebase.messaging.onBackgroundMessage((payload: any) => {
      console.log('New background message: ', payload);
      this.handleNotification(payload);
    });
Both methods, onMessage() and onBackgroundMessage, expect a callback function as an argument. The onMessage callback function is called each time a push message arrives while the app is in the foreground.
When the app is in the background or not started, the system displays a notification message. When the user taps on this dialog, the app starts, and the onBackgroundMessage callback function is called.
The handleNotification method keeps the last 5 messages stored in the instance variable items.
  handleNotification(data: any): void {
    if (!data.text) {
      return;
    }

    this.items.splice(0, 0, {id: data.id, text: data.text});

    // only keep the last 5 entries
    if (this.items.length > 5) {
      this.items.pop();
    }

    this.changeDetectorRef.detectChanges();
  }
The object that the handleNotification function receives as the parameter contains the two properties id and text that are set in the server-side code.
The template displays the items array with a for loop.
  <ion-list>
    @for (item of items; track item.id) {
      <ion-item>
        <ion-label class="ion-text-wrap">
          {{ item.id }}. {{ item.text }}
        </ion-label>
      </ion-item>
    }
  </ion-list>
To demonstrate subscribing and unsubscribing, we add a checkbox to the template.
    <ion-row>
      <ion-col size="8">Send me Chuck Norris Jokes</ion-col>
      <ion-col size="4">
        <ion-checkbox (ionChange)="onChange()" [(ngModel)]="allowPush"></ion-checkbox>
      </ion-col>
    </ion-row>
iOS: The permission system works differently on iOS than on Android. On Android, the app only needs the
internet permission to receive push messages. On iOS, the app needs the push permission, and the user has
to grant permission to the app. The Cordova plugin provides the requestPermission() method for this purpose.
await cordova.plugins.firebase.messaging.requestPermission();
This asynchronous method has no effect on Android and immediately fulfills the Promise. On iOS, it presents a dialog to the user.
By default, the system does not display a notification dialog when your app is in the foreground. You can change this behavior with the requestPermission() method. Set the forceShow option to true, and the system always presents a notification dialog.
cordova.plugins.firebase.messaging.requestPermission({forceShow: true})
Direct messages: Server 
When a sender wants to send messages to a specific device, they need to know the FCM registration token of the client. The client receives that token as soon as it is registered to FCM. Then it needs to send that token to the server. For that reason, we create a RestController that registers a handler for the URL /register and another handler for /unregister. In the client app, we're adding a checkbox where the user can enable and disable direct messages. When the user enables it, the client sends the FCM token to the /register endpoint.
@RestController
@CrossOrigin
public class PersonalMessageController {

  private final PersonalMessageSender pushSender;

  public PersonalMessageController(PersonalMessageSender pushSender) {
    this.pushSender = pushSender;
  }

  @PostMapping("/register")
  @ResponseStatus(HttpStatus.NO_CONTENT)
  public void register(@RequestParam("token") String token) {
    System.out.println("register: " + token);
    this.pushSender.addToken(token);
  }

  @PostMapping("/unregister")
  @ResponseStatus(HttpStatus.NO_CONTENT)
  public void unregister(@RequestParam("token") String token) {
    System.out.println("unregister: " + token);
    this.pushSender.removeToken(token);
  }

}
PersonalMessageController.java
The PersonalMessageSender bean manages the registered tokens in a Set and sends a random message every 30 seconds to all registered clients.
@Service
public class PersonalMessageSender {

  private final Set<String> tokenRegistry = new CopyOnWriteArraySet<>();

  private final FcmClient fcmClient;

  private int id = 0;

  public PersonalMessageSender(FcmClient fcmClient) {
    this.fcmClient = fcmClient;
  }

  public void addToken(String token) {
    this.tokenRegistry.add(token);
  }

  public void removeToken(String token) {
    this.tokenRegistry.remove(token);
  }

  @Scheduled(fixedDelay = 30_000)
  void sendPushMessages() {
    for (String token : this.tokenRegistry) {
      System.out.println("Sending personal message to: " + token);
      Map<String, String> data = new HashMap<>();
      data.put("id", String.valueOf(++this.id));
      data.put("text", String.valueOf(Math.random() * 1000));

      try {
        this.fcmClient.sendPersonalMessage(token, data);
      }
      catch (InterruptedException | ExecutionException e) {
        Application.logger.error("send personal message", e);
      }
    }
  }

}
The sendPushMessages method loops over all registered client tokens, creates a data object with an id and a random text, and calls the sendPersonalMessage from the FcmClient.
  public void sendPersonalMessage(String clientToken, Map<String, String> data)
      throws InterruptedException, ExecutionException {
    AndroidConfig androidConfig = AndroidConfig.builder()
        .setTtl(Duration.ofMinutes(2).toMillis()).setCollapseKey("personal")
        .setPriority(Priority.HIGH)
        .setNotification(AndroidNotification.builder().setTag("personal").build())
        .build();

    ApnsConfig apnsConfig = ApnsConfig.builder()
        .setAps(Aps.builder().setCategory("personal").setThreadId("personal").build())
        .build();

    Message message = Message.builder().putAllData(data).setToken(clientToken)
        .setApnsConfig(apnsConfig).setAndroidConfig(androidConfig)
        .setNotification(Notification.builder().setTitle("Personal Message")
            .setBody("A Personal Message").build())
        .build();

    String response = FirebaseMessaging.getInstance().sendAsync(message).get();
    System.out.println("Sent message: " + response);
  }
The sendPersonalMessage method works very similarly to the sendJoke method, which sends messages to a topic. Instead of specifying a topic, this method configures the receiver with setToken(clientToken). This way, only the client with this token receives the message.
Direct messages: Client 
To get the FCM registration token, the client calls the asynchronous getToken method.
this.token = await cordova.plugins.firebase.messaging.getToken();
The application also registers a token refresh callback function because Firebase may send a new token while the application is running. The application can then again use getToken to fetch the new token.
    cordova.plugins.firebase.messaging.onTokenRefresh(async () => {
      console.log('Token updated');
      this.token = await cordova.plugins.firebase.messaging.getToken();
    });
In the template, we add a checkbox where the user can enable and disable direct messages.
    <ion-row>
      <ion-col size="8">Send me Personal messages</ion-col>
      <ion-col size="4">
        <ion-checkbox (ionChange)="onPmChange()" [(ngModel)]="allowPersonal"></ion-checkbox>
      </ion-col>
    </ion-row>
In the click handler of the checkbox (onPmChange), the program either sends a request to the /register or /unregister endpoint with the FCM registration token in the body.
  register(): void {
    if (this.token !== null) {
      const formData = new FormData();
      formData.append('token', this.token);
      this.http.post(`${environment.serverURL}/register`, formData)
        .pipe(timeout(10000))
        .subscribe(() => localStorage.setItem('allowPersonal', JSON.stringify(this.allowPersonal)),
          () => this.allowPersonal = !this.allowPersonal);
    }
  }
  unregister(): void {
    if (this.token !== null) {
      const formData = new FormData();
      formData.append('token', this.token);
      this.http.post(`${environment.serverURL}/unregister`, formData)
        .pipe(timeout(10000))
        .subscribe(() => localStorage.setItem('allowPersonal', JSON.stringify(this.allowPersonal)),
          () => this.allowPersonal = !this.allowPersonal);
    }
  }
Messages that are sent directly to clients are handled the same way as topic messages.
The Cordova plugin calls either the onMessage() or onBackgroundMessage callback function depending on the state of the application. These callback functions then call the handleNotification method, which displays the text of the received message on the screen. The handleNotification method can handle both message types (topic and direct messages) because the payload is the same.
This concludes the blog post about receiving push messages in a Cordova application.
You can find the complete source code for the Ionic app and the Spring Boot application on GitHub.