JSON Web Token (JWT) is a standard (RFC 7519) for creating access tokens. A JWT consists of three parts: a header, a payload, and a signature. The header describes what algorithm is used to generate the signature. The payload contains information like the issuer of the token, the subject, when the token was issued, and the expiration date. There is no mandatory information an application has to write into the payload. The example application we build in this article puts the issue and expiration date and the username (subject) into the payload.
The last part of a JWT is a digital signature that prevents a malicious party from changing the contents of the token.
See a more detailed description of JWT: https://jwt.io/introduction
In this article, we build an Ionic app that communicates with a Spring Boot back end. The client app consists of a signup page where the user can create new accounts, a login page where the user enters their username and password, and a secret page that the user sees after a successful login. After a successful login, the client app receives a JWT from the server and stores it in localStorage. The next time the user opens the app, the application reads the JWT from localStorage and sends it in the request header to the server. When the token is still valid, the user is immediately logged in.
Server 
As usual, when I create a new Spring Boot application, I open the website https://start.spring.io, fill in the fields Group and Artifact, and select the required dependencies. For this application, we need the Web and Security dependencies.
After you have downloaded the generated code to your local computer, open the file pom.xml and add this dependency.
    <dependency>
      <groupId>io.jsonwebtoken</groupId>
      <artifactId>jjwt-api</artifactId>
      <version>0.12.6</version>
    </dependency>
    <dependency>
      <groupId>io.jsonwebtoken</groupId>
      <artifactId>jjwt-impl</artifactId>
      <version>0.12.6</version>
      <scope>runtime</scope>
    </dependency>
jjwt is a Java implementation of the JWT standard. It provides classes and methods to create and verify tokens.
Database 
We don't connect this application to a real database. The application stores the users in a hash map in memory. The User class is the entity object that represents a user in our application.
public class User {

  private String name;

  private String username;

  private String email;

  private String password;
The class UserService manages the Map of the users. The username is unique, and it serves as the key of the Map. The class provides public methods to lookup and save user objects and a check method that returns true if a username already exists.
The class is annotated with the @Service annotation so we can inject it into other Spring-managed beans.
@Service
public class UserService {

  private final Map<String, User> db;

  public UserService(PasswordEncoder passwordEncoder) {
    this.db = new ConcurrentHashMap<>();

    // add demo user
    User user = new User();
    user.setUsername("admin");
    user.setPassword(passwordEncoder.encode("admin"));
    save(user);
  }

  public User lookup(String username) {
    return this.db.get(username);
  }

  public void save(User user) {
    this.db.put(user.getUsername(), user);
  }

  public boolean usernameExists(String username) {
    return this.db.containsKey(username);
  }
}
Security 
In this section, we are configuring Spring Security, which is responsible for securing the back end.
To encrypt passwords, we configure an Argon2PasswordEncoder bean.
    @Bean
    PasswordEncoder passwordEncoder() {
    return new Argon2PasswordEncoder(16, 32, 8, 1 << 16, 4);
  }
We disable the authentication part of Spring Security. Our login system is straightforward, and we will implement it without the help of Spring Security. We are still going to use Spring Security for authorization and securing our backend services. To disable the authentication system, we have to prevent the Spring Boot auto-configurer from running by implementing a custom AuthenticationManager bean that does nothing.
  @Bean
  AuthenticationManager authenticationManager() {
    return authentication -> {
      throw new AuthenticationServiceException("Cannot authenticate " + authentication);
    };
  }
Next, we look at the TokenProvider class. This class provides a method to create a JWT (createToken) and a method to parse and validate a JWT and to return an Authentication object (getAuthentication).
  public TokenProvider(AppConfig config, UserService userService) {
    this.key = Jwts.SIG.HS512.key().build();
    this.jwtParser = Jwts.parser().verifyWith(this.key).build();
    this.tokenValidityInMilliseconds = 1000 * config.getTokenValidityInSeconds();
    this.userService = userService;
  }

  public String createToken(String username) {
    Date now = new Date();
    Date validity = new Date(now.getTime() + this.tokenValidityInMilliseconds);

    return Jwts.builder().id(UUID.randomUUID().toString()).subject(username)
        .issuedAt(now).signWith(this.key).expiration(validity).compact();
  }
The JWT is created with the Jwts builder from the jjwt library. We set a random id, the subject (username in our application), the issue date, and the expiration date. The builder also needs to know the signature algorithm and a secret key. The application reads this key from the application.properties file. The secret key is a per-application secret and should be different for each application. The method compact() builds and returns the JWT as a String.
  public Authentication getAuthentication(String token) {
    String username = this.jwtParser.parseSignedClaims(token).getPayload().getSubject();

    User user = this.userService.lookup(username);
    if (user == null) {
      throw new UsernameNotFoundException("User '" + username + "' not found");
    }

    UserDetails userDetails = org.springframework.security.core.userdetails.User
        .withUsername(username).password("").authorities(Set.of()).accountExpired(false)
        .accountLocked(false).credentialsExpired(false).disabled(false).build();

    return new UsernamePasswordAuthenticationToken(userDetails, null,
        userDetails.getAuthorities());
  }
This method receives a JWT and parses it. The code needs to use the same secret key as in the generate method to check the validity of the token. It then extracts the subject, which is the username in our application, and reads the user from the "database." Instead of doing a database query, you could store all information (for example, role information) into the JWT and extract it here. Doing a database query here has the advantage that we can immediately block a user or change their roles, but it also poses a bottleneck if you have thousands of users.
With no autoconfigured login system in place, we now implement the login endpoint.
  @PostMapping("/login")
  public ResponseEntity<String> authorize(@Valid @RequestBody User loginUser) {

    User user = this.userService.lookup(loginUser.getUsername());
    if (user != null) {
      boolean pwMatches = this.passwordEncoder.matches(loginUser.getPassword(),
          user.getPassword());
      if (pwMatches) {
        String token = this.tokenProvider.createToken(loginUser.getUsername());
        return ResponseEntity.ok(token);
      }
    }
    else {
      this.passwordEncoder.matches(loginUser.getPassword(),
          this.userNotFoundEncodedPassword);
    }

    return ResponseEntity.status(HttpStatus.UNAUTHORIZED).build();
  }
This is a plain HTTP POST endpoint that receives the username and password as request parameters. The method fetches the user from the database and compares the passwords. If the login information is valid, it creates the JWT and sends it back in the body of the response. Otherwise, it returns an HTTP status code 401.
Note that the password hash algorithm should be configured in a way that the check runs for about 1 second. When the endpoint receives a request for a user that is not stored in the database, we need to make sure that the runtime of the method stays the same by doing an artificial password check.
Next, we implement an empty secured HTTP GET endpoint.
  @GetMapping("/authenticate")
  @ResponseStatus(HttpStatus.NO_CONTENT)
  public void authenticate() {
    // we don't have to do anything here
    // this is just a secure endpoint and the JWTFilter
    // validates the token
    // this service is called at startup of the app to check
    // if the jwt token is still valid
  }
The client application at startup sends a request to this endpoint to decide if it should present the login page or route directly to the secret page. A request to this endpoint with a valid JWT returns an HTTP response code of 200; otherwise, it returns 403.
The next part of our security configuration is the JWTFilter class. This class is injected into the Spring Security filter chain, and every HTTP request that needs to be authenticated flows through this filter. The filter is responsible for extracting the JWT, creating the Authentication object, and putting it into the security context. The Spring Security authorization system needs this information to check if someone has access to a resource or not.
  @Override
  public void doFilter(ServletRequest servletRequest, ServletResponse servletResponse,
      FilterChain filterChain) throws IOException, ServletException {
    try {
      HttpServletRequest httpServletRequest = (HttpServletRequest) servletRequest;
      String jwt = resolveToken(httpServletRequest);
      if (jwt != null) {
        Authentication authentication = this.tokenProvider.getAuthentication(jwt);
        if (authentication != null) {
          SecurityContextHolder.getContext().setAuthentication(authentication);
        }
      }
      filterChain.doFilter(servletRequest, servletResponse);
    }
    catch (ExpiredJwtException | UnsupportedJwtException | MalformedJwtException
        | SignatureException | UsernameNotFoundException e) {
      Application.logger.info("Security exception {}", e.getMessage());
      ((HttpServletResponse) servletResponse)
          .setStatus(HttpServletResponse.SC_UNAUTHORIZED);
    }
  }
The client sends the JWT in the Authorization HTTP request header
Authorization:Bearer eyJhbGciOiJIUzUxMiJ9......
The first thing the filter does is extracting the JWT from this header (resolveToken). Then it calls the getAuthentication method from the TokenProvider. This method returns an Authentication object when the JWT is valid and puts the object into the security context. In the case of an invalid JWT, it does not put an Authentication object into the context, and Spring Security will prevent the request from accessing secure endpoints.
Finally, we need to configure Spring Security and put all the pieces together. We need to tell Spring Security what endpoints are secured and which ones are public. We do that with a configuration class.
  @Bean
  public SecurityFilterChain filterChain(HttpSecurity http) throws Exception {
    http.csrf(CsrfConfigurer::disable).cors(Customizer.withDefaults()).sessionManagement(
        customizer -> customizer.sessionCreationPolicy(SessionCreationPolicy.STATELESS))
        // optional, if you want to access the
        // services from a browser
        // .httpBasic(Customizer.withDefaults())
        .authorizeHttpRequests(customizer -> {
          customizer.requestMatchers("/signup", "/login", "/public").permitAll();
          customizer.anyRequest().authenticated();
        }).addFilterAfter(new JWTFilter(this.tokenProvider),
            SecurityContextHolderFilter.class);
    return http.build();
  }
The configuration disables CSRF protection and enables CORS handling (server and client apps are served from different ports). Then it sets the session creation policy to STATELESS, which prevents Spring Security from creating HttpSession objects and cookies. Each request already contains the Authorization header with the JWT, and we don't need an additional session cookie. The HTTP endpoints /signup, /login, and /public are accessible without authentication. All the other endpoints are secured and require a valid JWT token. Lastly, the JWTFilter is put into the security filter chain right after the SecurityContextHolderFilter, which is one of the first filters that gets called.
Endpoints 
The configuration for the security is now finalized, and we can move on to the implementation of the other HTTP endpoints. We start with the method that handles the signup request.
  @PostMapping("/signup")
  public String signup(@RequestBody User signupUser) {
    if (this.userService.usernameExists(signupUser.getUsername())) {
      return "EXISTS";
    }

    signupUser.encodePassword(this.passwordEncoder);
    this.userService.save(signupUser);
    return this.tokenProvider.createToken(signupUser.getUsername());
  }
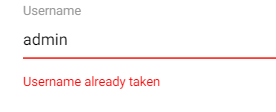
This method checks if the username already exists and returns the string "EXISTS" in that case. The client then presents an error message to the user when it receives this response.
If the username does not already exist, the password is encoded with the password encoder before it's stored in the "database." Then the method creates the JWT and returns it, and the user is logged in.
Finally, we create a test endpoint that is only accessible with a valid JWT.
  @GetMapping("/secret")
  public String secretService(@AuthenticationPrincipal UserDetails details) {
    System.out.println(details.getUsername());
    return "A secret message";
  }
The client shows the response from this method on the secret page. This concludes the server part of our application.
Client 
The client is built with the Ionic framework and based on the blank starter template.
ionic start jwt blank
I installed the @auth0/angular-jwt library that simplifies the JWT handling and ng2-validation for additional form validation functions.
npm install @auth0/angular-jwt
npm install ng2-validation
The application needs to add the JWT to every HTTP request it sends to the server. @auth0/angular-jwt handles this for us and automatically attaches the JWT as an Authorization HTTP request header. The library does this with the help of an HttpInterceptor.
@auth0/angular-jwt also provides a few helper methods for checking the expiration date of a token and for decoding the token's payload.
Pages 
The start command already created a page called HomePage. The app presents this page to the user if they have a valid JWT. We also need to create two additional pages, a service, and a route guard.
ng generate page Signup
ng generate page Login
ng generate service Auth
ng generate guard Auth
App Configuration 
To configure the @auth0/angular-jwt library use the following code.
export function tokenGetter(): string | null {
  return localStorage.getItem('jwt_token');
}

bootstrapApplication(AppComponent, {
  providers: [
    provideIonicAngular(),
    importProvidersFrom(JwtModule.forRoot({
      config: {
        tokenGetter,
        allowedDomains: environment.allowedDomains
      }
    })),
To import the angular-jwt library, we use importProvidersFrom(JwtModule.forRoot({.
By default, the @auth0/angular-jwt library reads the token from localStorage with the key id_token.
In this example, we use a custom token getter method that reads the token from localStorage with the name jwt_token.
Because @auth0/angular-jwt attaches an HttpInterceptor to Angular's HTTP client service, every request
initiated from our application goes through that interceptor. By default, the library does not add the
Authorization header to any request. You have to whitelist URLs where the library is allowed to add
the Authorization header with the allowedDomains property.
In this application, only requests sent to localhost:8080 will have an Authorization HTTP request header.
AuthService 
The AuthService class manages the authentication of our app. It validates the JWT, sends login and signup requests to the server, and handles the responses.
Our app uses the ReplaySubject provided by the RxJs library to notify other parts of the app when the authorization state changes.
This object represents an observable sequence as well as an observer. Every time the app calls next on this object, all subscribers are notified.
We only expose the observable part of the subject to others, so they can only subscribe but not call next.
  private authUser = new ReplaySubject<string | null>(1);
  public authUserObservable = this.authUser.asObservable();
Every time the application starts up, it calls the hasAccess() method.
  hasAccess(): Promise<boolean> {
    const jwt = localStorage.getItem(this.jwtTokenName);

    if (jwt && !this.jwtHelper.isTokenExpired(jwt)) {

      return new Promise((resolve) => {

        this.httpClient.get(`${environment.serverURL}/authenticate`)
          .subscribe({
            next: () => {
              this.authUser.next(jwt);
              resolve(true);
            },
            error: () => {
              this.logout();
              resolve(false);
            }
          });
      });

      // OR
      // this.authUser.next(jwt);
      // Promise.resolve(true);
    } else {
      this.logout();
      return Promise.resolve(false);
    }
  }
The method fetches the JWT from localStorage, checks the validity, and then sends a request to the secure endpoint /authenticate. If that call succeeds, it calls authUser.next with the JWT as a parameter and returns true.
If the /authenticate call fails, or there is no JWT locally stored, or the token is expired, the app deletes the token, calls authUser.next(null), and navigates to the login page.
  logout(): void {
    localStorage.removeItem(this.jwtTokenName);
    this.authUser.next(null);
    this.navCtrl.navigateRoot('login', {replaceUrl: true});
  }
The logout method is also called when the user clicks on the logout icon.
The call to /authenticate is debatable, as is the query to fetch the user from the database. It depends on the use case. If the client and the server only depend on the information stored in the JWT without ever checking the server and the user database, the application would not be able to immediately block a user or change the roles of a user. On the other hand, we are sending an additional request to the server, which could be a bottleneck if you have thousands of users.
The next method we implement in the AuthService class is login. This method is called from the login page after the user enters their username and password and taps the login button. The method posts the data to the /login endpoint and receives back a JWT when the login information is valid. The code stores the token in localStorage and then calls authUser.next.
  login(values: { username: string, password: string }): Observable<string> {
    return this.httpClient.post(`${environment.serverURL}/login`, values, {responseType: 'text'})
      .pipe(tap(jwt => this.handleJwtResponse(jwt)));
  }
  private handleJwtResponse(jwt: string): string {
    localStorage.setItem(this.jwtTokenName, jwt);
    this.authUser.next(jwt);

    return jwt;
  }
And finally, we implement the signup method. The function posts the signup information to the /signup endpoint and receives back either a JWT or the string EXISTS when the username already exists. When the response is a JWT, it calls handleJwtResponse, which stores the token.
  signup(values: { name: string, email: string, username: string, password: string }): Observable<string> {
    return this.httpClient.post(`${environment.serverURL}/signup`, values, {responseType: 'text'})
      .pipe(tap(jwt => {
        if (jwt !== 'EXISTS') {
          return this.handleJwtResponse(jwt);
        }
        return jwt;
      }));
  }
AuthGuard 
In the Angular route configuration, you see that the application protects the route to the home page with a canActivate guard.
{path: 'home', component: HomePage, canActivate: [() => inject(AuthGuard).canActivate()]},
This guard calls the hasAccess method from the AuthService class.
import {inject, Injectable} from '@angular/core';
import {UrlTree} from '@angular/router';
import {Observable} from 'rxjs';
import {AuthService} from './auth.service';

@Injectable({
  providedIn: 'root'
})
export class AuthGuard {
  private readonly authService = inject(AuthService);


  canActivate(): Observable<boolean | UrlTree> | Promise<boolean | UrlTree> | boolean | UrlTree {
    return this.authService.hasAccess();
  }

}
This method either returns true or false. False blocks the route request and displays the login page. True allows the request to go through and shows the home page to the user.
Login Page 
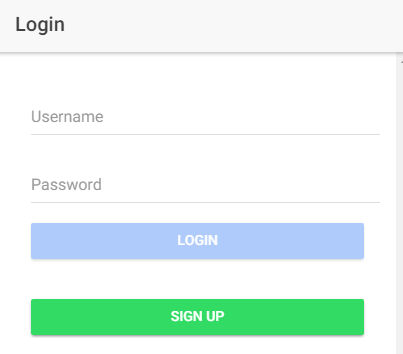
The login page is a simple form implemented with the template-driven approach and presents the user a username and password field and two buttons: one to log in and the other to switch to the signup page.
When the user taps on the login button, the app opens a loading dialog and calls the method login from AuthService. If an error occurs, a toast message is presented to tell the user that something went wrong. When the login succeeds, the user sees the home page.
Template: login.page.html
TypeScript class: login.page.ts
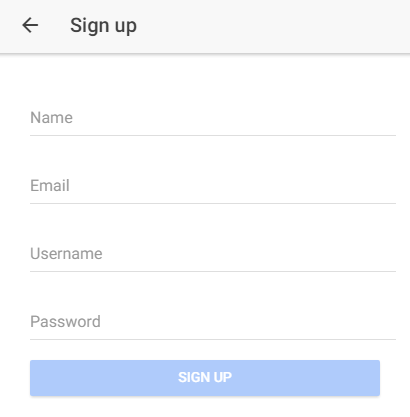
Sign up Page 
The signup page displays the input fields name, email, username, and password. A tap on the signup button calls the authService.signup function.
To handle the special "EXISTS" case, the app injects the NgModel of the username field into the SignupPage class.
And later, when the server returns the string "EXISTS", the app can access the FormControl and set an error.
Template: signup.page.html
TypeScript class: signup.page.ts
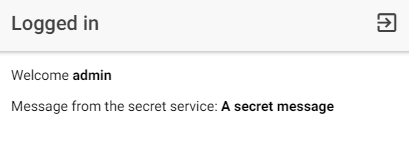
Home Page 
The HomePage is the page the users see when login or sign up was successful or when the app finds a valid JWT in the storage. The home page displays the username of the logged-in user and the response of the /secret HTTP endpoint.
The HomePage subscribes to the authService.authUserObservable in the constructor,
and when it receives a JWT, it decodes it with the JwtHelper.decodeToken function,
extracts the username from the subject field (sub), and assigns it to the instance variable user.
    this.authService.authUserObservable.subscribe(jwt => {
      if (jwt) {
        const decoded = jwtHelper.decodeToken(jwt);
        this.user = decoded.sub;
      } else {
        this.user = null;
      }
    });
The ngOnInit lifecycle method calls the /secret endpoint and assigns the response to the message instance variable.
  ngOnInit(): void {
    this.httpClient.get(`${environment.serverURL}/secret`, {responseType: 'text'}).subscribe(
      text => this.message = text,
      err => console.log(err)
    );
  }
The HomePage also displays a logout icon in the top right corner. Tapping on this icon calls the authService.logout() method.
This concludes our JWT implementation with Ionic/Angular and Spring Boot.
You find the complete source code for this project on GitHub.