Validating user input is an important part of an application. The validation process ensures that the data entered by the user is both sensible and valid. In this article, we explore the possibilities to do client-side validation in an Angular (Ionic) app and server-side validation with Spring and the Java Bean Validation (JSR 303) framework.
Client 
For the client, we create an Ionic app with the blank starter template:
ionic start validation blank
We use a reactive/model-driven form for this example. First, we create the template for the form. Open the file src/app/home/home.page.html and create this basic form.
<ion-content class="ion-padding">
  <form [formGroup]="registrationForm" (submit)="register()" novalidate>

    <ion-list>
      <ion-item>
        <ion-label position="stacked">Username</ion-label>
        <ion-input formControlName="username" type="text"></ion-input>
      </ion-item>

      <ion-item>
        <ion-label position="stacked">Email</ion-label>
        <ion-input formControlName="email" type="email"></ion-input>
      </ion-item>

      <ion-item>
        <ion-label position="stacked">Age</ion-label>
        <ion-input formControlName="age" type="number"></ion-input>
      </ion-item>
    </ion-list>

    <ion-button expand="block" type="submit" [disabled]="!registrationForm.valid">
      Create an Account
    </ion-button>

  </form>
</ion-content>
The form consists of three input elements: username, email, and age. We bind the form with the formGroup directive to a FormGroup instance in the code. The three input elements are bound to FormControl instances with the formControlName directive. On the form, the submit event is bound to a register() function. A click/tap on the submit button at the bottom triggers this event. The disabled attribute of the button is bound to the valid property of the FormGroup class. This flag has the value true when all the containing FormControls of this group don't have any validation errors. In that case, disabled is set to false, and the user can click/tap on the button.
In the src/app/home/home.page.ts file, we add the TypeScript code for the form. We do this in the constructor and,
because we want to use the FormBuilder, we inject it into our class.
  private readonly emailRegex = `(?:[a-z0-9!#$%&'*+/=?^_\`{|}~-]+(?:\\.[a-z0-9!#$%&'*+/=?^_\`{|}~-]+)*|"(?:[\x01-\x08\x0b\x0c\x0e-\x1f\x21\x23-\x5b\x5d-\x7f]|\\\\[\x01-\x09\x0b\x0c\x0e-\x7f])*")@(?:(?:[a-z0-9](?:[a-z0-9-]*[a-z0-9])?\\.)+[a-z0-9](?:[a-z0-9-]*[a-z0-9])?|\\[(?:(?:25[0-5]|2[0-4][0-9]|[01]?[0-9][0-9]?)\\.){3}(?:25[0-5]|2[0-4][0-9]|[01]?[0-9][0-9]?|[a-z0-9-]*[a-z0-9]:(?:[\x01-\x08\x0b\x0c\x0e-\x1f\x21-\x5a\x53-\x7f]|\\\\[\x01-\x09\x0b\x0c\x0e-\x7f])+)\\])`;

  constructor() {
    const formBuilder = inject(UntypedFormBuilder);
    const usernameValidator = inject(UsernameValidator);


    this.registrationForm = formBuilder.group({
      username: ['', [Validators.required, Validators.minLength(2), Validators.maxLength(30)]
        , usernameValidator.validate.bind(usernameValidator)],
      email: ['', [Validators.required, Validators.pattern(this.emailRegex)]],
      age: ['', [Validators.required, AgeValidator.validate(this.minAge)]]
    });
We have to make sure that the names we use for the FormGroup and FormControl match the names in the template.
The first argument of the FormControl is the initial value shown to the user when the form is presented the first time.
We set it to the empty string '' for all fields. The next argument is an array of validators. Angular provides a few built-in validators, and most of them are static
methods of the Validators class. Here is a project that provides
many more useful validators for Angular applications: https://github.com/yuyang041060120/ng2-validation
We specify that the username is required and must have a length between 2 and 30 characters. The email is required and must match a regular expression pattern. The age field is required.
Next, we implement the register() method:
register(): void {
  console.log(this.registrationForm.value);
}
At the moment, we only print out the form values to the console. The FormControl class contains a value property that returns the form data as an object:
{
  age:"18"
  email:"test@test.com"
  username:"username"
}
Next, we start the app with the command ionic serve, enter some data, click on the submit button, and when everything is valid,
you should see the output in the developer console. The button is disabled when there are validation errors.
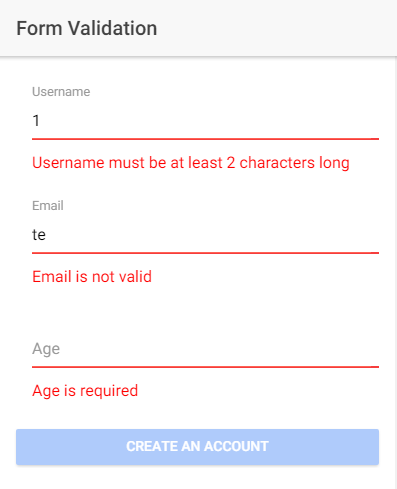
The form in its current state is not very user-friendly. The user only notices that the button is disabled, but he has no idea why. In this step, we add error messages to give the user feedback on what's wrong with the input.
In the file src/app/home/home.page.html below the ion-input field, we add several ion-item components for every possible validation error.
      <ion-item>
        <ion-input [class.invalid]="isInvalidAndDirty('username')"
                   formControlName="username" label="Username"
                   labelPlacement="stacked" type="text"></ion-input>
      </ion-item>
      @if (hasError('username', 'required')) {
        <ion-item class="error-message">
          <ion-label>
            Username is required
          </ion-label>
        </ion-item>
      }
      @if (hasError('username', 'minlength')) {
        <ion-item class="error-message">
          <ion-label>
            Username must be at least 2 characters long
          </ion-label>
        </ion-item>
      }
      @if (hasError('username', 'maxlength')) {
        <ion-item class="error-message">
          <ion-label>
            Username cannot be longer than 30 characters
          </ion-label>
        </ion-item>
      }
      @if (hasError('username', 'usernameTaken')) {
        <ion-item class="error-message">
          <ion-label>
            Username is already taken
          </ion-label>
        </ion-item>
      }
The template calls two functions in the TypeScript code to check if a field has errors.
On the input field itself, the CSS class invalid is added when the function isInvalidAndDirty returns true.
The method is implemented in the TypeScript code:
  isInvalidAndDirty(field: string): boolean {
    const ctrl = this.registrationForm.get(field);
    return ctrl !== null && !ctrl.valid && ctrl.dirty;
  }
The get function of the FormGroup returns the FormControl with the given name. The function then checks if the FormControl is not valid, and the user changed the value (dirty).
Below the input field, messages are displayed when the function hasError returns true.
  hasError(field: string, error: string): boolean {
    const ctrl = this.registrationForm.get(field);
    return ctrl !== null && ctrl.dirty && ctrl.hasError(error);
  }
This function works very similarly to the isInvalidAndDirty function. It fetches the FormControl and
checks if the user entered some data (dirty) and if it contains a validation error with the given name.
When you enter some invalid data, you should now see an error message.
Custom validator 
Next, we want to validate the age field so that the user only enters numbers equal to or greater than 18. Because Angular does not have a built-in validator for that, we have to write our own validator. Create a new TypeScript file and open it in an editor.
import {AbstractControl} from '@angular/forms';

export class AgeValidator {

  static validate(minAge: number): (control: AbstractControl) => { [key: string]: boolean } | null {
    return (control: AbstractControl): { [key: string]: boolean } | null => {
      if (!control.value || 0 === control.value.length) {
        return null;
      }

      if (control.value >= minAge) {
        return null;
      }
      return {notOldEnough: true};
    };
  }

}
A validation function receives the control as an argument and returns an object when there is a validation error or null when the value is valid.
With control.value the code has access to the value the user entered. The function checks first if the value is not empty because we don't want the age validator to show an error message in this case. The required validator already takes care of this case. Then the function checks if the value is equal to or greater than the minimum. If not, it returns the object {"notOldEnough": true}. Because we want a reusable validator, we don't hard code the minimum age value in this function. Instead, we create a factory function that encloses the minAge argument and returns the validation function.
Back in the home.page.ts file, we add the validator to the age control and specify the minimum age.
public readonly minAge: number = 18;
age: ['', [Validators.required, AgeValidator.validate(this.minAge)]]
and in the template file, we add a new error message:
      @if (hasError('age', 'notOldEnough')) {
        <ion-item class="error-message">
          <ion-label>
            You must be at least {{ minAge }} years old!
          </ion-label>
        </ion-item>
      }
Notice that the string 'notOldEnough' corresponds with the key in the object the validator returns in case of an error.
You should now see an error message when you enter an age of less than 18.
Custom asynchronous validator 
Angular does support not only synchronous validators like the age validator but also asynchronous validators. An asynchronous validator is a function that returns a Promise or an Observable and is especially useful when the client has to ask a server to validate an input value.
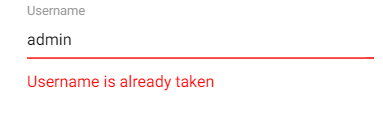
For this example, we want to check if the username is unique. Most of the time, a user database is stored on a server, and the client cannot determine if the username is already taken by someone else.
We start with the server and create a simple Spring Boot application. As usual, I create my Spring Boot applications with the website https://start.spring.io/. For this example, we only need the Web dependency.
We don't access a real database. The code just checks a Set if the username is already taken or not. We create a RestController and a method mapped to the /checkUsername URL. This method checks if the value is an element in the set and returns true or false.
@RestController
@CrossOrigin
public class RegistrationController {

  private final Set<String> existingUsernames = new HashSet<>();

  RegistrationController() {
    this.existingUsernames.add("admin");
    this.existingUsernames.add("user");
  }

  @GetMapping("/checkUsername")
  public boolean checkUsername(@RequestParam("value") String value) {
    return this.existingUsernames.contains(value);
  }
Start the server with ./mvnw spring-boot:run or start the main class in an IDE. Back on the client, we create a new TypeScript file and add the following code for the asynchronous validator.
import {HttpClient} from '@angular/common/http';
import {AbstractControl} from '@angular/forms';
import {environment} from '../environments/environment';
import {inject, Injectable} from '@angular/core';

@Injectable({
  providedIn: 'root'
})
export class UsernameValidator {
  private readonly http = inject(HttpClient);


  private timeout: any = null;

  validate(control: AbstractControl): Promise<{ [key: string]: boolean } | null> {
    if (this.timeout !== null) {
      clearTimeout(this.timeout);
      this.timeout = null;
    }

    const value = control.value;

    // do not call server when input is empty or shorter than 2 characters
    if (!value || value.length < 2) {
      return Promise.resolve(null);
    }

    return new Promise((resolve) => {
      this.timeout = setTimeout(() => {
        this.http.get<boolean>(`${environment.serverURL}/checkUsername?value=${control.value}`)
          .subscribe(flag => {
              if (flag) {
                resolve({usernameTaken: true});
              } else {
                resolve(null);
              }
            },
            (err) => {
              console.log(err);
            }
          );
      }, 200);
    });
  }

}
The validator sends a GET request to the server endpoint with the username as a query parameter. It returns a Promise that resolves to either null when the server returns false or to the object {'usernameTaken': true} when the server returns true.
The code first checks if the user input is not empty and has a length of at least 2 characters. There are already validators for these two cases in place, so we ignore them here. Validators are called every time the user enters some characters. This generates many HTTP requests. To reduce the number of requests, the http.get call is wrapped in a setTimeout function that waits 200 milliseconds before it runs the code. When Angular calls the validator again during these 200 milliseconds, the previous call is canceled with clearTimeout(this.timeout).
Next, we inject this new validator into the home component class and add it to the username array as the third(!) element. It is not going to work when you add asynchronous validators to the array of the synchronous validators (2nd element).
    const usernameValidator = inject(UsernameValidator);


    this.registrationForm = formBuilder.group({
      username: ['', [Validators.required, Validators.minLength(2), Validators.maxLength(30)]
        , usernameValidator.validate.bind(usernameValidator)],
The bind might look a bit strange, but it is necessary because we have to reference functions,
and if we add the validator like this usernameValidator.validate it loses the context. When Angular calls the function, this would be bound to something else, and it throws an error because we have instance variables in our validator (http, timeout). To make sure that this is bound to the usernameValidator instance, the code calls the built-in bind function, which does return a new function that wraps the validate function and binds this to the provided argument.
Next, we add a new validation message to the template.
      @if (hasError('username', 'usernameTaken')) {
        <ion-item class="error-message">
          <ion-label>
            Username is already taken
          </ion-label>
        </ion-item>
      }
The parameter 'usernameTaken' matches the key in the validation object returned from the validator. When everything is in place, and you enter either admin or user in the username field, a validation message appears.
Server validation 
Because a server should not trust the client, and it's quite easy to change HTTP requests, we want the server to validate the user input again when it receives the data. In a Java application, we can utilize the Java Bean Validation framework for that. The necessary library is already loaded and automatically configured by Spring Boot. All that's left for the developer to do is adding the necessary annotations to the fields of the bean.
  @NotBlank
  @Size(min = 2, max = 30)
  private String username;

  @NotBlank
  @Email
  private String email;

  @Min(18)
  @NotNull
  private Integer age;
This code mirrors the validation on the client-side. Every field is required, the username must have a length between 2 and 30 characters, the email string has to contain a valid email address, and the age field must have a value of at least 18.
In the RegistrationController class, we add a POST mapping for the URL /register. Because the client sends the data as JSON, we annotate the parameter with @RequestBody. The @Valid annotation triggers a validation run as soon as the message is deserialized. The second parameter, BindingResult, contains the validation messages. Because there is no built-in validation for checking if the username is already taken, the application does it here. Although the Java Bean Validation framework supports custom validators, and if an application uses the same validation in multiple places, writing such a custom validator would be a better approach.
  @PostMapping("/register")
  public Map<String, Set<String>> register(@Valid @RequestBody Registration registration,
      BindingResult result) {

    Map<String, Set<String>> errors = new HashMap<>();

    if (this.existingUsernames.contains(registration.getUsername())) {
      errors.computeIfAbsent("username", key -> new HashSet<>()).add("usernameTaken");
    }

    for (FieldError fieldError : result.getFieldErrors()) {
      String code = fieldError.getCode();
      String field = fieldError.getField();
      if ("NotBlank".equals(code) || "NotNull".equals(code)) {
        errors.computeIfAbsent(field, key -> new HashSet<>()).add("required");
      }
      else if ("Email".equals(code) && "email".equals(field)) {
        errors.computeIfAbsent(field, key -> new HashSet<>()).add("pattern");
      }
      else if ("Min".equals(code) && "age".equals(field)) {
        errors.computeIfAbsent(field, key -> new HashSet<>()).add("notOldEnough");
      }
      else if ("Size".equals(code) && "username".equals(field)) {
        if (registration.getUsername().length() < 2) {
          errors.computeIfAbsent(field, key -> new HashSet<>()).add("minlength");
        }
        else {
          errors.computeIfAbsent(field, key -> new HashSet<>()).add("maxlength");
        }
      }
    }

    if (errors.isEmpty()) {
      System.out.println(registration);
    }

    return errors;
  }
What the code does is mapping the validation errors from the framework to the names we use on the client-side. For example, when the age field violates the Min validation, it adds the string "notOldEnough" to the result, the same string we use in the client-side validator.
The method returns an object that contains the field name as the key and an array of validation errors. Spring, with the help of Jackson, automatically converts this to the following JSON:
{email: ["pattern"], age: ["notOldEnough"], username: ["usernameTaken"]}
On the client, we need to add code to the register() function.
  register(): void {
    console.log(this.registrationForm.value);
    this.http.post<{ [key: string]: string[] }>(`${environment.serverURL}/register`, this.registrationForm.value)
      .subscribe(async (data) => {
        for (const fieldName of Object.keys(data)) {
          const serverErrors = data[fieldName];

          const errors: { [key: string]: boolean } = {};
          for (const serverError of serverErrors) {
            errors[serverError] = true;
          }

          const control = this.registrationForm.get(fieldName);
          if (control !== null) {
            control.setErrors(errors);
            control.markAsDirty();
          }
        }
First, the function sends a POST request to the server with the values of the form.
Then it handles the response. If there are any validation errors, it fetches the FormControl with this.registrationForm.get(fieldName)
and sets an error object with control.setErrors. Because the template also checks the dirty flag before it shows the validation messages,
the code calls control.markAsDirty(). At the end of the method, a toast message is displayed when there are no validation errors.
To test the validation on the server, we need to disable the client validations. We can do that by removing all the validators from the formBuilder statement.
this.registrationForm = formBuilder.group({
  username: [],
  email: [],
  age: []
});
Now enter some invalid data and click on submit. After a short delay, you see the validation messages.
You find the complete source code for this example on GitHub.