Rate limiting is a technology used in networks to control traffic rates. We also see applications of this technology in the HTTP world. For example, services that provide an HTTP API often limit the number of requests a client can send over a certain period.
For example, GitHub rate limits access to authenticated API calls to 5,000 per hour and 60 requests per hour for unauthenticated requests (associated with IP address): https://docs.github.com/en/rest/using-the-rest-api/rate-limits-for-the-rest-api?apiVersion=2022-11-28
This blog post shows you how to rate limit Spring MVC endpoints in Spring Boot applications.
Algorithm 
Rate limiting can be implemented with many different algorithms:
- Token bucket
- Leaky bucket
- Fixed window counter
- Sliding window log
- Sliding window counter
The examples in this blog post use the bucket4j Java library, which implements the token bucket algorithm.
The basics of the algorithm are straightforward to understand. You have a bucket with a maximum number of tokens (capacity). Whenever a consumer wants to call a service or consume a resource, they take out one or multiple tokens. The consumer can only consume a service if they can take out the required number of tokens. If the bucket does not contain the required number of tokens, they need to wait until enough tokens are in the bucket.
When we have someone that takes out tokens, we also need someone that puts tokens into the bucket. That is the job of a refiller, that periodically creates new tokens and puts them into the bucket.
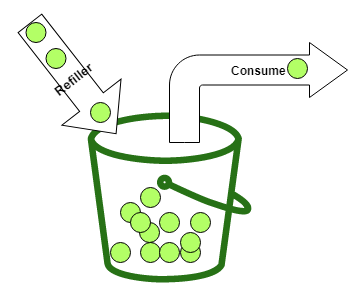
The bucket4j library differentiates between two types of refillers:
Bandwidth limit = Bandwidth.builder().capacity(5).refillIntervally(5, Duration.ofMinutes(1)).build();
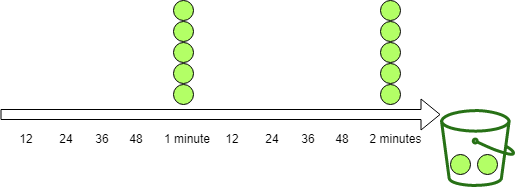
The "intervally" refiller waits until the specified amount of time has passed and then puts in all tokens at once. In this example, it adds five tokens every minute.
The bucket4j library also provides a special form of the intervally refiller: IntervallyAligned. With this kind of refiller, you can specify the time when the first refill should happen. See more information in the official documentation.
Bandwidth limit = Bandwidth.builder().capacity(5).refillGreedy(5, Duration.ofMinutes(1)).build();
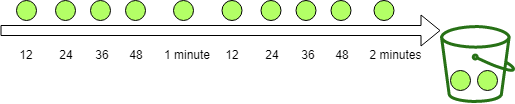
The "greedy" refiller adds the tokens more greedily. In this example, the refiller splits one minute into five periods and puts one token into the bucket at each of these periods.
The refiller puts one token every 12 seconds into the bucket with the configuration above. After one minute, both refillers put the same number of tokens into the bucket.
It is important to notice that buckets have a maximum capacity. Therefore, the refiller only puts tokens into the bucket until this capacity is reached. The refiller does not put any more tokens into the bucket when the bucket is full.
For a more detailed description of the Token Bucket algorithm, check out the Wikipedia page.
Setup 
Before we can use bucket4j, we need to add it to the classpath of our project. In a Maven-managed project, we add the following dependency to the pom.xml
    <dependency>
      <groupId>com.bucket4j</groupId>
      <artifactId>bucket4j_jdk17-core</artifactId>
      <version>8.14.0</version>
    </dependency>
This library does not depend on any other library. You can use it with any framework that runs on the Java Virtual Machine.
Basic example 
As an example server, I wrote a Spring Boot application that provides HTTP endpoints for fetching data about earthquakes that happened during the last week. The application automatically downloads the latest earthquake data from usgs.gov and inserts it into a relational database with JOOQ.
The following endpoint returns information about the earthquake with the highest magnitude.
  @GetMapping("/top1")
  public ResponseEntity<Earthquake> getTop1() {
      Earthquake body = this.dsl.selectFrom(EARTHQUAKE).orderBy(EARTHQUAKE.MAG.desc())
          .limit(1).fetchOneInto(Earthquake.class);
      return ResponseEntity.ok().body(body);
  }
We decide that only ten requests per minute can reach this service. So first, we create an instance of the Bandwidth class. This instance holds 10 tokens, and a greedy refiller refills the bucket with ten tokens per minute. That means this refiller puts one token every 6 seconds into the bucket.
    long capacity = 10;
    Bandwidth limit = Bandwidth.builder().capacity(capacity)
        .refillGreedy(capacity, Duration.ofMinutes(1)).build();
    this.bucket = Bucket.builder().addLimit(limit).build();
The bucket we create here is global, so the same bucket handles every client request. Later in this blog post, we will see examples of configuring buckets on a per-client basis.
It is worth noting that when you create the Bandwidth instance this way, the bucket is initially filled with the same number of tokens as the maximum capacity. In the example above, the bucket contains ten tokens after the instantiation. Sometimes this is not the desired effect, and you want to start with a different amount of tokens. In these cases, you can specify the initial amount of tokens with the initialTokens method.
    long capacity = 10;
    Bandwidth limit = Bandwidth.builder()
        .capacity(capacity)
        .refillGreedy(capacity, Duration.ofMinutes(1))
        .initialTokens(1)
        .build();
This bucket starts with one token.
We can now add the rate-limiting code to our endpoint with the bucket in place. We call the method tryConsume(numTokens) to get a token from the bucket. This method returns true if it could consume the given number of tokens from the bucket, and false when the bucket is empty or does not contain the required number of tokens. The argument passed to the tryConsume() must be a positive number. It does not have to be just one token. You can decide that a service is more expensive and consumes 2, 3, or more tokens.
  @GetMapping("/top1")
  public ResponseEntity<Earthquake> getTop1() {
    if (this.bucket.tryConsume(1)) {
      Earthquake body = this.dsl.selectFrom(EARTHQUAKE).orderBy(EARTHQUAKE.MAG.desc())
          .limit(1).fetchOneInto(Earthquake.class);
      return ResponseEntity.ok().body(body);
    }

    return ResponseEntity.status(HttpStatus.TOO_MANY_REQUESTS).build();
  }
For HTTP endpoints, it's common to send back the status code 429 (TOO_MANY_REQUESTS) if the calling client exceeds the configured rate limit. This is not a hard requirement; your service can do whatever it wants if the clients exceed the rate limit. However, this is a standard convention, and you should follow it, especially when you create a public-facing HTTP API.
We can now test the rate limiter. For this purpose, I wrote a simple client with the Java 11 HTTP client.
      for (int i = 0; i < 11; i++) {
        Builder builder = HttpRequest.newBuilder().uri(URI.create(SERVER_1 + "/top1"))
            .GET();
        HttpRequest request = builder.build();
        HttpResponse<String> response = httpClient.send(request, BodyHandlers.ofString());
        System.out.println(response.statusCode());
      }
If we configured everything correctly, the first 10 GET calls return the status code 200, and the 11th call returns 429 because the bucket is empty. Our client now has to wait 6 seconds until the refiller adds 1 token to the bucket, and we can send another GET request.
Return additional rate limit information 
Often you not only want to send back the status code 429 but also more information, like the remaining number of tokens or the remaining time until the bucket is refilled.
For this purpose, instead of calling bucket.tryConsume(), call the method bucket.tryConsumeAndReturnRemaining() which returns an instance of ConsumptionProbe. This object contains the result of consumption, which we can access with isConsumed(), as well as the remaining number of tokens (getRemainingTokens()) and the time in nanoseconds until the next refill (getNanosToWaitForRefill()).
getNanosToWaitForRefill() returns the time only when isConsumed() returns false. In case of a successful token consumption, getNanosToWaitForRefill() returns 0.
We leverage the same bucket as before, but we send back additional HTTP response headers in this example. If the call is successful, the endpoint sends back X-Rate-Limit-Remaining with the remaining amount of tokens. The client then knows how many more requests they can send before the rate limit kicks in.
In case the client exceeds the limit, the endpoint sends back the header X-Rate-Limit-Retry-After-Milliseconds, which tells the client how long (in milliseconds) they have to wait before sending a new request and expecting a successful response.
  @GetMapping("/top/{top}")
  public ResponseEntity<List<Earthquake>> getTopOrderByMag(@PathVariable("top") int top) {
    ConsumptionProbe probe = this.bucket.tryConsumeAndReturnRemaining(1);
    if (probe.isConsumed()) {
      List<Earthquake> body = this.dsl.selectFrom(EARTHQUAKE)
          .orderBy(EARTHQUAKE.MAG.desc()).limit(top).fetchInto(Earthquake.class);
      return ResponseEntity.ok()
          .header("X-Rate-Limit-Remaining", Long.toString(probe.getRemainingTokens()))
          .body(body);
    }

    // X-Rate-Limit-Retry-After-Seconds
    return ResponseEntity.status(HttpStatus.TOO_MANY_REQUESTS)
        .header("X-Rate-Limit-Retry-After-Milliseconds",
            Long.toString(TimeUnit.NANOSECONDS.toMillis(probe.getNanosToWaitForRefill())))
        .build();
  }
We can now test this endpoint with the following client.
    for (int i = 0; i < 11; i++) {
      get(SERVER_1 + "/top/3");
    }
      Builder builder = HttpRequest.newBuilder().uri(URI.create(url)).GET();
      if (apiKey != null) {
        builder.header("X-api-key", apiKey);
      }
      HttpRequest request = builder.build();
      HttpResponse<String> response = httpClient.send(request, BodyHandlers.ofString());
      System.out.print(response.statusCode());
      if (response.statusCode() == 200) {
        String remaining = response.headers().firstValue("X-Rate-Limit-Remaining")
            .orElse(null);
        System.out.println(" Remaining: " + remaining);
      }
      else {
        String retry = response.headers()
            .firstValue("X-Rate-Limit-Retry-After-Milliseconds").orElse(null);
        System.out.println(" retry after milliseconds: " + retry);
      }
The first 10 GET calls return the status code 200 with the remaining number of tokens, and the 11th call fails with 429 and sends back the header X-Rate-Limit-Retry-After-Milliseconds.
200 Remaining: 9
200 Remaining: 8
200 Remaining: 7
200 Remaining: 6
200 Remaining: 5
200 Remaining: 4
200 Remaining: 3
200 Remaining: 2
200 Remaining: 1
200 Remaining: 0
429 retry after milliseconds: 5863
Rate limit with Spring MVC Interceptor 
We mixed the rate limit code with the business code in the two examples above. This might be acceptable if we only want to protect one or two services. However, as soon as we have to rate limit multiple endpoints, we write a lot of duplicate code.
It would be better to separate these two concerns. With Spring MVC, we can implement this in different ways. The following example will extract the rate limit code into a Spring MVC interceptor. An interceptor allows an application to intercept HTTP requests before they reach the service and after they come back. Here we are only interested in the before case; we can either let the request go through or block it and send back the status code 429.
Here is an example of a generic rate limit interceptor. The bucket, as well as the number of consumption tokens, are passed to the constructor. This way, we can construct multiple interceptors with different bucket configurations.
Spring MVC calls the preHandle() method before sending the request to the next interceptor or the handler itself. The interceptor either returns true, Spring MVC then sends the request to the next component in the chain, or the interceptor returns false, which signifies Spring MVC that the request was handled by the interceptor and sends the response back to the client.
The rate limit code is the same as in the previous example.
public class RateLimitInterceptor implements HandlerInterceptor {

  private final Bucket bucket;

  private final int numTokens;

  public RateLimitInterceptor(Bucket bucket, int numTokens) {
    this.bucket = bucket;
    this.numTokens = numTokens;
  }

  @Override
  public boolean preHandle(HttpServletRequest request, HttpServletResponse response,
      Object handler) throws Exception {

    ConsumptionProbe probe = this.bucket.tryConsumeAndReturnRemaining(this.numTokens);
    if (probe.isConsumed()) {
      response.addHeader("X-Rate-Limit-Remaining",
          Long.toString(probe.getRemainingTokens()));
      return true;
    }

    response.setStatus(HttpStatus.TOO_MANY_REQUESTS.value()); // 429
    response.addHeader("X-Rate-Limit-Retry-After-Milliseconds",
        Long.toString(TimeUnit.NANOSECONDS.toMillis(probe.getNanosToWaitForRefill())));

    return false;

  }
Next, we need to configure the interceptor and specify which URLs it should handle. The following example protects the /last endpoint with a bucket that allows ten requests per minute and the /place/... endpoint with a bucket that allows only three requests per minute.
    Bandwidth limit = Bandwidth.builder().capacity(10)
        .refillGreedy(10, Duration.ofMinutes(1)).build();
    Bucket bucket = Bucket.builder().addLimit(limit).build();
    registry.addInterceptor(new RateLimitInterceptor(bucket, 1)).addPathPatterns("/last");

    limit = Bandwidth.builder().capacity(3).refillIntervally(3, Duration.ofMinutes(1))
        .build();
    bucket = Bucket.builder().addLimit(limit).build();
    registry.addInterceptor(new RateLimitInterceptor(bucket, 1))
        .addPathPatterns("/place/*");
The code for these two endpoints is free from any rate limit code.
  @GetMapping("/last")
  public Earthquake getLast() {
    return this.dsl.selectFrom(EARTHQUAKE).orderBy(EARTHQUAKE.TIME.desc()).limit(1)
        .fetchOneInto(Earthquake.class);
  }

  @GetMapping("/place/{place}")
  public List<Earthquake> getPlace(@PathVariable("place") String place) {
    return this.dsl.selectFrom(EARTHQUAKE).where(EARTHQUAKE.PLACE.endsWith(place))
        .fetchInto(Earthquake.class);
  }
With this architecture in place, we can easily adjust the parameters of the buckets in one place, only have to write the rate limit code once, and no longer pollute our business code with the rate limit code.
Rate limit in a cluster 
When the number of requests grows, you might need to scale out and run multiple instances of your application. The buckets we have created before only rate limit requests per JVM instance. With multiple application instances, you often have to access resources that exist only once, like a database. So instead of rate limiting per JVM, we want to rate limit across the whole cluster.
Fortunately for us, this can easily be achieved with Spring Boot and bucket4j. bucket4j provides adapters for popular products like Hazelcast, Apache Ignite, Infinispan, and Oracle Coherence. We are going to look at an example with Hazelcast.
First, we need to add the required libraries to our Spring Boot project.
    <dependency>
        <groupId>com.bucket4j</groupId>
        <artifactId>bucket4j-hazelcast</artifactId>
        <version>8.10.1</version>
    </dependency>
    <dependency>
      <groupId>com.hazelcast</groupId>
      <artifactId>hazelcast-spring</artifactId>
    </dependency>
    <dependency>
      <groupId>javax.cache</groupId>
      <artifactId>cache-api</artifactId>
    </dependency>
Spring Boot autoconfigures Hazelcast if it finds the library on the classpath. All we have to provide in our code is a Config bean. With this in place, we can inject an instance of HazelcastInstance into any Spring-managed bean.
@Configuration
public class ApplicationConfig {

  @Bean
  public Config hazelCastConfig() {
    Config config = new Config();
    config.setInstanceName("my-hazelcast-instance");
    return config;
  }

}
The next step is to get an instance of IMap. Then, Hazelcast automatically synchronizes the content of this map across all nodes of a Hazelcast cluster.
The code that creates the bucket changes a bit. First, we must create an instance of BucketConfiguration and configure the Bandwidth class with addLimit. Then we create a HazelcastProxyManager and pass the Hazelcast IMap to the constructor. And finally, we can build the bucket. Make sure that the first argument of the build method is a unique key. This is the key under which bucket4j stores the bucket in the IMap and is synchronized across the Hazelcast cluster.
    BucketConfiguration configuration = BucketConfiguration.builder().addLimit(limit)
        .build();
    IMap<String, byte[]> map = this.hzInstance.getMap("bucket-map");
    HazelcastProxyManager<String> proxyManager = new HazelcastProxyManager<>(map);
    Bucket hazelcastBucket = proxyManager.builder().build("rate-limit",
        () -> configuration);

    registry.addInterceptor(new RateLimitInterceptor(hazelcastBucket, 1))
        .addPathPatterns("/place/*");
This is all we have to change to configure a clustered bucket. Thanks to the generic interceptor, we don't have to change any code in the business logic handler.
Start the application two times with the following commands to test this setup. We need to make sure that we start the two HTTP servers with different listening ports.
.\mvnw.cmd spring-boot:run -Dspring-boot.run.arguments=--server.port=8080
.\mvnw.cmd spring-boot:run -Dspring-boot.run.arguments=--server.port=8081
.\mvnw.cmd works only on Windows; on macOS and Linux, use the command /mvnw instead.
The bucket we are using here only allows three requests per minute. So we can easily see the effect of the clustered bucket when we send requests to both servers.
    System.out.println("/place/Alaska");
    for (int i = 0; i < 4; i++) {
      get(SERVER_1 + "/place/Alaska");
    }
    for (int i = 0; i < 4; i++) {
      get(SERVER_2 + "/place/Alaska");
    }
After three requests, we get back status 429, and when we send the later requests to the 8081 server, all return 429 too. With the previous non-clustered bucket, our client sent three requests to 8080 and 3 to 8081 before it got the 429 status code.
Rate limit per client 
All the examples above created one bucket, and all clients had to share this single bucket. This is one way you can rate limit your service. Another approach is to limit the number of requests per client. For this approach, you have to build a bucket per client.
You can either use the same limit for all clients or assign individual rate limits.
In the following example, we give each client a unique API key, which they must send in the HTTP request header. In this contrived example, API keys that start with "1" denote premium customers that are allowed to send 100 requests per minute, and the other clients are standard customers that can send 50 requests per minute. And we also provide a free tier where a client can send ten requests per minute. Notice that all clients in the free tier share one single bucket. Unlike clients with an API key with their own bucket, every free-tier client must compete for these ten tokens.
The implementation is encapsulated in an interceptor. The code stores the buckets for the clients with the API key in a map. Each time a request comes in with an API key, the program fetches the bucket from the map. If the bucket does not exist, it creates a new bucket and stores it in the map.
The instance variable freeBucket references the singleton bucket for clients without an API key.
package ch.rasc.ratelimit;

import java.time.Duration;
import java.util.Map;
import java.util.concurrent.ConcurrentHashMap;
import java.util.concurrent.TimeUnit;

import org.springframework.http.HttpStatus;
import org.springframework.web.servlet.HandlerInterceptor;

import io.github.bucket4j.Bandwidth;
import io.github.bucket4j.Bucket;
import io.github.bucket4j.ConsumptionProbe;
import jakarta.servlet.http.HttpServletRequest;
import jakarta.servlet.http.HttpServletResponse;

public class PerClientRateLimitInterceptor implements HandlerInterceptor {

  private final Map<String, Bucket> buckets = new ConcurrentHashMap<>();

  private final Bucket freeBucket = Bucket.builder().addLimit(Bandwidth.builder()
      .capacity(10).refillIntervally(10, Duration.ofMinutes(1)).build()).build();

  @Override
  public boolean preHandle(HttpServletRequest request, HttpServletResponse response,
      Object handler) throws Exception {

    Bucket requestBucket;

    String apiKey = request.getHeader("X-api-key");
    if (apiKey != null && !apiKey.isBlank()) {
      if (apiKey.startsWith("1")) {
        requestBucket = this.buckets.computeIfAbsent(apiKey, key -> premiumBucket());
      }
      else {
        requestBucket = this.buckets.computeIfAbsent(apiKey, key -> standardBucket());
      }
    }
    else {
      requestBucket = this.freeBucket;
    }

    ConsumptionProbe probe = requestBucket.tryConsumeAndReturnRemaining(1);
    if (probe.isConsumed()) {
      response.addHeader("X-Rate-Limit-Remaining",
          Long.toString(probe.getRemainingTokens()));
      return true;
    }

    response.setStatus(HttpStatus.TOO_MANY_REQUESTS.value()); // 429
    response.addHeader("X-Rate-Limit-Retry-After-Milliseconds",
        Long.toString(TimeUnit.NANOSECONDS.toMillis(probe.getNanosToWaitForRefill())));

    return false;
  }

  private static Bucket standardBucket() {
    return Bucket.builder().addLimit(Bandwidth.builder().capacity(50)
        .refillIntervally(50, Duration.ofMinutes(1)).build()).build();
  }

  private static Bucket premiumBucket() {
    return Bucket.builder().addLimit(Bandwidth.builder().capacity(100)
        .refillIntervally(100, Duration.ofMinutes(1)).build()).build();
  }

}
PerClientRateLimitInterceptor.java
Lastly, we register the interceptor. In this example, we rate limit all requests to /depth/... with this interceptor.
    registry.addInterceptor(new PerClientRateLimitInterceptor())
        .addPathPatterns("/depth/**");
Rate limit per client in a cluster 
The previous example works fine as long as we only have one instance of our application running. However, if we run multiple instances and want to synchronize the bucket state across the whole cluster, we can again use Hazelcast (or any other grid library supported by bucket4j).
Like in the Hazelcast example above, we need to add the necessary libraries to the classpath and configure Spring Boot.
We can now write our per-client clustered rate limiter with the proper configuration in place.
To create the buckets, we use the HazelcastProxyManager class.
As the argument to the constructor, we need to pass an instance of a Hazelcast IMap.
The buckets stored in the IMap are automatically synchronized across all nodes of the Hazelcast cluster.
public class PerClientHazelcastRateLimitInterceptor implements HandlerInterceptor {

  private final HazelcastProxyManager<String> proxyManager;

  public PerClientHazelcastRateLimitInterceptor(HazelcastInstance hzInstance) {
    this.proxyManager = new HazelcastProxyManager<>(
        hzInstance.getMap("per-client-bucket-map"));
  }

  @Override
  public boolean preHandle(HttpServletRequest request, HttpServletResponse response,
      Object handler) throws Exception {

    String apiKey = request.getHeader("X-api-key");
    if (apiKey == null || apiKey.isBlank()) {
      apiKey = "free";
    }

    BucketConfiguration configuration;

    if (apiKey.startsWith("1")) {
      Bandwidth limit = Bandwidth.builder().capacity(100)
          .refillIntervally(100, Duration.ofMinutes(1)).build();
      configuration = BucketConfiguration.builder().addLimit(limit).build();
    }
    else if (!apiKey.equals("free")) {
      Bandwidth limit = Bandwidth.builder().capacity(50)
          .refillIntervally(50, Duration.ofMinutes(1)).build();
      configuration = BucketConfiguration.builder().addLimit(limit).build();
    }
    else {
      Bandwidth limit = Bandwidth.builder().capacity(10)
          .refillIntervally(10, Duration.ofMinutes(1)).build();
      configuration = BucketConfiguration.builder().addLimit(limit).build();
    }

    Bucket requestBucket = this.proxyManager.builder().build(apiKey, () -> configuration);

    ConsumptionProbe probe = requestBucket.tryConsumeAndReturnRemaining(1);
    if (probe.isConsumed()) {
      response.addHeader("X-Rate-Limit-Remaining",
          Long.toString(probe.getRemainingTokens()));
      return true;
    }

    response.setStatus(HttpStatus.TOO_MANY_REQUESTS.value()); // 429
    response.addHeader("X-Rate-Limit-Retry-After-Milliseconds",
        Long.toString(TimeUnit.NANOSECONDS.toMillis(probe.getNanosToWaitForRefill())));

    return false;
  }

}
PerClientHazelcastRateLimitInterceptor.java
Multiple refillers 
All the buckets in these examples use one refiller. bucket4j also supports multiple refillers per bucket. Here is an example from the documentation that allows 10,000 requests per hour but not more than 20 requests per second.
    Bucket bucket = Bucket.builder()
        .addLimit(limit -> limit.capacity(10_000).refillGreedy(10_000, Duration.ofHours(1)))
        .addLimit(limit -> limit.capacity(20).refillGreedy(20, Duration.ofSeconds(1))).build();
This kind of configuration is something you need to consider for a production environment.
See more information in the bucket4j documentation here.
Client 
All the examples we have seen so far are using bucket4j for rate-limiting HTTP endpoints. You can also use the library on the client for calling a rate-limited service.
The /top/... service allows ten requests per minute. We can write a client that sends requests to this endpoint at the same rate. First, we create the bucket and use the same configuration we use on the server. The important part is converting the bucket into a BlockingBucket with bucket.asBlocking().
The method consume() immediately returns when it could consume the requested number of tokens or blocks the calling thread and waits until the required number of tokens are available in the bucket.
As soon as there are enough tokens, it wakes up, consumes the tokens, and the calling thread resumes its work.
  private static void bucketClient() throws InterruptedException {
    Bucket bucket = Bucket.builder().addLimit(limit -> limit.capacity(10)
        .refillGreedy(10, Duration.ofMinutes(1)).initialTokens(1)).build();
    BlockingBucket blockingBucket = bucket.asBlocking();

    for (int i = 0; i < 10; i++) {
      blockingBucket.consume(1);
      get(SERVER_1 + "/top/3");
    }
  }
You can use this pattern for any program where you have to limit the number of operations over a period of time.
You've reached the end of this introduction to rate limiting with bucket4j and Spring MVC. Check out the bucket4j home page for more in-depth information and examples.
The source code of all examples in this blog post is hosted on GitHub:
https://github.com/ralscha/blog2019/tree/master/ratelimit