While writing applications that deliver emails is often easy, testing is sometimes challenging during development and unit testing. First, your application needs to connect to an SMTP server. Then, you need to make sure that you do not accidentally send thousands of emails during development to your clients in production. Workarounds, like changing all email addresses in the database to a test email address or adding code that checks if the application runs in development and then changes the recipient address, might work. Still, you can't forget to apply these changes. When changing the recipient address, you also face the problem that you can't tell for sure if an email goes to the correct recipient.
Another problem is what if you want to work on your project but don't have access to the SMTP server? For example, when you work in the office, you can use the company SMTP server, but when you work at home, you might not have access to this server. Or you want to work in an environment where you don't have any network access at all (for example, on a plane).
The solution to all these problems is to install a catch-all SMTP server locally on your development computer. These are small applications that you start from the command line and that implement the SMTP protocol. They listen for SMTP traffic and accept all messages for any email address and don't relay them. Instead, they store them locally in a file or RAM and give you access to the inbox with a GUI.
With such a setup in place, you can always send emails to the correct recipients, no changes required in the database or the code, and it always works even when you don't have access to a network, as long as you don't forget to change the SMTP server address in your application's configuration file. A locally installed catch-all SMTP server does not prevent your application from delivering emails to a real SMTP server.
In this blog post, we are going to look at a few catch-all server applications. They are all free and run on multiple platforms.
Email Demo 
First, we need a simple application that delivers emails. For this purpose, we write a trivial Spring Boot application. Add the spring-boot-starter-mail dependency to the project's classpath, which automatically includes the necessary email libraries to your project.
    <dependency>
      <groupId>org.springframework.boot</groupId>
      <artifactId>spring-boot-starter-mail</artifactId>
    </dependency>
In a Spring-managed bean, we inject the JavaMailSender bean, which is responsible for creating emails and for sending them.
@Service
public class EmailService {

  private final JavaMailSender mailSender;

  private final String defaultSender;

  public EmailService(JavaMailSender mailSender, AppProperties appProperties) {
    this.mailSender = mailSender;
    this.defaultSender = appProperties.getDefaultEmailSender();
  }

  public void sendEmail() throws MessagingException {
    MimeMessage message = this.mailSender.createMimeMessage();
    MimeMessageHelper helper = new MimeMessageHelper(message);
    helper.setFrom(this.defaultSender);
    helper.setTo("developer@test.com");
    helper.setText("<h1>Hello World</h1>", true);
    helper.setSubject("Test Email");

    this.mailSender.send(message);
  }
This demo application also configures a GET endpoint (/send) that calls the sendEmail() method of our service. We can then trigger the email delivery by opening the URL http://localhost:8080/send in a browser or sending a request from the command line with curl or any other HTTP client.
@RestController
public class EmailController {

  private final EmailService emailService;

  public EmailController(EmailService emailService) {
    this.emailService = emailService;
  }

  @GetMapping("/send")
  public void send() throws MessagingException {
    this.emailService.sendEmail();
  }

}
Lastly, we need to configure the address and port of the SMTP server in the application.properties file. It's important here that we always point to the catch-all server.
spring.mail.host=localhost
spring.mail.port=2525
app.default-email-sender=no-reply@test.com
fake-smtp-server 
This is a Node package that you install globally.
npm install -g fake-smtp-server
To start the server, issue the following command:
fake-smtp-server
The server listens on port 1025 for incoming SMTP traffic and starts a web server on port 1080.
You may change both ports with the following options:
fake-smtp-server --smtp-port 2525 --http-port 9090
Alternatively, you can start the server directly with the following command without calling npm install first.
npx fake-smtp-server --smtp-port 2525 --http-port 9090
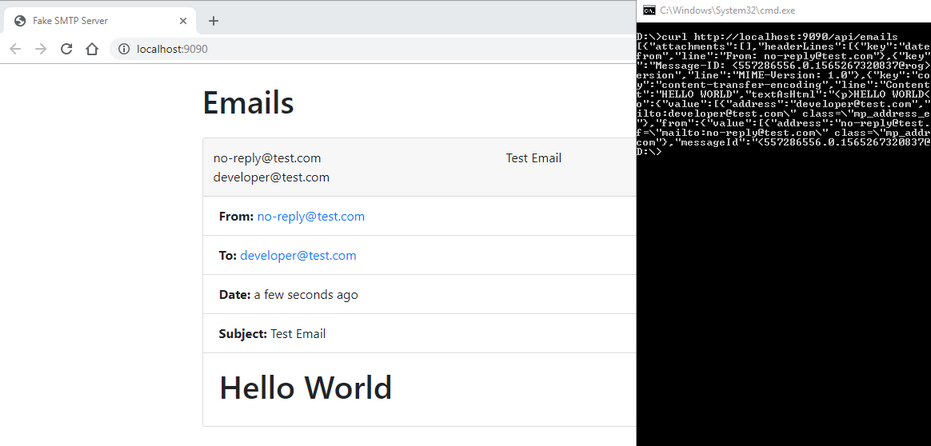
To see the emails, open a browser and go to the URL http://localhost:9090. The server also provides a JSON interface under the address http://localhost:9090/api/emails. You can filter emails with request parameters. See the project page for more information.
fake-smtp-server 
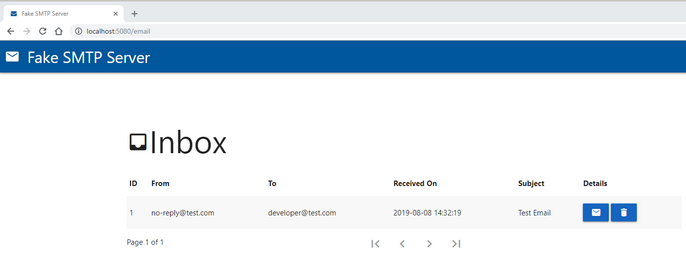
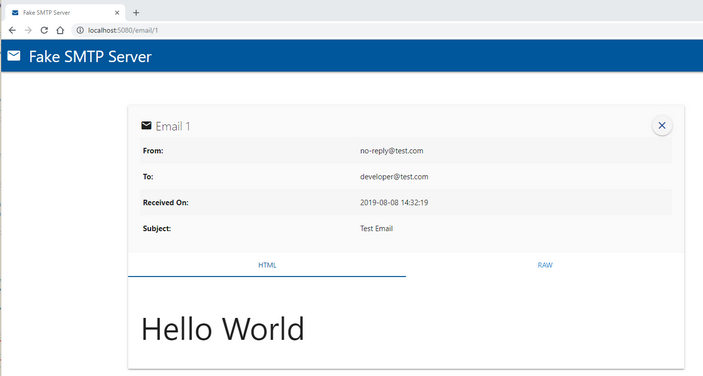
This project, with the same name as the previous NPM package, is written in Java and uses Spring Boot to start a web and an SMTP server.
To install it on your computer, go to the release page and download the latest version.
Start the server with
java -jar fake-smtp-server-2.4.2.jar
By default, the application listens on port 5025 for SMTP traffic, and it provides a web GUI on port 5080.
The ports are configurable. You can find all the necessary information on the project page.
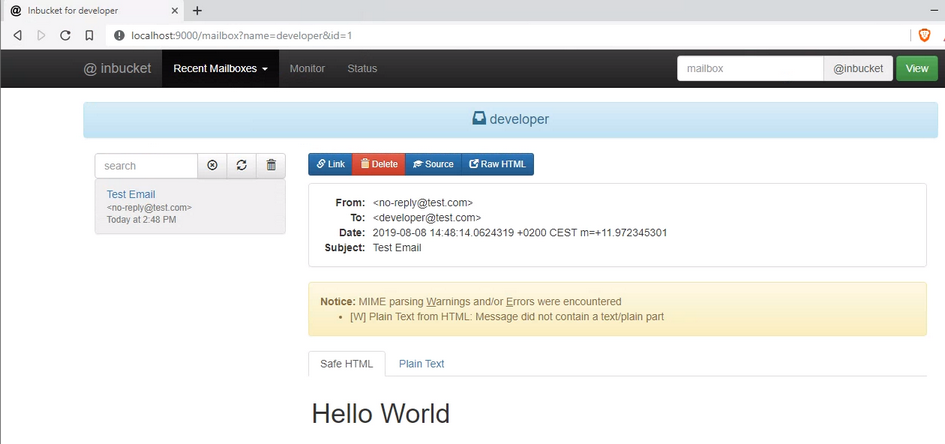
Inbucket 
Inbucket is an application written in Go and Elm. Download the latest version from the download page. Binaries are available for macOS, Windows, Linux, and FreeBSD.
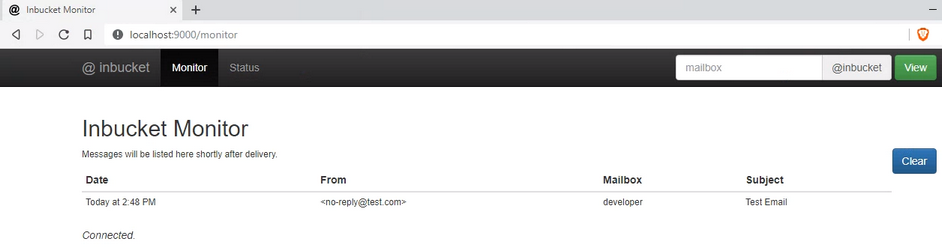
Start the server with the inbucket binary. Inbucket starts the SMTP server on port 2500 and the web server on port 9000. Unlike all the other servers we tested so far, Inbucket also implements the POP3 protocol and starts a POP3 server on port 1100.
Inbucket is configured via environment variables. See this page for more information: https://github.com/inbucket/inbucket/blob/main/doc/config.md
Alternatively, you can start Inbucket as a Docker container.
docker run -d --name inbucket -p 9000:9000 -p 2500:2500 -p 1100:1100 inbucket/inbucket
Inbucket not only provides a web GUI where you can see all the incoming emails, but it also provides an HTTP REST API to access the emails programmatically. See this wiki page for more information: https://github.com/inbucket/inbucket/wiki/REST-API
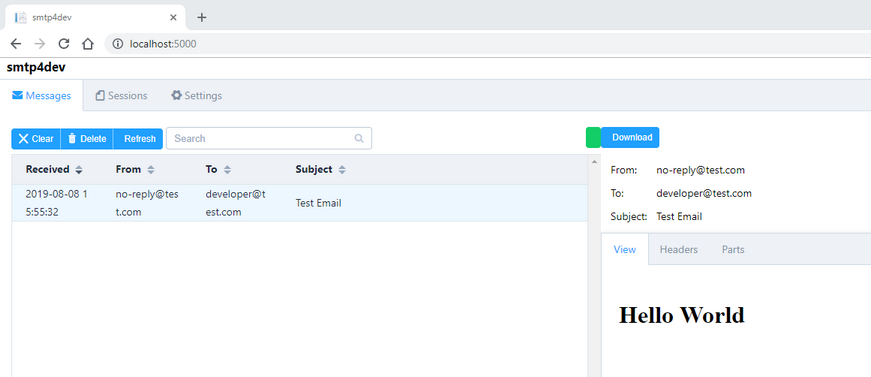
smtp4dev 
smtp4dev is written in C# and TypeScript and runs on Windows, Linux, and macOS. Download the latest release from the release page.
To start the server, execute the Rnwood.Smtp4dev.exe binary. The application starts the SMTP server on port 25 and the HTTP server on port 5000.
To change the SMTP port, either change the setting in the appsettings.json configuration file before you start the binary, or change the port via a command-line option.
Rnwood.Smtp4dev.exe --smtpport 2525
smtp4dev is also available as a Docker container.
docker run -p 3000:80 -p 2525:25 rnwood/smtp4dev:linux-amd64-v3
GreenMail 
GreenMail is written in Java and is the only server on this list that does not only support SMTP and POP3 (like Inbucket) but also IMAP.
Go to the download page and download the standalone version.
To start all three servers, issue the following command:
java -Dgreenmail.setup.test.all -jar greenmail-standalone-2.1.3.jar
The default ports are: smtp = 3025, smtps = 3465, pop3 = 3110, pop3s = 3995, imap = 3143, imaps = 3993. You can change ports and which service should be started with command-line options. The application prints out all supported options when you run it without any arguments.
java -jar greenmail-standalone-2.1.3.jar
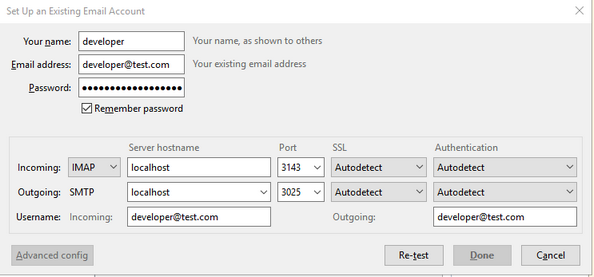
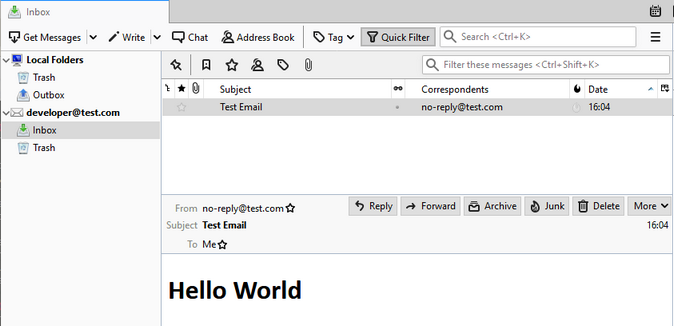
GreenMail automatically creates user accounts when it receives emails. Our demo application sends emails to developer@test.com, so GreenMail creates a user account with the username and password set to "developer@test.com".
GreenMail does not provide a GUI to check the incoming emails. Because GreenMail implements POP3 and IMAP, you can attach any email client and access the mailbox in this way.
GreenMail supports different deployment models: as a standalone Java application, as a WAR module, and as a JBoss service. You can start GreenMail also in a Docker container.
docker pull greenmail/standalone:2.1.3
docker run -t -i -p 3025:3025 -p 3110:3110 -p 3143:3143 -p 3465:3465 -p 3993:3993 -p 3995:3995 greenmail/standalone:2.1.3
Unit tests 
All the applications above fit well into a development workflow. Start a server manually, send emails from your application, and manually check emails via the provided GUI. For unit tests, we need something that is automatic and reproducible. You could write a script that starts a server, runs the unit tests, and inside the unit tests, check the emails with POP3 or IMAP or via a provided REST API.
When you write unit tests for a Java application, GreenMail provides a straightforward solution. You can add GreenMail as a test dependency to your application. Then you can programmatically start the server before the unit tests run. The GreenMail library also provides convenient access methods to the email inbox.
Let's see how this integration looks in JUnit 5 tests.
First, we add the GreenMail library to the test classpath of our project.
    <dependency>
      <groupId>com.icegreen</groupId>
      <artifactId>greenmail</artifactId>
      <version>2.1.4</version>
      <scope>test</scope>
    </dependency>
Then we start the GreenMail server before we run the unit tests. In this example, we start the server once before all the test methods run. Make sure that the port of the SMTP server is also configured correctly in your application. In a Maven-managed Spring Boot application, we can do this by creating an application.properties file just for the tests (src/test/resources/application.properties).
In the @AfterAll method, the test class shuts down the server. The method purgeEmailFromAllMailboxes() deletes all emails in the inbox. As an example, we do this after each @Test method.
@SpringBootTest
class EmailApplicationTests {

  @Autowired
  private EmailService emailService;

  @Autowired
  private AppProperties appProperties;

  private static GreenMail greenMail;

  @BeforeAll
  public static void setupSMTP() {
    greenMail = new GreenMail(new ServerSetup(2525, "127.0.0.1", "smtp"));
    greenMail.start();
  }

  @AfterAll
  public static void tearDownSMTP() {
    greenMail.stop();
  }

  @AfterEach
  public void cleanup() throws FolderException {
    greenMail.purgeEmailFromAllMailboxes();
  }
In the @Test method, we first call our service, which sends an email. This can take a few milliseconds. Therefore, we block the calling thread with waitForIncomingEmail(). The argument we pass to this method determines how many emails have to arrive until the method unblocks. The method waits 5 seconds for the given number of emails to arrive. If they don't arrive, the method returns false; otherwise, true.
After that, we access the emails with getReceivedMessages(). This method returns all messages in all folders for all users and returns an array of javax.mail.internet.MimeMessage instances. A MimeMessage instance contains the email header information and the body of the email.
  @Test
  void testSendEmail() throws MessagingException, IOException {
    this.emailService.sendEmail();

    boolean ok = greenMail.waitForIncomingEmail(1);
    // boolean ok = greenMail.waitForIncomingEmail(10_000, 1);

    if (ok) {
      MimeMessage testMessage = greenMail.getReceivedMessages()[0];
      assertThat(testMessage.getSubject()).isEqualTo("Test Email");
      assertThat(testMessage.getRecipients(RecipientType.TO)[0].toString())
          .isEqualTo("developer@test.com");
      assertThat(testMessage.getFrom()[0].toString())
          .isEqualTo(this.appProperties.getDefaultEmailSender());

      String emailContent = (String) testMessage.getContent();
      assertThat(emailContent.replaceAll("\\r\\n|\\r|\\n", ""))
          .isEqualTo("<h1>Hello World</h1>");
    }
    else {
      Assertions.fail("email not sent");
    }
  }
An alternative to getReceivedMessages() is getReceivedMessagesForDomain(), which only returns emails for a particular domain.
greenMail.getReceivedMessagesForDomain("test.com")
As mentioned before, waitForIncomingEmail() waits 5 seconds. If this time is not enough, change the timeout.
// 10 seconds timeout
greenMail.waitForIncomingEmail(10_000, 1);
You've reached the end of this blog post. This was an overview of catch-all SMTP servers. If you know another useful server, send me a message, and I will add it to the list.