The web is moving to HTTPS. More and more sites are only accessible with HTTP over TLS. Thanks to Let's Encrypt, you have access to free TLS certificates, and with the ACME protocol, a way to automate certificate management.
But there is one area where TLS is not that prevalent: our development environment. This is a bit of a problem because more and more features in browsers require a secure context. For example, Geolocation, Service Workers, Web Crypto, and others. These features only work when the page is served over HTTPS. Fortunately, browsers make an exception for connections to localhost and 127.0.0.1, and you can work with these features in your development environment with HTTP over plaintext TCP.
However, one feature requires a TLS connection: HTTP/2. If you want to use HTTP/2 in your development, you have to have TLS enabled. There is a specification for using HTTP/2 over cleartext TCP, but browsers and Spring Boot did not implement it.
Another reason to use TLS in your development environment is the mixed content issue. For example, you have an HTML page that references the jQuery library with HTTP.
<!DOCTYPE html>
<html lang="en">
<head>
    <title>Mixed Content</title>
</head>
<body>
    <script src="http://code.jquery.com/jquery-3.3.1.slim.min.js"></script>
</body>
</html>
In your development environment, you use HTTP over cleartext TCP, and everything looks good and works. Then you deploy this web page to a production server which serves the resources over HTTPS. Suddenly, your application is no longer working because browsers refuse to load resources over an insecure connection when the host page has been loaded over a secure connection.
The browser prints this error message in the developer tools console:
Mixed Content: The page at 'https://localhost:8443/index.html' was loaded over HTTPS, but requested an
insecure script 'http://code.jquery.com/jquery-3.3.1.slim.min.js'. This request has been blocked;
the content must be served over HTTPS.
You see that there are valid reasons to always develop and test your application with the same protocol that you use in production.
mkcert 
Unfortunately, it is not that easy to set up TLS on your local machine because you can't get a TLS certificate for localhost or 127.0.0.1. You could create self-signed certificates, but browsers show you ugly warning messages, and it's not very convenient.
Another workaround is to use tools like ngrok and localtunnel. They give you an HTTPS address to your application, but the drawback is that the traffic is routed from your computer to the ngrok or localtunnel servers and then back to your computer. So, it won't work when you don't have an internet connection, for example, if you want to do some development during a flight. Although these services are very convenient when you want to give somebody outside your network access to your computer, for example, presenting a co-worker or customer a web application that you are working on.
The better solution is to install your own private CA (certification authority) and create TLS certificates that are signed with this CA and also configure your operating system and browsers to trust this CA.
Setting this up is a bit complicated, but it is possible to do it from scratch with tools like openssl or the keytool from Java.
But in this example, we use a tool that simplifies the setup process quite a lot: mkcert.
It's a command-line tool written in Go and runs on Windows, Linux, and macOS. See the readme on how to install it. For this blog post, I'm going to demonstrate the tool on Windows 10. I downloaded the executable from the release page and saved it in an arbitrary directory.
First, run the -install command. This creates a private CA and configures the operating system and browsers to trust this CA. It also automatically adds the CA to Java if it finds a JAVA_HOME environment variable.
mkcert-v1.4.3-windows-amd64.exe -install
This creates two files, rootCA.pem and rootCA-key.pem, in your home directory (C:\Users\<USER>\AppData\Local\mkcert). It registers the CA in the Windows system certification store. Browsers like Chrome and Firefox read root certificates from this store.
You can verify the entry with the Windows certification manager tool:
certmgr.msc
You find the CA under Trusted Root Certification Authorities -> Certificates.
Next, we create a TLS certificate for the domains localhost, 127.0.0.1, and ::1 that is signed by our own private CA. By default, mkcert creates certificates in the PEM format. Because we want to use the certificate in a Java application (Spring Boot), and Java can't load PEM certificates, we have to create the certificate in the PKCS#12 format.
mkcert-v1.4.3-windows-amd64.exe -pkcs12 localhost 127.0.0.1 ::1
This creates a new file, localhost+2.p12, in the current directory. The PKCS#12 bundle is secured with the password changeit.
Spring Boot 
In this section, we create a trivial Spring Boot application and enable TLS and HTTP/2 with our newly created TLS certificate.
I usually bootstrap my Spring Boot applications with a visit to https://start.spring.io. In this case, I use the curl method. Run the following command in your command prompt:
curl https://start.spring.io/starter.zip -d dependencies=web,thymeleaf -d javaVersion=16 -d groupId=ch.rasc -d artifactId=h2demo -o h2demo.zip
Unzip the h2demo.zip file and copy the certificate localhost+2.p12 into the root folder of your project.
Open src/main/resources/application.properties, which is empty by default, and insert the following content:
server.http2.enabled=true
server.port=8443

server.ssl.enabled=true
server.ssl.key-store=./localhost+2.p12
server.ssl.key-store-type=PKCS12
server.ssl.key-store-password=changeit
With these settings, we enable TLS and HTTP/2 and set the listening port to 8443. When you enable TLS in Spring Boot, you also have to specify the key store, the format, and the password.
To test if everything works, we write a simple RestController and a GET endpoint.
@SpringBootApplication
@RestController
public class Application {

  public static void main(String[] args) {
    SpringApplication.run(Application.class, args);
  }

  @GetMapping("/")
  public String helloWorld() {
    return "Hello World";
  }
}
Start the application from the command line or inside your IDE.
.\mvnw.cmd spring-boot:run
Open the URL https://localhost:8443/
Check the network tab in the browser developer tools.

You see that this request has been served with HTTP/2 over TLS.
Charles 
Charles is an HTTP proxy, monitor, and reverse proxy used to inspect all the HTTP and HTTPS traffic between an application on your machine and the internet. It is very similar to the network tool in the browser developer tools, but it is not limited to browsers; it can intercept traffic from all applications running on your computer.
To inspect the TLS connection between our browser and Spring Boot, we need to install our private root certificate into Charles.
mkcert creates the root certificate in the PEM format, which Charles can't read. We, therefore, have to convert the file into a PKCS#12 file.
If you don't remember where mkcert stored the root certificate, run the following command. It tells you the directory containing the root certificate.
mkcert-v1.4.3-windows-amd64.exe -CAROOT
In a command prompt, change into this directory and execute the following command.
openssl pkcs12 -export -out rootCA.pkcs12 -inkey rootCA-key.pem -in rootCA.pem
Enter the password changeit, and openssl creates a new file, rootCA.pkcs12, from the PEM file.
Start Charles, open the menu Proxy -> SSL Proxying Settings, open the tab Root Certificate, and select the pkcs12 file we've just created.

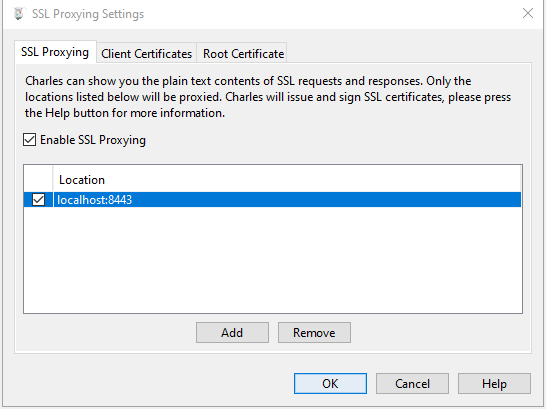
Open the SSL Proxying tab and enable SSL Proxying. Add a new entry to the location list (localhost:8443).

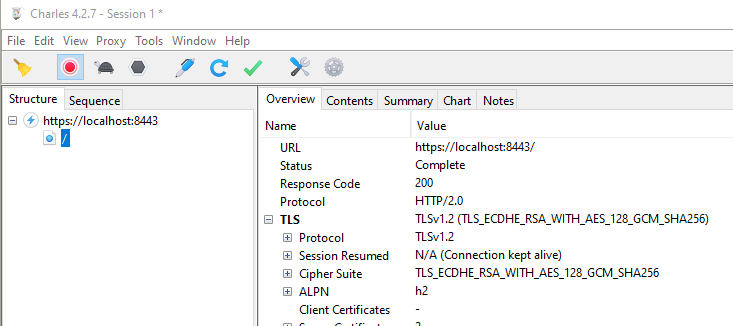
Open the URL https://localhost:8443/ in your browser. You should see the traffic in Charles if everything is configured correctly.

HTTP/2 Push 
With a working TLS and HTTP/2 Spring Boot application, we can now start experimenting a bit with HTTP/2 push, a new way to send content from a server to the client.
A typical workflow of an HTTP request for an HTML page looks like this:
- The browser sends a GET request.
- The server responds with the HTML page.
- The browser parses the HTML code and looks for references to other files in tags like
<img>,<link>,<script>, and others. - The browser sends requests for all the referenced resources.
- The server sends back the requested resources.
- The browser displays the page.
With HTTP/2, the server can push resources to the client. For example, the following page contains an <img> tag. We, as the developers of the page, know that when a browser requests this HTML page, it also needs the image, so why not send it together with the HTML page? That is what HTTP/2 push provides.
<!DOCTYPE html>
<html lang="en">
<head>
    <title>HTTP2 Push Test</title>
</head>
<body>
    <img src="cat.webp">
</body>
</html>
The workflow for an HTTP request for this particular page with HTTP/2 push follows these steps:
- The browser sends a GET request.
- The server responds with the HTML page AND the image
cat.webp. - The browser parses the HTML page, sees the
<img>tag, and looks for it in the push cache (a special cache for resources that have been pushed from the server). Because the browser finds the image there, it immediately displays the page without sending any further requests.
There is one issue: the browser cache. Without using push, after the browser has parsed the HTML page, it checks if any of the referenced files are stored in one of its caches. If they are, it does not send additional requests to the server and retrieves the resources from the local cache. This saves bandwidth, and the browser can display the page faster.
With HTTP/2 push, this is different; the server has no knowledge of whether the files are cached or not. It always pushes the files to the client. This would waste a lot of bandwidth, but fortunately, browsers solve that problem by canceling the push connection as soon as they have checked the cache and find the resources there.
To observe this behavior, I've created two endpoints in my Spring Boot application. In Spring Boot, everything is already built-in; we only have to specify the resources we want to push.
  @GetMapping("/withoutPush")
  public String withoutPush() {
    return "index";
  }

  @GetMapping("/withPush")
  public String withPush(PushBuilder pushBuilder) {
    if (pushBuilder != null) {
      pushBuilder.path("cat.webp").push();
    }
    return "index";
  }
index references the HTML page mentioned above, which is stored in the src/main/resources/template folder. javax.servlet.http.PushBuilder is a class from the Servlet 4 implementation and allows us to specify which resources we want to push in addition to the HTML page.
Start the application and then open the network tab in the browser.
When we call /withoutPush with an empty browser cache, we see the typical waterfall of requests. The browser receives the HTML, parses it, and requests the image.

With a populated browser cache, the browser does not have to send an additional request for the image; it can retrieve it from the local cache.

With push and an empty browser cache, we see that the browser also sends just one request to the server.

When the image is already stored in the cache, the browser cancels the push stream. Because you can't see that in the browser developer tools, I show you here a screenshot of Charles. There you see that Chrome closes the stream before the server is able to send the complete picture.

This was just a brief overview of HTTP/2 push. If you want to dig deeper into HTTP/2 push, I recommend reading this article from Jack Archibald. He writes about all the pitfalls and different browser implementations of HTTP/2 push: https://jakearchibald.com/2017/h2-push-tougher-than-i-thought/
You have seen in this article that setting up TLS on your localhost is not that complicated, thanks to the mkcert tool. With a valid TLS certificate, setting up TLS on Spring Boot and Java 11 is also straightforward because it provides everything out of the box for running a TLS and HTTP/2 server.