Creating and training your own machine learning models is not easy. Not only do you need to know how the model should look, but you also need to collect and prepare a lot of useful training data.
Sometimes it is more practical to rely on an existing trained model. The big cloud providers like Amazon, IBM, Google, Microsoft and Alibaba have a growing list of machine learning products in their portfolio.
The downside of these services is that you need access to the internet. Especially if you write applications for mobile devices, this can be a problem.
An interesting offering in this area comes from Firebase with ML Kit. These are libraries for native Android and iOS applications. Some of the services provided in these libraries are capable of running locally on the device without sending any information to a back-end service. Visit the product page for more information: https://firebase.google.com/products/ml
In this blog post, we look at a collection of JavaScript libraries that run locally in a browser and don't need a back-end service. These could be especially useful for mobile web applications.
All these libraries come from the tfjs-models project. These are pre-trained models built for Tensorflow.js. All these models run locally in a browser, but they have to download the model from the internet. All these models are stored on Google Cloud Storage and are quite big (between 5MB and 28MB).
I'm going to show you 4 examples with an Ionic web application. You can find the source code for this application on GitHub: https://github.com/ralscha/blog2019/tree/master/tfjs-models
You can also play with the application here:
https://omed.hplar.ch/tfjs-models/
MobileNet 
This model is trained with images from ImageNet. ImageNet is a collection of currently over 14 million images organized according to the WordNet hierarchy. The database is open, and you can use it for your own research.
You add this library to your project with the following install command. We also need to install Tensorflow.js, which the library depends on.
npm install @tensorflow-models/mobilenet
npm install @tensorflow/tfjs
In a TypeScript class, we import the library
import {load, MobileNet} from '@tensorflow-models/mobilenet';
load the model
  constructor(private readonly loadingController: LoadingController) {
    this.modelPromise = load();
  }
and classify an image with classify()
    const model = await this.modelPromise;
    this.predictions = model.classify(this.image.nativeElement, 4).then(predictions => {
      loading.dismiss();
      console.log(predictions);
      return predictions;
    });
The model has a size of about 16.3 MB, and the load() method downloads it from Google Cloud Storage.
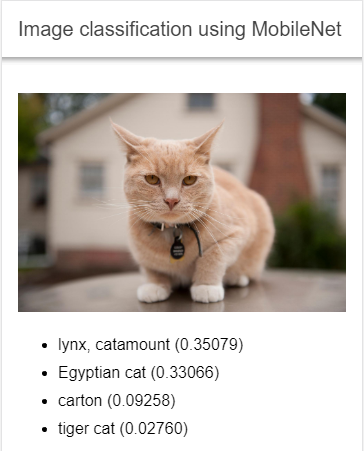
The classify() method can take as input any image element (<img>, <video>, <canvas>) and returns an array of the most likely predictions
and their confidence.
You can pass a second optional argument to the classify() method. This is a number that tells the method how many of the top probabilities it should return. By default, the method returns 3 labels.
The object that classify() returns is an array of objects with a className and a probability score property.
[ {
  className: "lynx, catamount",
  probability: 0.35078904032707214
}, {
  className: "Egyptian cat",
  probability: 0.33066123723983765
}, {
  className: "carton",
  probability: 0.09258472919464111
}, {
  className: "tiger cat",
  probability: 0.027597373351454735
} ]

You can find more information about MobileNet in the readme:
https://github.com/tensorflow/tfjs-models/tree/master/mobilenet
Object Detection (coco-ssd) 
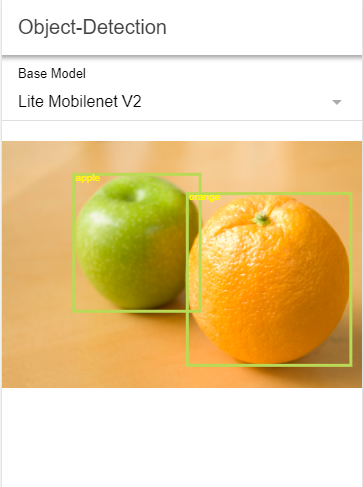
This model tries to localize and identify multiple objects in images. The model is based on the dataset from COCO Common Objects in Context and is capable of detecting 90 classes of objects.
To use the library, you install it with npm or yarn
npm install @tensorflow-models/coco-ssd
npm install @tensorflow/tfjs
then import it
import {load, ObjectDetection, ObjectDetectionBaseModel} from '@tensorflow-models/coco-ssd';
load the model
  constructor(private readonly loadingController: LoadingController) {
    this.modelPromise = load({base: this.baseModel});
  }
and feed image data to it
      const model = await this.modelPromise;
      const predictions = await model.detect(img);
load() downloads the model that has a size of about 28MB from Google Cloud Storage.
detect() is capable of processing image data from <img>, <video> and <canvas> elements and returns an object in the following form:
[ {
  bbox: [159.52301025390625, 74.1237481534481, 280.68275451660156, 304.24583235383034],
  class: "apple",
  score: 0.9868752956390381
}, {
  bbox: [411.81201934814453, 116.7046831548214, 363.41304779052734, 381.84274533391],
  class: "orange",
  score: 0.9685460329055786
} ]
bbox contains the pixel coordinates where on the image it detected the object (x, y, width, height). score is a number between 0 and 1 and
indicates how confident the model is about the detected object.

You can find more information about coco-ssd in the readme:
https://github.com/tensorflow/tfjs-models/tree/master/coco-ssd
PoseNet 
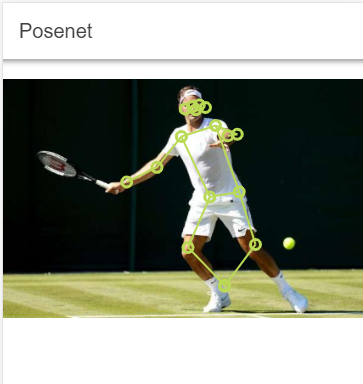
This library contains a model for running real-time body pose estimation.
Like the other libraries, you install it with npm or yarn
npm install @tensorflow-models/posenet
npm install @tensorflow/tfjs
Import it
import {getAdjacentKeyPoints, load, PoseNet} from '@tensorflow-models/posenet';
Load the model
  constructor(private readonly loadingController: LoadingController) {
    this.modelPromise = load();
  }
load() downloads about 13.2 MB of data from Google Cloud Storage.
To detect a pose, you pass image data from an <img>, <video> or <canvas> element to the estimatePoses() method and get back an object with the detected positions.
  private async estimate(img: any): Promise<void> {
    const flipHorizontal = false;

    const model = await this.modelPromise;
    const poses = await model.estimatePoses(img, {
      flipHorizontal,
      decodingMethod: 'single-person'
    });
    const pose = poses && poses[0];
The return value is an object with two properties: score, the overall confidence score, and keypoints, an array with the coordinates of different body parts. Each element in the keypoints array is an object with the name of the part, the x,y pixel coordinates, and a confidence score.
{
    score: 0.9003790126127356,
    keypoints: [ {
        part: "nose",
        position: {x: 454.15630186870425, y: 72.40642578710468},
        score: 0.9945268034934998
      },
     {score: 0.9955940842628479, part: "leftEye", position: {…}},
     {score: 0.9914423823356628, part: "rightEye", position: {…}},
     {score: 0.7791908383369446, part: "leftEar", position: {…}},
     {score: 0.7425264120101929, part: "rightEar", position: {…}},
     {score: 0.9854977130889893, part: "leftShoulder", position: {…}},
     {score: 0.9964697360992432, part: "rightShoulder", position: {…}},
     {score: 0.9371750354766846, part: "leftElbow", position: {…}},
     ...
    ]
}

See the readme for more information about PoseNet:
https://github.com/tensorflow/tfjs-models/tree/master/posenet
The repository also contains more advanced demos with the camera:
https://github.com/tensorflow/tfjs-models/tree/master/posenet/demo
Read this article for more in-depth information about PoseNet:
https://medium.com/tensorflow/real-time-human-pose-estimation-in-the-browser-with-tensorflow-js-7dd0bc881cd5
Speech Command Recognizer 
The Speech Command Recognizer is a library and pre-trained model that can recognize spoken commands. It only understands simple isolated English words from a small vocabulary. The words that this model currently understands are the ten digits from "zero" to "nine", "up", "down", "left", "right", "go", "stop", "yes" and "no". Although very limited, this could be useful for controlling a simple web application or a trivial game.
Like the other tfjs-models libraries, you install this package with npm or yarn
npm install @tensorflow-models/speech-commands
npm install @tensorflow/tfjs
Import the library
import {create} from '@tensorflow-models/speech-commands';
Create an instance of the speech recognizer and load the model from Google Cloud Storage (5.6 MB)
  constructor(private readonly router: Router) {
    this.recognizer = create('BROWSER_FFT');
    this.recognizer.ensureModelLoaded().then(() => {
      this.wordLabels = this.recognizer.wordLabels();
      // @ts-ignore
      this.whitelistIndex = this.wordLabels.map((value, index) => {
        if (this.whitelistWords.indexOf(value) !== -1) {
          return index;
        }
        return undefined;
      }).filter(value => value !== undefined);
    });
  }
The create() expects the type of audio input as an argument. The two available options are BROWSER_FFT and SOFT_FFT.
BROWSER_FFT uses the browser's native Fourier transform, and SOFT_FFT uses JavaScript implementations of Fourier transform.
create() supports a second, optional argument to specify the vocabulary the model will be able to recognize. By
default, it uses '18w', the 20-item vocabulary containing the words mentioned above. Alternatively, you can specify 'directional4w'
which only contains the words "up", "down", "left", and "right".
See https://github.com/tensorflow/tfjs-models/tree/master/speech-commands#vocabularies for more information.
The method wordLabels() returns an array of all currently supported words the model can recognize.
this.wordLabels = this.recognizer.wordLabels();
// ["_background_noise_", "_unknown_", "down", "eight", "five", "four", "go", "left", "nine", "no", "one", "right", "seven", "six", "stop", "three", "two", "up", "yes", "zero"]
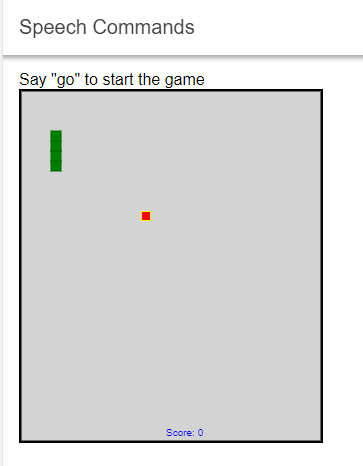
For this demo, I ported a simple snake game I found on GitHub and changed it so it can be controlled with voice commands instead of keyboard inputs. To start the game say "go" and then change the direction of the snake with the words "down", "left", "right", "up", and to stop the snake, you say "stop".

To start the recognition process, call the method listen() and pass a callback function as an argument.
This callback function is invoked each time a word is recognized.
    this.recognizer.listen(result => {
      // ...
    }, {
      includeSpectrogram: false,
      probabilityThreshold: 0.75
    });
The second argument of the listen() method takes a configuration object.
In this example, I set the probabilityThreshold to 0.75. This configures when the listen() method should call the callback function.
In this case, it only calls it when the maximum probability score of all the words is greater than 0.75. The default is 0.
I also set includeSpectrogram to false to tell the listen() method not to return the spectrogram object.
The application, in this case, does not need this information. If you would set this to true, the parameter you get in the callback function contains the property spectrogram.
See the readme for more information and a description of all supported listen() configuration options:
https://github.com/tensorflow/tfjs-models/tree/master/speech-commands#parameters-for-online-streaming-recognition
The parameter you get in the callback does not contain a property that directly tells the application what word the model recognized. Instead, it returns an
array of numbers in the scores property. This array has the same length as the array the wordLabels() method returns (see the output above).
Each element in the scores array corresponds to the word in the wordLabels() array.
scores: [6.75944e-9, 0.012278481, 0.000253004, 2.9860339e-10, .....16 more elements..... ]
All we have to do is look for the index with the largest value in the scores array and then pick the same index from the wordLabels() array,
and we get the word that the speech recognition process is most confident with.
  start(): void {
    this.recognizer.listen(async result => {

      // @ts-ignore
      const ix: number = result.scores.reduce((bestIndexSoFar: number, currentValue: number, currentIndex: number) => {
        if (this.whitelistIndex.indexOf(currentIndex) !== -1) {
          // @ts-ignore
          return currentValue > result.scores[bestIndexSoFar] ? currentIndex : bestIndexSoFar;
        }
        return bestIndexSoFar;
      }, 0);
If you no longer want to listen and stop the recognition process, call the method stopListening()
  stop(): void {
    if (this.recognizer.isListening()) {
      this.recognizer.stopListening();
      this.stopGame();
    }
  }
Additional libraries 
Another pre-trained model that is part of the tfjs-models libraries is BodyPix:
https://github.com/tensorflow/tfjs-models/tree/master/body-pix
It is a standalone model for running real-time person and body part segmentation. It can segment an image into pixels that are and are not part of a person, and it can differentiate between 24 body parts.
I did not add a demo for this model, but you can find an example in the repository:
https://github.com/tensorflow/tfjs-models/tree/master/body-pix/demo
The tfjs-models repository contains one more library: KNN Classifier.
This library is different from the others because it does not contain a pre-trained model with weights; it's a utility library that creates custom k-nearest neighbors classifiers and can be used for transfer learning.
You can find an example with this library in the repository:
https://github.com/tensorflow/tfjs-models/tree/master/knn-classifier/demo
This concludes this overview of the libraries from the tfjs-models project. You have seen a simple demo for four of the currently available pre-trained models: MobileNet, Coco SSD, PoseNet, and Speech Commands.