When you follow standard password rules, you use reasonably lengthy passwords, don't use passwords that are exposed in data breaches, and use a different password for each service. If you are using many services on the web, this results in many different passwords. You then either have a good memory or use a password manager to store all these passwords. Then you only have to remember one good password to open the password manager.
There are different approaches to how you can use a password manager. For instance, you can install a tool like KeePass that stores the passwords encrypted in a file locally on your computer. Another popular solution is to use an online password manager, like 1Password, LastPass, and Bitwarden. These services not only provide access to the passwords over a web interface; they also provide clients for mobile and desktop devices. These services and clients take on synchronizing the data between the different devices.
Bitwarden sets itself apart from the rest of these services because the source code is publicly hosted on GitHub, and you may install Bitwarden on your server.
Hosting Bitwarden on your server is free, and you can register as many users as you want. However, there are premium features that you need to pay for if you want to use them, even when you self-host Bitwarden. Also, if you want to use the sharing feature, you have to buy a license. Check out this page for more information: https://bitwarden.com/help/licensing-on-premise/
Before starting a self-hosted installation, check the system requirements. Bitwarden runs in Docker containers. Therefore, you can install Bitwarden on any operating system that supports Docker.
In this tutorial, I'm going to install Bitwarden on a VPS. The server I use for this tutorial is running a plain Ubuntu 20.04 with just an SSH server installed.
DNS 
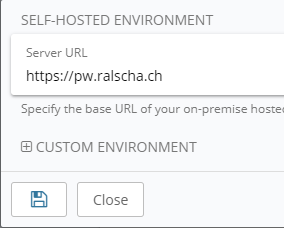
For this demo installation, I use the domain pw.ralscha.ch.
This step is optional. You can connect to the server with just the IP address, but you need a domain name if you want to secure the HTTP connection with a TLS certificate (and you definitely should).
In the web console of my DNS provider, I insert an A and AAAA record that point to the IP address of my VPS.
pw.ralscha.ch.        86400   IN      A       51.38.124.133
pw.ralscha.ch.        86400   IN      AAAA    2001:41d0:701:1100::e54
If your DNS provider supports this feature, I also recommend adding a CAA record. Either for the whole domain if you get all your certificates from one CA or just for the subdomain if you use multiple certificate authorities.
ralscha.ch.             86400   IN      CAA     0 issue "letsencrypt.org"
// OR
pw.ralscha.ch.        86400   IN      CAA     0 issue "letsencrypt.org"
Install Docker 
Bitwarden works with any Docker edition. For this article, I installed the Community Edition and followed the instructions from this page: https://docs.docker.com/engine/install/ubuntu/
Next, we have to install Docker Compose. I installed version 2 by following the instructions from this link: https://docs.docker.com/compose/
Because the Bitwarden scripts reference v1 of docker-compose, I also had to install compose-switch.
curl -fL https://raw.githubusercontent.com/docker/compose-switch/master/install_on_linux.sh | sh
See the project page for more information: https://github.com/docker/compose-switch
Install Bitwarden 
Each Bitwarden installation requires a unique installation ID and installation key. According to the documentation, the ID and key are used to:
- Register your installation and contact email to contact you in case of essential security updates.
- Validate licensing of paid features.
- Authenticate to push relay servers for push notifications to Bitwarden client applications.
Go to the website https://bitwarden.com/host/ and enter your email address. Bitwarden then displays the ID and key.
Do not share the installation ID and key across multiple Bitwarden installations. Request a new ID and key when you install multiple instances.
Open the following page and follow the instructions:
https://bitwarden.com/help/install-on-premise-linux/#create-bitwarden-local-user--directory
You should now have created the bitwarden user, and a new directory /opt/bitwarden.
Next, download the installation script and run it. You find the link on this page: https://bitwarden.com/help/install-on-premise-linux/#install-bitwarden
The Bitwarden install script asks you for the domain name for your installation. For my test installation, I enter pw.ralscha.ch. After that, the script asks if you want to use Let's Encrypt to create TLS certificates. I recommend always doing that, unless you have some other certificates you want to use. The script then asks for the database name. Choose an arbitrary name. Next, you have to enter an email address used for Let's Encrypt. They are going to send certificate expiration reminders to this address. And finally, the installation script prompts for the installation ID and key.
You can now start Bitwarden with the following command.
/opt/bitwarden/bitwarden.sh start
You can now open a browser and enter the Bitwarden URL.
Email 
To unlock all features, users have to verify their email addresses. However, before they can do that, we have to configure the email server that Bitwarden should use for sending emails.
You can set up an email server on your server. You don't need to install a full-fledged server; Bitwarden only requires a send-only email server. See my previous blog post about installing a send-only server on Ubuntu:
You can also connect to an existing email server or use an external service like SendGrid. SendGrid offers a free tier that allows sending 100 emails per day. This should be more than enough for a small Bitwarden installation.
Next, we open the configuration file and enter the address of the email server.
nano /opt/bitwarden/bwdata/env/global.override.env
You need to configure at least the host, username, and password.
globalSettings__mail__replyToEmail=no-reply@pw.ralscha.ch
globalSettings__mail__smtp__host=REPLACE
globalSettings__mail__smtp__port=587
globalSettings__mail__smtp__ssl=false
globalSettings__mail__smtp__username=REPLACE
globalSettings__mail__smtp__password=REPLACE
For example, if you use SendGrid:
globalSettings__mail__smtp__host=smtp.sendgrid.net
globalSettings__mail__smtp__username=apikey
globalSettings__mail__smtp__password=SG.YOUR.API_KEY
After each change, you need to restart Bitwarden.
/opt/bitwarden/bitwarden.sh restart
See also the official documentation for more information:
https://bitwarden.com/help/install-on-premise-linux/#post-install-configuration
Self-registration 
If you run a Bitwarden installation for your friends and family, you can now send them a link, and they can create their accounts. Be aware that everybody who knows the URL of your Bitwarden installation can create an account. You can disable this self-registration feature after everybody has created their account.
cd /opt/bitwarden
nano bwdata/env/global.override.env
And set the value for globalSettings__disableUserRegistration to true.
globalSettings__disableUserRegistration=true
Restart Bitwarden
./bitwarden.sh restart
Docker and ufw 
One thing you need to be aware of, if you are using ufw on your server, Docker itself also installs iptables rules and therefore interferes with your ufw rules. Check out the following articles if you want to fix this.
https://www.techrepublic.com/article/how-to-fix-the-docker-and-ufw-security-flaw/ https://www.mkubaczyk.com/2017/09/05/force-docker-not-bypass-ufw-rules-ubuntu-16-04/
The Bitwarden containers open ports 80 and 443.
Update Bitwarden 
From time to time, you should check on your Bitwarden installation and update the software with the following commands.
cd /opt/bitwarden
./bitwarden.sh updateself
./bitwarden.sh update
Even better is to install a cron job that does this periodically. See this page for more information: https://bitwarden.com/help/updating-on-premise/
Admin Interface 
Bitwarden has a built-in Admin Portal, where the system administrator can check the installed Bitwarden version, browse all registered users, and delete users.
To access this portal, we have to permit specific users. By default, nobody can access the admin portal.
nano /opt/bitwarden/bwdata/env/global.override.env
Add emails of persons that are allowed to access the admin panel. They don't need to be registered with an account in your Bitwarden installation.
adminSettings__admins=john@example.com,bill@gmail.com,tom@example.com
You can leave this setting empty (default) to prevent access to the admin portal.
adminSettings__admins=
Restart the server when you make changes to this setting.
When a user wants to log in to the admin portal, he opens the /admin page of the Bitwarden installation (e.g., https://pw.ralscha.ch/admin).
The user enters his email address, and when the email matches one of the configured emails (adminSettings__admins), he receives a temporary login link (valid for 15 minutes). A click on the link opens the admin portal.
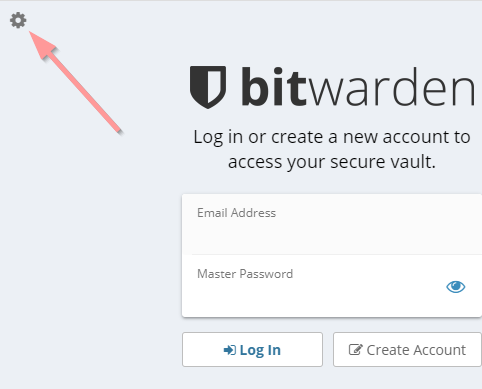
Client 
All the provided Bitwarden clients you find on the download page point by default to the hosted Bitwarden version at bitwarden.com. But they all work with self-hosted installations.
All you need is to configure the server once in the settings. In all desktop and mobile clients and browser extensions, you find a cogwheel icon in the top left corner of the login screen. Click or tap on this icon and enter the URL of your Bitwarden server.
Backup 
Backups are important, especially for a password manager. A minimal backup solution should at least back up the bwdata folder. In my installation, the folder is: /opt/bitwarden/bwdata.
If you installed Bitwarden on a virtual server, you could create snapshots of the whole server and store them on a backup drive.
In the following section, I show you how to install a script that runs daily, compresses the bwdata folder with 7zip, encrypts the file with gpg, and uploads it to Amazon S3.
I wrote about this backup approach in a previous blog post.
If you follow this tutorial, first request the necessary access_key and secret_key from Amazon by following the steps I described in my previous post.
Install 7zip, gpg, and the Amazon S3 command-line tools.
apt install p7zip-full s3cmd gpg
In the Bitwarden installation folder, create a new script called bitwarden-backup.
cd /opt/bitwarden
nano bitwarden-backup
And paste the following code into the file.
#!/bin/sh

cd /opt/bitwarden
7za a -t7z -m0=lzma -mx=9 -mfb=64 -md=32m -ms=on bwdata.7z bwdata

gpg --cipher-algo AES256 --symmetric --batch --passphrase the_passphrase bwdata.7z
s3cmd --access_key=AKIA... --secret_key=LDf...  put ./bwdata.7z.gpg s3://<bucket_name>

rm bwdata.7z bwdata.7z.gpg
Enter the correct keys and replace <bucket_name> with your bucket name.
Make the script executable.
chmod 700 bitwarden-backup
Next, install a timer service in systemd. This takes care of starting the backup job daily at the specified time.
nano bitwarden-backup.timer
Paste this code into the file
[Unit]
Description=Run bitwarden-backup once a day

[Timer]
OnCalendar=*-*-* 05:00:00
RandomizedDelaySec=30
Persistent=true

[Install]
WantedBy=timers.target
nano bitwarden-backup.service
Paste this code into the file
[Unit]
Description=bitwarden-backup

[Service]
WorkingDirectory=/opt/bitwarden
Type=oneshot
ExecStart=/opt/bitwarden/bitwarden-backup
Then link these files into the systemd folder, reload systemd, start, and enable the timer.
ln -s /opt/bitwarden/bitwarden-backup.timer /lib/systemd/system/bitwarden-backup.timer
ln -s /opt/bitwarden/bitwarden-backup.service /lib/systemd/system/bitwarden-backup.service
systemctl daemon-reload
systemctl start bitwarden-backup.timer
systemctl enable bitwarden-backup.timer
Check if the timer is installed properly.
systemctl list-timers
Manually start the job.
systemctl start bitwarden-backup
journalctl -u bitwarden-backup