This tutorial will show you how to install a Gitea Git server on a VPS (virtual private server).
There are many Git servers available that you can self-host. I chose Gitea for this example because it's straightforward to install. Gitea is written in Go, and you only have to install one binary.
For this demo installation, I used a VPS server from Hetzner (referral link). I chose the smallest server offering: CX11 with 2GB of RAM. For the operating system, I selected Debian 11.
Install Gitea 
I run all the following commands as a root user. If you are not logged in as root, prepend sudo to the commands or switch to root with sudo -i.
I install Gitea directly onto Linux. If you are interested in a Docker installation, check out this documentation page.
First, make sure that the system is up to date.
apt update
apt full-upgrade
On the server, install the Git package, which Gitea depends on.
apt install git
Create a new user under which the Gitea process will run.
adduser \
   --system \
   --shell /bin/bash \
   --gecos 'Git Version Control' \
   --group \
   --disabled-password \
   --home /home/git \
   git
Create the required directory structure.
mkdir -p /var/lib/gitea/{custom,data,log}
chown -R git:git /var/lib/gitea/
chmod -R 750 /var/lib/gitea/
mkdir /etc/gitea
chown root:git /etc/gitea
chmod 770 /etc/gitea
Note: the permissions for /etc/gitea are open so the webserver can write to this directory.
After the installation, they should be changed.
chmod 750 /etc/gitea
chmod 640 /etc/gitea/app.ini
Download the Gitea binary and make it executable. Check the download page first to find the latest version. Currently (April 2023), 1.19.0 is the latest version.
wget -O gitea https://dl.gitea.com/gitea/1.19.0/gitea-1.19.0-linux-amd64
chmod +x gitea
mv gitea /usr/local/bin/gitea
Next, we need to install Gitea as a service, so it automatically starts when the server restarts.
On Debian, this is the responsibility of systemd.
The Gitea project provides an example of a systemd service file.
cd /etc/systemd/system
wget https://raw.githubusercontent.com/go-gitea/gitea/main/contrib/systemd/gitea.service
You can now start Gitea and check the status.
systemctl start gitea
systemctl status gitea
You should see a green active (running) message if everything is okay.
Check the log file with journalctl -u gitea if something is wrong.
The service is running but not enabled yet and will not automatically start at the next server startup. Enable it and check if it is enabled:
systemctl enable gitea
systemctl is-enabled gitea
The is-enabled command should return enabled.
Update Gitea 
From time to time, you should check if there is a new Gitea version available. To update Gitea, run the following commands.
wget -O gitea https://dl.gitea.com/gitea/1.19.x/gitea-1.19.x-linux-amd64
systemctl stop gitea
chmod +x gitea
mv gitea /usr/local/bin/gitea
systemctl start gitea
HTTP Server 
In this section, we install an HTTP server. The server sits in front of the Gitea server and proxies all requests from the clients to Gitea. This service takes care of setting up the TLS connection. As a web server, I will install Caddy because it is straightforward to set up and automatically manages TLS certificates from Let's Encrypt.
To install Caddy, follow the installation instructions on this page: https://caddyserver.com/docs/install#debian-ubuntu-raspbian
Open the Caddy configuration.
nano /etc/caddy/Caddyfile
Replace everything with the following configuration.
{
   email <valid_email_address>
}

git.rasc.ch {
   reverse_proxy localhost:3000
}
Replace git.rasc.ch with your domain. Enter a valid email address. This address is used for creating the TLS certificate with Let's Encrypt. Let's Encrypt sends you expiration notices
and other important information regarding your certificate.
Before starting Caddy, make sure that DNS records are set up correctly.
You need an A record that points to the server. If the server has an IPv6 address, insert an AAAA record, and I also recommend creating a CAA record.
If the DNS is not set up correctly, Caddy will not create the Let's Encrypt TLS certificate.
systemctl restart caddy
Initial configuration 
Open a browser and enter the URL to your Git server (https://git.rasc.ch/). Gitea should display the initial installation dialog.
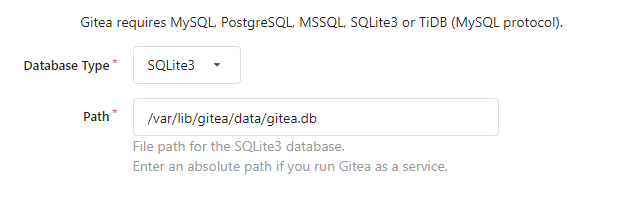
Gitea requires a database and supports many different database servers. I prefer SQLite3, an embedded database that doesn't need additional setup.
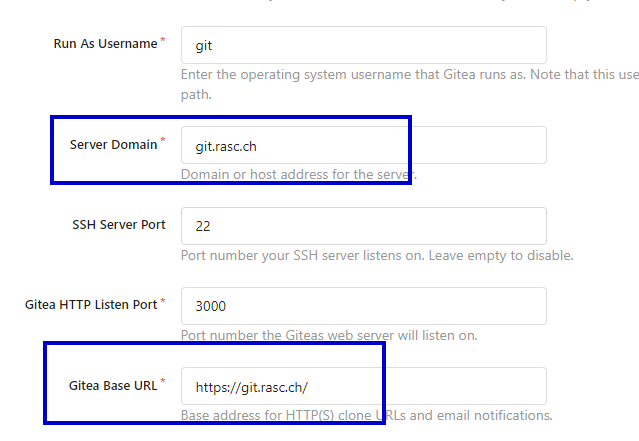
Under the General Application Settings section, change Server Domain and Gitea Base URL.
Click on the Install Gitea button at the bottom of the page. After a few seconds, Gitea should present the
login screen. If not, enter the URL https://git.rasc.ch/user/login manually. Set up the first user.
Click on Sign up now, create an account, and log in with this account. The first user you create has administrator privileges.
With this configuration, self-registration is enabled. Everybody in the world that knows the URL of your server can create an account.
If you want to disable this, open the configuration file nano /etc/gitea/app.ini and search for the line:
DISABLE_REGISTRATION = false
and change it to:
DISABLE_REGISTRATION = true
Restart Gitea with systemctl restart gitea.
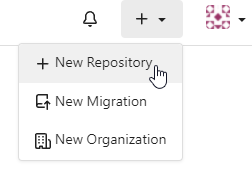
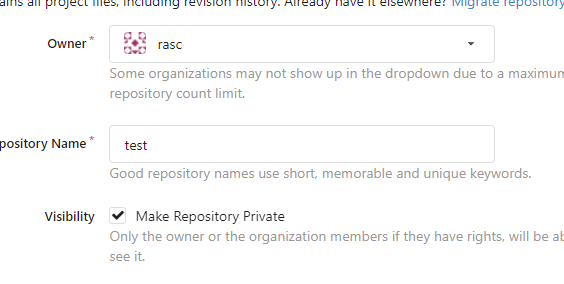
First repository 
We can now create our first Git repository. Log in and create a new repository. Gitea supports public and private repositories. Public repositories are visible to everyone, even visitors that don't have an account. It's very similar to the public repositories on GitHub.
On your local computer, clone the repository, create a file, add, commit, and push it to the remote repository:
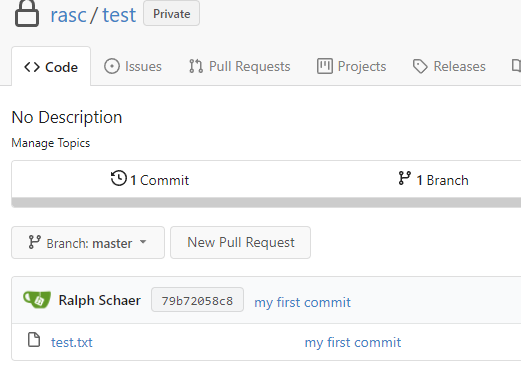
git clone https://git.rasc.ch/rasc/test.git
cd test
echo Hello World > test.txt
git add test.txt
git commit -m "my first commit"
git push
Visit the repository page in Gitea, and you should see the commit.
Git over SSH 
Gitea also supports Git over SSH. You might be familiar with this when you work with GitHub repositories. First, we need to create a key pair on our computer.
ssh-keygen -f e:/gitea_key -N "passphrase" -t ed25519 -C "gitea_key"
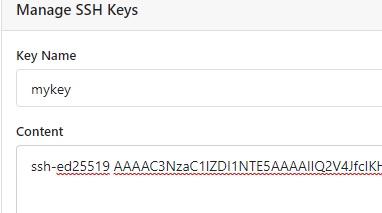
Open the Gitea webpage, go to Settings -> SSH / GPG Keys.
Under the section Manage SSH Keys, click Add Key. Next, open the public key file in a text editor. In my example, ssh-keygen stored the public file in e:/gitea_key.pub. Copy and paste the public key into the Content text field, then click the green Add Key button.
Open <user_home>/.ssh/config on your local computer and add a new entry for Gitea.
IdentityFile points to the private key file that ssh-keygen generated.
Host git.rasc.ch
  HostName git.rasc.ch
  User git
  Port 22
  IdentityFile e:/gitea_key
  IdentitiesOnly yes
Now we can test if Git over SSH works.
git clone git@git.rasc.ch:rasc/test.git
cd test
echo A change >> test.txt
git add test.txt
git commit -m "update"
git push
Open the repository web page and check if you see the commit.
Check out this page for more information about Git over SSH.
Backup 
There are different ways of how you can back up the Gitea installation. Gitea itself provides a built-in dump and restore feature.
dump writes all the configuration files and repositories into one zip file.
See the official homepage for more information about the built-in Backup and Restore functionality.
In this blog post, you find a tutorial for installing a daily backup job that sends files to Amazon S3.