When you manage your server and self-host applications on it, you often need a way to send emails. In this tutorial, we're going to look at two ways how you can send emails from your server to the rest of the world.
Receiving email servers check incoming emails if they are legitimate. There are different checks an incoming email has to pass if it fails the email server either immediately rejects the email, or he moves it to the spam folder.
One check is to verify the reverse DNS entry (PTR) of the sender's IP address. The PTR has to point from the IP address to the domain name and the domain name should be an A and AAAA record in your DNS, that points to the IP address.

Another check is to read the SPF record from the DNS and verify if the sender's IP address is listed in the SPF record. Only servers whose IP address is listed in the SPF record are allowed to send emails for this specific domain. These checks are in place to prevent an email server from sending emails for a domain they don't own.
Without Domain 
Without owning a domain, you can't enter this information in the DNS, and your server can't reliably send emails. Instead, we're going to use a 3rd party email server. You need to have an account with this email provider. In my case, this is gmail.com, which I'm going to use as an example, but it should work with any email provider.
First, install SSMTP with apt.
sudo apt install ssmtp
SSMTP is a program that delivers emails from a local computer to a remote email server. It's an email client, like Mozilla Thunderbird, without the fancy user interface, and without the receiving part, SSMPT is only able to send emails.
In the next step, we have to configure the email server SSMTP should use for sending emails.
sudo nano /etc/ssmtp/ssmtp.conf
For gmail.com, I enter the following information. The root email address is an account that receives all the emails that the systems sends to a user with a UID below 1000 (for instance: root)
root=myname@gmail.com
mailhub=smtp.gmail.com:587
rewriteDomain=gmail.com

# The full hostname
hostname=vps552696.ovh.net

UseTLS=Yes
UseSTARTTLS=Yes

AuthUser=myname@gmail.com
AuthPass=password
AuthMethod=LOGIN
When you enabled two-factor authentication on your Google account (as you should), inserting username and password is not going to work. Instead, you have to create a special App Password.
Open this page https://myaccount.google.com/apppasswords, select App -> Other, then enter a descriptive name and click Generate. The website displays a 16 character password. Copy and paste the password after AuthPass=. Remove any spaces.
Just like your regular password, this app password grants complete access to your Google Account. Don't share it with anyone. You can always delete the password on the same page if you no longer need it.
We can now try and send an email. Also, try to send an email to someone that does not have a gmail.com account.
echo -e 'Subject: Test\nThis is a test' | ssmtp myname@gmail.com
echo -e 'Subject: Test\nThis is a test' | ssmtp somebodyelse@othercompany.com
echo -e 'Subject: Test\nThis is a test' | ssmtp root
When you send an email to a local system account, like root, SSMTP replaces the receiver with the address that is configured as the root option.
If the emails do not arrive, check the spam folder of your email account and the mail log file on the server.
sudo less /var/log/mail.log
See more information about SSMTP on the wiki page: https://wiki.archlinux.org/title/SSMTP
With Domain 
If we own a domain, we can install a full-featured SMTP server that sends emails directly from our server without relying on a 3rd party server.
There are two popular open-source email servers available: Exim and Postfix. I'm going to use Exim for this setup because I have more experience with this software.
Exim is a full-featured SMTP server that can send and receive emails, but we're going to configure just the sending part and disable the receiving function. This set up is often called a "send-only mail server".
If you are interested in setting up a complete email server (smtp, pop3, imap4, webmail, ...) check out projects like Mail-in-a-Box and homebox.
I tested the following set up on an Ubuntu 18.04 server.
A and AAAA record 
First, we define and add a subdomain to our DNS. We add this subdomain to the PTR record and also use this subdomain as the new hostname for our server. In this example, I use the domain server.ralscha.ch.
Login to your DNS provider and add an A and AAAA record. The A record points to the public IPv4 address and the AAAA record to the public IPv6 address of your server.
server.ralscha.ch.   IN      A       51.38.124.133
server.ralscha.ch.   IN      AAAA    2001:41d0:701:1100::e54
SPF 
The SPF entry specifies which servers are allowed to send emails for a domain. You add an SPF entry with a TXT record to your DNS.
ralscha.ch. IN TXT "v=spf1 ip4:51.38.124.133 ip6:2001:41d0:701:1100:0:0:0:e54 -all"
PTR record 
For the configuration of the PTR, you have to go to the web management console of your VPS provider. There you should find somewhere an option to set the PTR record. Add a reverse entry for both addresses if you have an IPv6 and IPv4 address.
In the OVH web console, you find the option under the menu IP
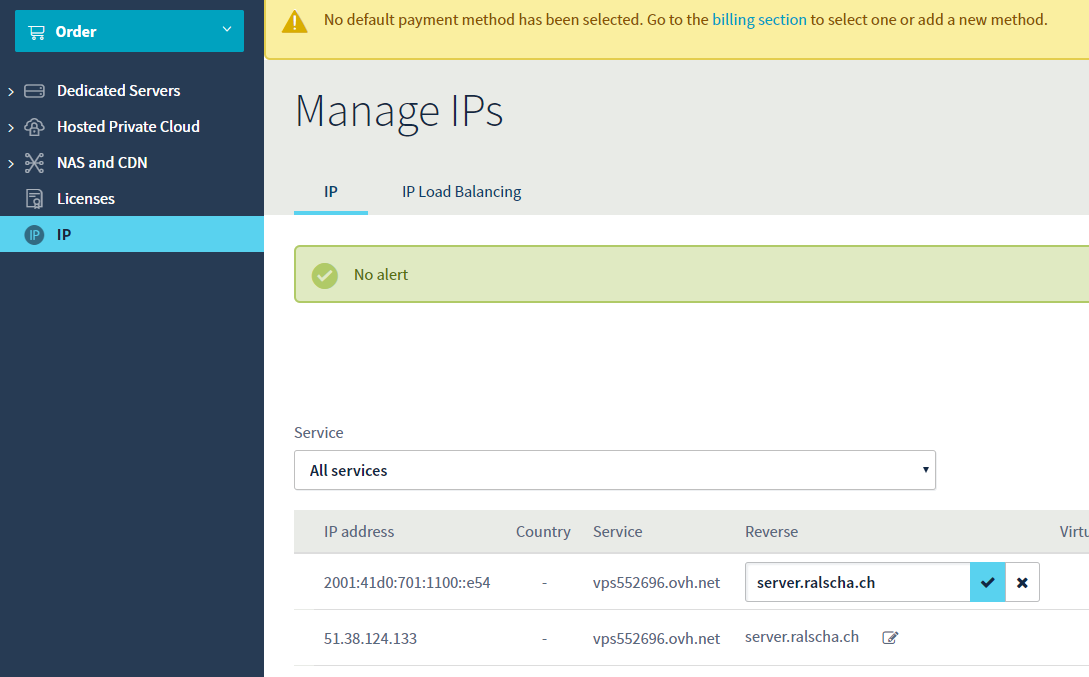
Enter the reverse domain names. They have to correspond with the A and AAAA records.
Change Hostname 
Next, we change the hostname of our server to the subdomain. Exim uses hostname when it sends emails (HELO).
sudo hostnamectl set-hostname server.ralscha.ch
Exim Installation 
Make sure that all installed packages are up to date and then install Exim.
sudo apt update
sudo apt upgrade
sudo apt install exim4
Exim Configuration 
Start the configuration with
sudo dpkg-reconfigure exim4-config
The Exim configuration presents several dialogs. Go to the next page with enter or navigate to the Ok button with the tab or cursor key and press enter. Navigate to Cancel and press enter if you want to go back to the previous page.
- Select
internet site; mail is sent and received directly using SMTP - Text field should contain the hostname
server.ralscha.ch. Accept with enter - IP addresses, the Exim SMTP listener daemon listens on. The daemon should only listen on
127.0.0.1and::1 - Domains for which this machine should consider itself the final destination. Text field should contain
server.ralscha.ch. - Relay domains. Leave blank
- Relay for other servers. Leave blank
- Keep number of DNS-queries minimal. Select
No - Delivery method for local mail. Select
Maildir format in home directory - Split configuration into small files? Select
No - Root and postmaster mail recipient. Enter a real email address. On my server, I enter my gmail.com email address.
You can run sudo dpkg-reconfigure exim4-config multiple times if you want to change a setting. The email address you enter in step 10 receives all emails sent to a local user (cat /etc/aliases).
Test 
To test the installation, you can send emails with the following command. Replace you@yourweb.com with a real address.
echo "Hello - this is a test!" | mail -s Testing you@yourweb.com
If you don't receive the email, check your spam folder and check the Exim log file on the server.
sudo less /var/log/exim4/mainlog
To check if the SPF record is configured correctly, open the original email message (in Gmail under Show original). You should find an entry similar to this:
Authentication-Results: mx.google.com;
       spf=pass (google.com: best guess record for domain of manager@server.ralscha.ch designates 2001:41d0:701:1100::e54 as permitted sender)
If the SPF record is misconfigured, the receiving email server either rejects the email or moves it into the spam folder. If a message is delivered to the spam folder, you should look at the original message. Often you see more information there why the email server thinks this mail is spam.
DKIM 
The DomainKeys Identified Mail (DKIM) standard exists for the same reason as SPF to prevent somebody from sending emails with your domain. DKIM uses a private key to sign parts of the email message. The recipient server verifies the signature with the public key that he finds in the Domain Name System of the domain.
We start with the generation of the private/public key pair.
sudo mkdir /etc/exim4/dkim
cd /etc/exim4/dkim
sudo openssl genrsa -out dkim.key 2048
sudo openssl rsa -in dkim.key -pubout -out dkim.pub
sudo chgrp Debian-exim dkim.key
sudo chmod 640 dkim.key
Open the Exim configuration file
sudo nano /etc/exim4/exim4.conf.localmacros
Add the following text. A domain might have multiple keys assigned to it, and to differentiate them, a selector is used. In this example, I use the current date, but you can choose any string you want.
DKIM_CANON = relaxed
DKIM_SELECTOR = 20180615
DKIM_DOMAIN = server.ralscha.ch
DKIM_PRIVATE_KEY = /etc/exim4/dkim/dkim.key
Activate the configuration
sudo update-exim4.conf
sudo systemctl restart exim4
Check if Exim is active and running
sudo systemctl status exim4
Next we need to publish the public key in the DNS. You have to add a TXT record, that follows this pattern. <selector>._domainkey.<domain_name>
For this example I add the following TXT record:
20180615._domainkey.server.ralscha.ch IN TXT "v=DKIM1; p=MIIBIjANBgkqhkiG9w0BAQEFAAOCAQ8AMIIBCgKCAQEA8FLhA61tFp49wdwP7QmHUTELB6DwyzOk6eYKEtAXlrcFIj/ybUfsRJP+dgDW0tqT8JsVlWvlRVaOLYCbl6f/nD34Kvp+XfGrAOk4lK/VEfbk8rGkTJj6Yqi+6fjcJvVuEiGL7QMnDQhpFAVwMAuxvWGme9Tz7rQqPYPCnqCPBNTwR55CaziqAaaqpPFDZufK8nPTSAZLTR5LP8YQc4r9RApyG1lojjjSeQEG78Ry2iZvO2scj3o6C7ryEkymE3AGjzz8hdxP4cqrna0VmOD1A/Yr8ACA4loYMUzWqtOS7KhhsBrocWJ0t6TxDJIDEqukV75WjN8UHSS5ecEyZerCYwIDAQAB; t=s"
The part after p= is the public key from the /etc/exim4/dkim/dkim.pub file. Remove the comments -----BEGIN PUBLIC KEY----- and -----END PUBLIC KEY----- and remove the line breaks. The TXT record must be written on one line.
Send a test email
echo "Hello - this is a test!" | mail -s Testing you@yourweb.com
Open the original message in your email client and look for DKIM checks.


Bonus 
With the ability to send emails, we can enable useful server maintenance jobs that send emails when updates are available, or problems occur.
The first job is part of the unattended-upgrades package. It observes the installed apt packages and sends an email detailing any packages that need upgrading or have problems. This is very handy, so you don't have to regularly log in to the server and check for new updates. Instead, you can wait for the email. By default, unattended-upgrades sends the email to root.
To enable the email open the configuration file
sudo nano /etc/apt/apt.conf.d/50unattended-upgrades
Search for the line Configuring Unattended-Upgrade::Mail and uncomment it (remove // at the start of the line).
Very similar works the package apticron. This package configures a cron job that sends emails with information about any packages on the system that have updates available, as well as a summary of changes in each package.
sudo apt install apticron
You can change the receiver of the email in /etc/apticron/apticron.conf, by default, it's root.